• Home
  • About
  • Contact
  • Partner
  • Privacy Policy
    • Facebook
    • Instagram
    • Pinterest
    • Twitter
    • YouTube

Create and Babble

  • DIY
    • Home Improvement
    • Upcycle
    • Furniture Makeovers
    • Build It
  • Craft
    • Silhouette
    • Sewing
    • Wedding DIYs
    • Seasonal
    • Gifts
  • Lifestyle
    • Bicyling
    • Travel
    • shopping

STAY UP TO DATE

Get the latest crafting and DIY tips, tricks and tutorials delivered straight to your inbox!

DIY Distressed Wood Welcome Sign

September 4, 2014

If you like it, please share it!Share on pinterest
Pinterest
Share on facebook
Facebook
Share on twitter
Twitter
Share on stumbleupon
Stumbleupon
Share on google
Google
Share on linkedin
Linkedin
Share on reddit
Reddit

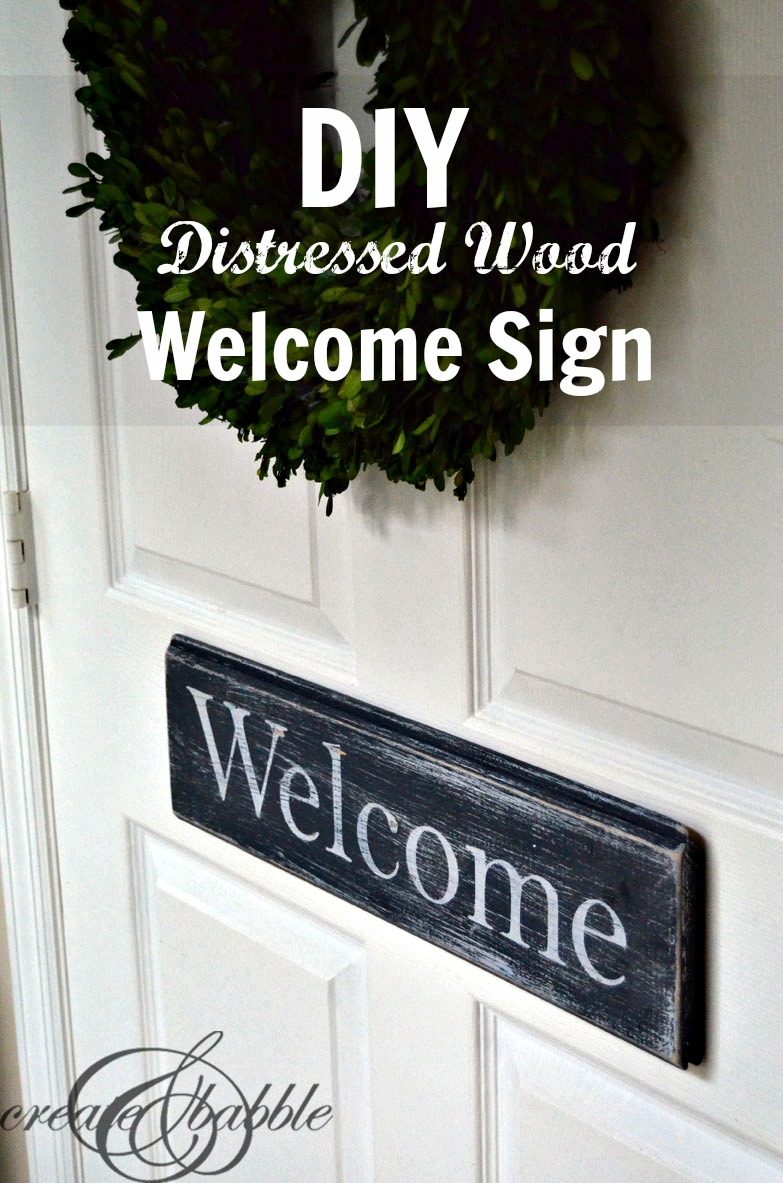
One of the benefits of my woodworking hobby is that I have lots of wood scraps. I used to have run to the craft store to buy small boards but not anymore!  I now have a small stockpile to choose from to make wooden signs. You see wooden signs everywhere. I came across one that caught my eye recently. It was $35. Pffft. I can make that for nothin’. And you can, too. Feel free to pin this image to one of your Pinterest Boards to save it.

diy-distressed-wood-welcome-sign-createandbabble

I experimented with layering paint to get the old, weathered, distressed look to my sign. It was easy. If you want to make one here’s what you’ll need:

diy-distressed-wood-for-welcome-sign

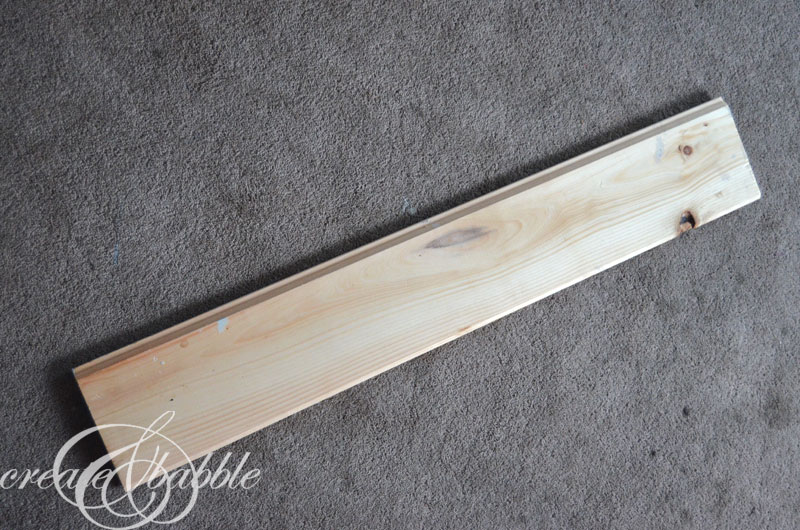
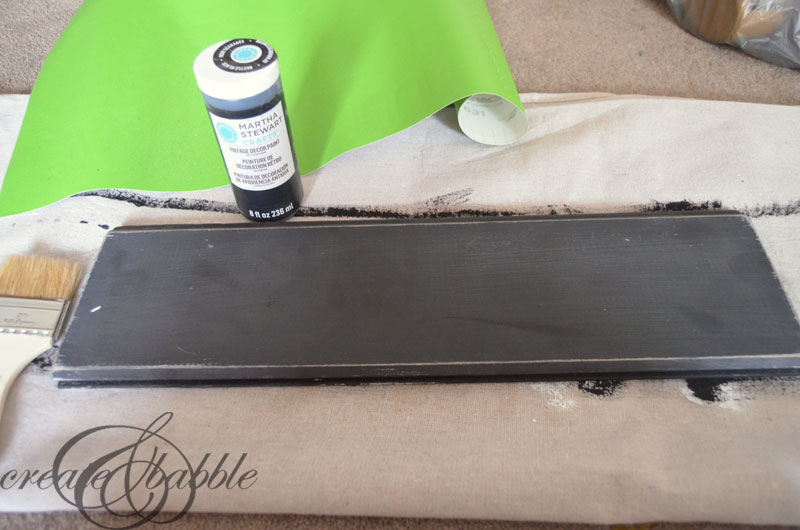
A piece of wood. I’m using a leftover of 6″ wide tongue and groove board.

distressed welcome sign

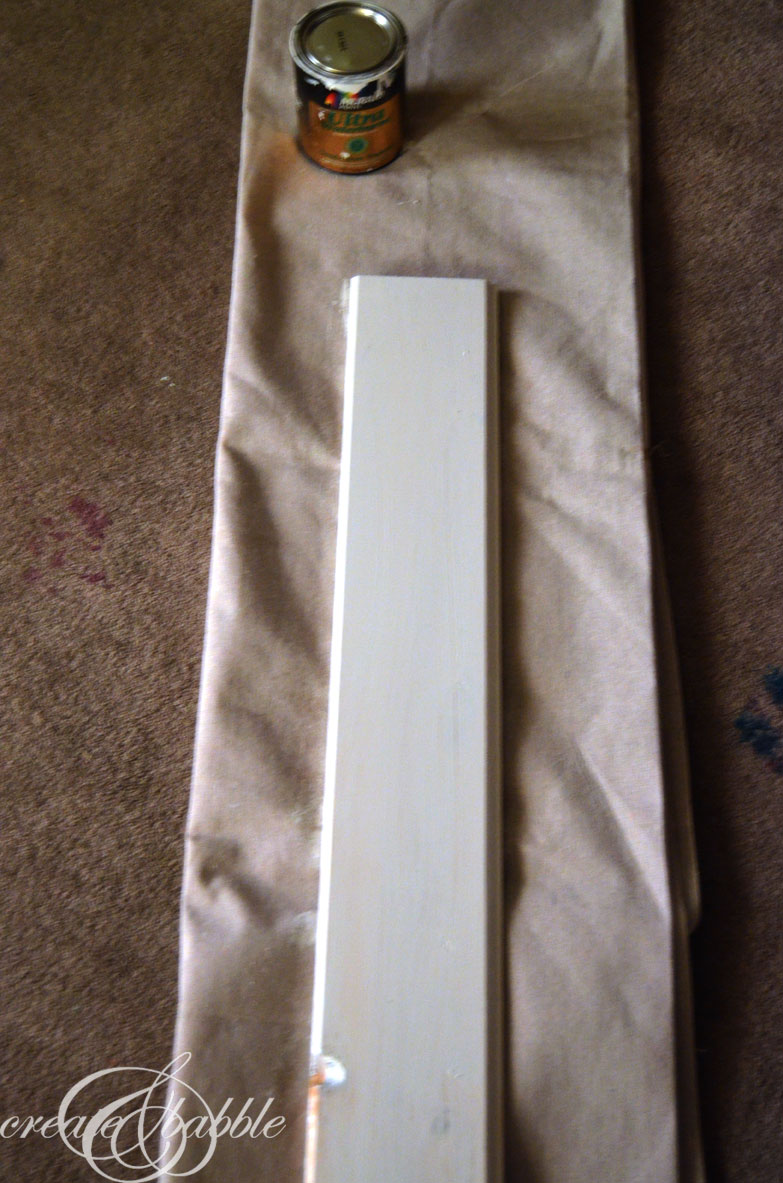
Paint it with any white paint you have. (Then take a bad cell phone picture!)

diy welcome sign

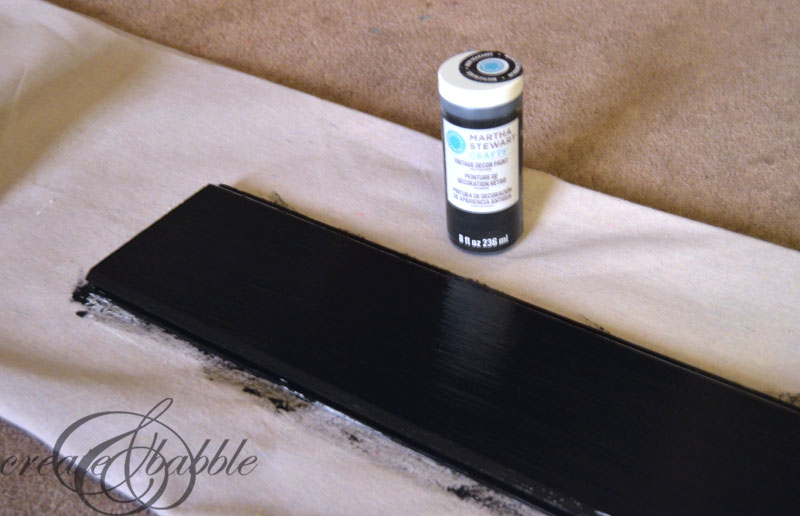
Once the white paint is dry, use a black chalky-type paint for the next layer. I used the new Martha Stewart chalky paint that I found at Michaels. It’s a little pricey so use a coupon!

distressed wood sign

When the chalky paint is dry, it’s time to give the piece a good sanding, especially around the edges where the board would naturally show age.

wooden welcome sign

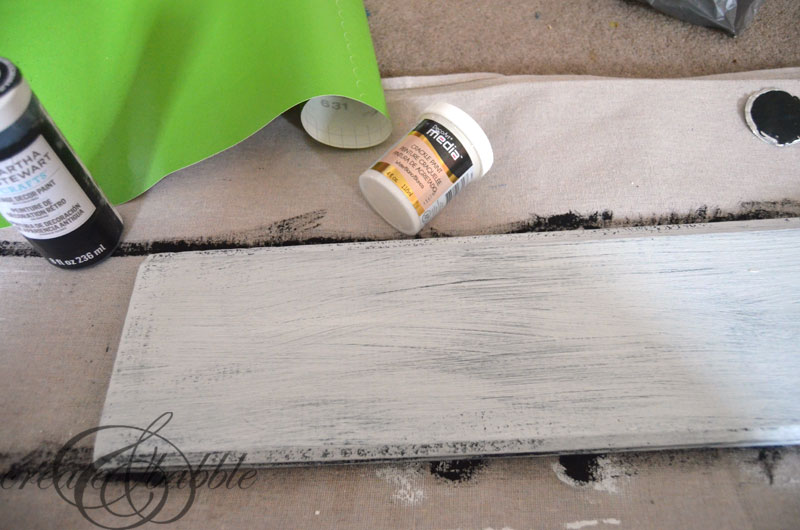
One more layer of white paint. This time I used DecoArt Crackle Medium. It’s designed to be mixed with other colors, but I just used it straight out of the jar since I wanted white.

distressed wood sign

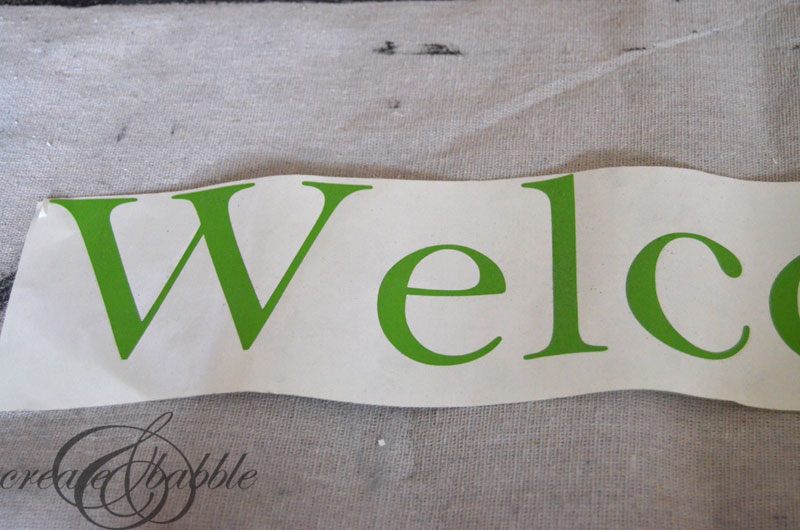
While the paint was drying, I used my Silhouette to cut the letters for my sign out of leftover vinyl.

welcome-sign-step-6

After the last coat of paint is good and dry, transfer the letters to the board making sure all of the edges of the letters are well adhered to the board.

welcome-sign-step-7

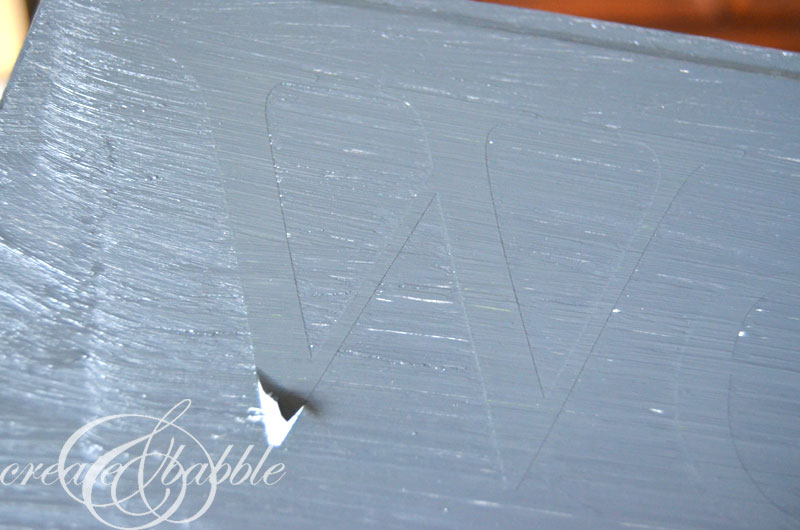
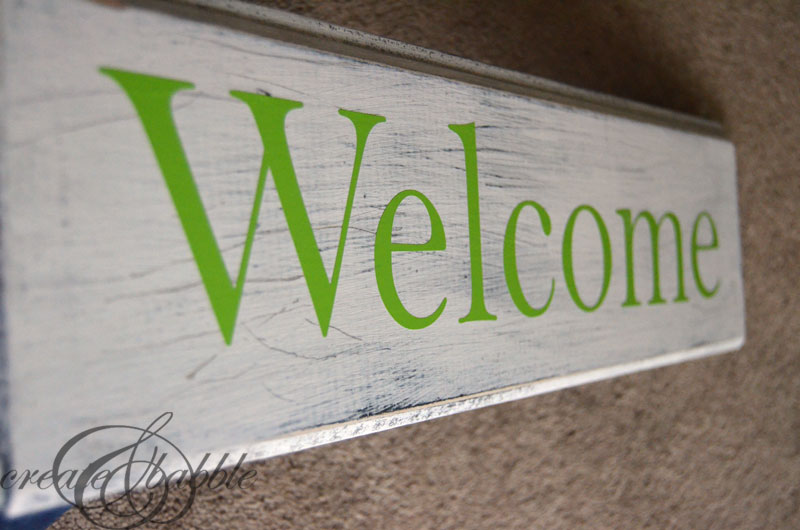
Then paint over the entire board, letters and all with one more coat of black paint. I know that the paint looks gray in this photo – I lightened it up so you can see the vinyl letters under the paint.

welcome-sign-step-8

Then the fun part: peel off the vinyl letters!

distressed-wood-sign-createandbabble

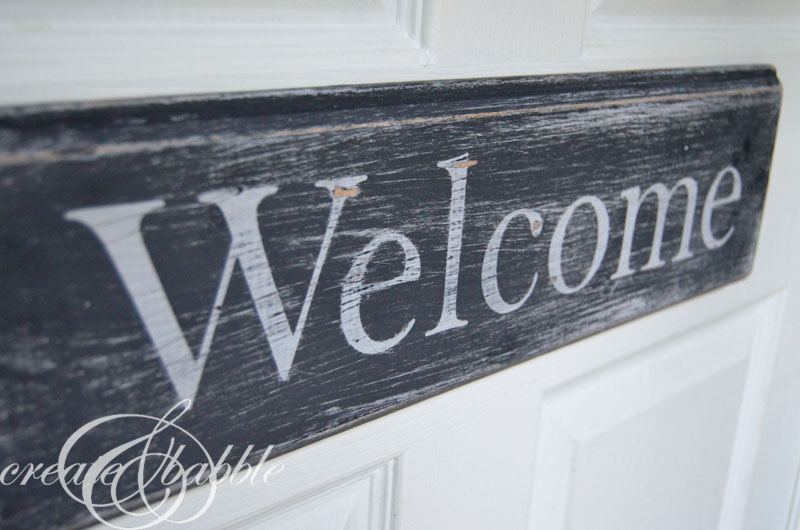
Go over the entire board with a sanding sponge until you get the amount of distressing that you want.

diy-distressed-wood-sign

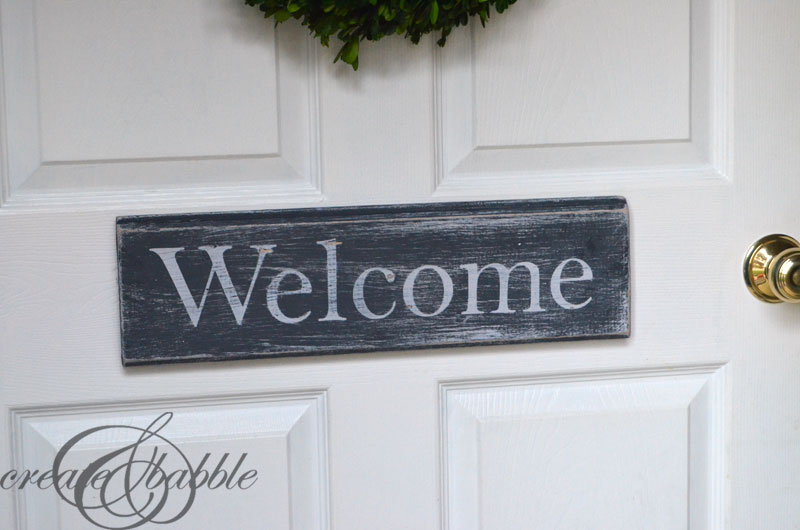
Hang it near or on your front door to welcome your guests! (Then pat yourself on the back that you just saved $35 plus shipping!)

If you like it, please share it!Share on pinterest
Pinterest
Share on facebook
Facebook
Share on twitter
Twitter
Share on stumbleupon
Stumbleupon
Share on google
Google
Share on linkedin
Linkedin
Share on reddit
Reddit

Filed Under: DIY, Home Decor

« Pretty Pumpkins
Blogland Tour »

Comments

  1. Kendra says

    November 22, 2014 at 11:16 am

    So pretty, Jeanie! I love anything distressed! Would love to invite you to share your beautiful projects with us at our link party please 🙂 It goes live on Thursdays and runs till Monday! Have a wonderful weekend !

    Reply
  2. Iwona HELT says

    December 5, 2014 at 9:31 am

    Thank You. Cool technique. I’ll also myself on the front door and write in Polish WELCOME “WITAMY”

    Reply
  3. steve breax says

    December 8, 2014 at 7:12 pm

    buss steve wood sign

    Reply
  4. steve breax says

    December 8, 2014 at 7:13 pm

    add stevewood sign

    Reply
  5. steve breax says

    December 8, 2014 at 7:16 pm

    piz add steve woodsign 409 332-9670

    Reply
  6. Ashley B. says

    October 26, 2015 at 4:31 pm

    Hi,

    I’m so excited to start my project. But first, did you use a hand held sander for the first sanding process or the sanding sponge for for both??

    Thanks so much,
    Ashley

    Reply
  7. Selene says

    July 14, 2017 at 4:16 pm

    Awesome post! Using the letters definitely makes it easy, very cute! Thanks for sharing!

    Reply
  8. Sharon says

    July 18, 2017 at 5:46 pm

    What if I did grey first? Can I slather some white over top then sand?

    Reply
  9. Charlice @ Sprayerguide says

    May 29, 2018 at 8:01 am

    Thanks so much, for sharing this. I love the way the sign is big enough for any incoming visitor to see it. I love to have signs like this especially for motivational quotes or something to use as direction just outside the home. I like it even better that I’m not paying anyone to help me do this.

    Reply
  10. William Thompson says

    August 8, 2024 at 9:46 pm

    I want to express my deepest gratitude to the author for their invaluable contribution to Geometry Dash Wave the discourse surrounding this topic, providing readers with a wealth of knowledge and perspectives to consider.

    Reply

Trackbacks

  1. Rustic Charm: 15 DIY Wood Signs to Hang in Your Home - Style Motivation says:
    July 11, 2018 at 6:19 pm

    […] createandbabble […]

    Reply
  2. Rustic Charm: 15 DIY Wood Signs to Hang in Your Home – chuckiesblog says:
    July 11, 2018 at 9:21 pm

    […] createandbabble […]

    Reply
  3. 17 DIY Wood Signs That Add Rustic Charm To Your Home – TheHomeRoute says:
    October 23, 2018 at 12:38 pm

    […] 10. DIY Distressed Wood Welcome Sign […]

    Reply
  4. Eclectic Farmhouse Tour - Making Peace With My Life says:
    February 20, 2019 at 11:07 pm

    […] Don’t happen to have a vintage sign? Here’s a great tutorial to create your own! […]

    Reply
  5. Eclectic Farmhouse Tour says:
    March 1, 2019 at 5:47 pm

    […] Don’t happen to have a vintage sign? Here’s a great tutorial to create your own! […]

    Reply
  6. 20 Black Fixer Upper Style Ideas | Yesterday On Tuesday says:
    April 6, 2019 at 11:49 am

    […] DIY Distressed Wood Welcome Sign from createandbabble.com […]

    Reply
  7. Cool DIY Welcome Signs - DIYCraftsGuru says:
    April 29, 2019 at 8:11 am

    […] createandbabble […]

    Reply
  8. Eclectic Farmhouse Tour - Topisaw General // Cooking + Crafting A Creative Country Life says:
    May 16, 2019 at 4:44 pm

    […] Don’t happen to have a vintage sign? Here’s a great tutorial to create your own! […]

    Reply
  9. 35 schöne DIY Willkommensschilder für Ihre Veranda – Pin Media says:
    August 6, 2019 at 8:57 pm

    […] Bringen Sie die Vintage-Stimmung auf Ihre Veranda, indem Sie dieses verzweifelte handgemachte Willkommensschild hinzufügen, das einfach und unkompliziert herzustellen ist und Sie nichts kostet! Schnappen Sie sich ein übrig gebliebenes Stück Holz wie ein hölzernes Typenschild, bemalen Sie es mit Kreidetafeln und überschreiben Sie dann die Begrüßungsbriefe! Details hier kreativundgeschwätzig […]

    Reply
  10. 35 schöne DIY Willkommensschilder für Ihre Veranda - Handwerk Ideen says:
    August 18, 2019 at 7:09 pm

    […] Bringen Sie die Vintage-Stimmung auf Ihre Veranda, indem Sie dieses verzweifelte handgemachte Willkommensschild hinzufügen, das einfach und unkompliziert herzustellen ist und Sie nichts kostet! Schnappen Sie sich ein übrig gebliebenes Stück Holz wie ein hölzernes Typenschild, bemalen Sie es mit Kreidetafeln und überschreiben Sie dann die Begrüßungsbriefe! Details hier kreativundgeschwätzig […]

    Reply
  11. Youtube Woodworking Tips And Tricks – Health Care says:
    January 10, 2020 at 7:35 pm

    […] Download Plan More @ createandbabble.com […]

    Reply
  12. 35 Beautiful DIY Welcome Signs for Your Front Porch ⋆ DIY Crafts says:
    October 3, 2020 at 8:26 am

    […] Bring the vintage vibes to your porch by adding this distressed handmade welcome sign that is simple and straightforward to make and will simply cost you nothing! Grab a leftover piece of wood like a wooden nameplate, chalkboard paint it and distress and then overwrite the welcome letters! Details here createandbabble […]

    Reply
  13. 11 DIY Farmhouse Signs - Weekend Craft says:
    April 18, 2021 at 2:59 pm

    […] DIY Welcome Sign from Create and Babble […]

    Reply
  14. 16 DIY Welcome Porch Sign - DIYS says:
    December 25, 2021 at 8:22 am

    […] createandbabble […]

    Reply
  15. 1waterfall says:
    January 10, 2022 at 7:10 am

    2mid-air

    Reply
  16. 100 Handmade DIY Wood Signs To Make Your Own says:
    November 22, 2022 at 9:36 pm

    […] Check out this minimalistic DIY distressed wood welcome sign to hang up outside your main door. It will look so catchy and add up to your hospitality quite a lot. The weathered look is given using a layered painting technique. Starting off with white paint, then black paint, and black chalky paint. createandbabble […]

    Reply
  17. 12 Creative DIY Welcome Sign Ideas - All Sands says:
    February 20, 2023 at 4:16 am

    […] createandbabble […]

    Reply
  18. 25 DIY Wood Signs Showcasing Your Designs with Rusticness at its Best! says:
    April 2, 2023 at 4:12 am

    […] DIY Details : createandbabble […]

    Reply

Leave a Reply Cancel reply

Your email address will not be published. Required fields are marked *

About Jeanie

About Jeanie

Welcome to Create & Babble. This is where I share my loves: crafting, hiking and camping

Read more about me here

Categories

Archives

AntiqueFarmHouse
Zots Craft Adhesive Dots

Amazon Associates Disclosure

Jeanie Hevener Emmert is a participant in the Amazon Services LLC Associates Program, an affiliate advertising program designed to provide a means for sites to earn advertising fees by advertising and linking to amazon.com.


hobby lobby

Copyright © 2025 · Site by Pretty Pink Studio

Copyright © 2025 · Glam Theme on Genesis Framework · WordPress · Log in

This website uses cookies to improve your experience. We'll assume you're ok with this, but you can opt-out if you wish.Accept Reject Read More
Privacy & Cookies Policy

Privacy Overview

This website uses cookies to improve your experience while you navigate through the website. Out of these, the cookies that are categorized as necessary are stored on your browser as they are essential for the working of basic functionalities of the website. We also use third-party cookies that help us analyze and understand how you use this website. These cookies will be stored in your browser only with your consent. You also have the option to opt-out of these cookies. But opting out of some of these cookies may affect your browsing experience.
Necessary
Always Enabled
Necessary cookies are absolutely essential for the website to function properly. This category only includes cookies that ensures basic functionalities and security features of the website. These cookies do not store any personal information.
Non-necessary
Any cookies that may not be particularly necessary for the website to function and is used specifically to collect user personal data via analytics, ads, other embedded contents are termed as non-necessary cookies. It is mandatory to procure user consent prior to running these cookies on your website.
SAVE & ACCEPT