


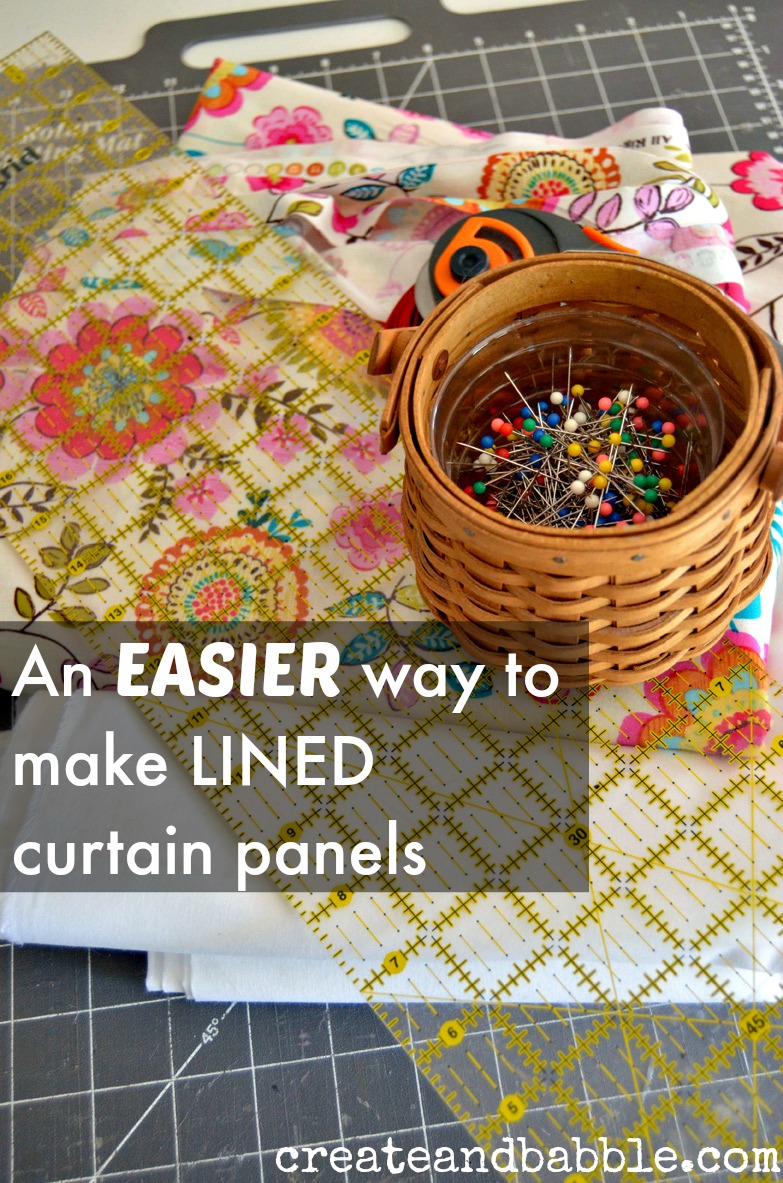
Hey everyone! I came up with an easy way to make lined curtains. Yes, you still have to use your sewing machine, but this is super easy. If you can thread the machine and sew a (relatively) straight stitch, then you can make these curtains.
I’m probably not the first to have thought of this way of making lined curtain panels but I’ve never seen it. I am familiar with the “usual way” of making them – you know, where you’re basically making two curtains panels. One of the curtain fabric and one of the lining fabric – lots of folding, lots of ironing and lots of straight stitching. Well with this way, you still have folding, ironing and straight stitching. Just not as much.
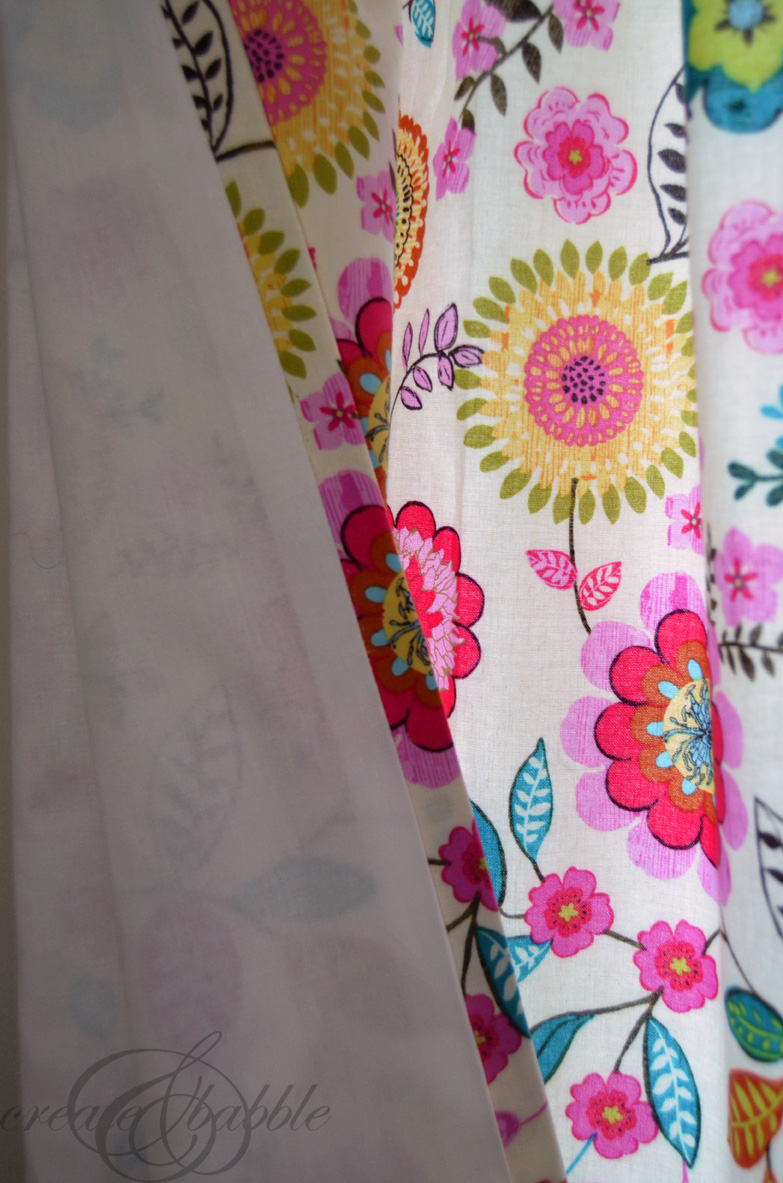
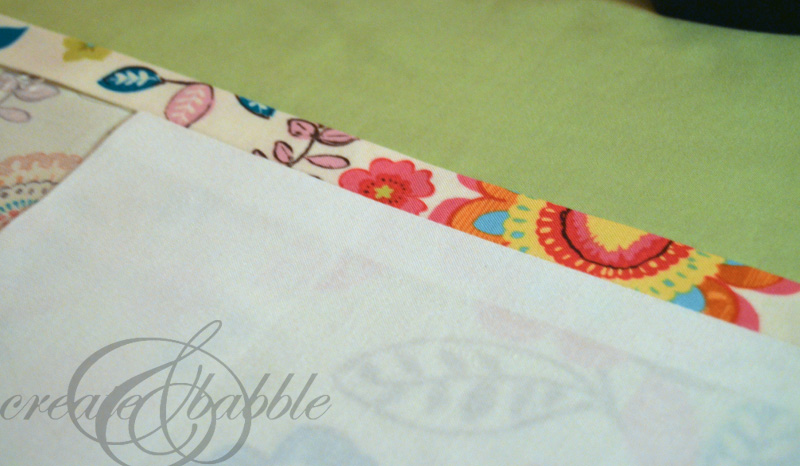
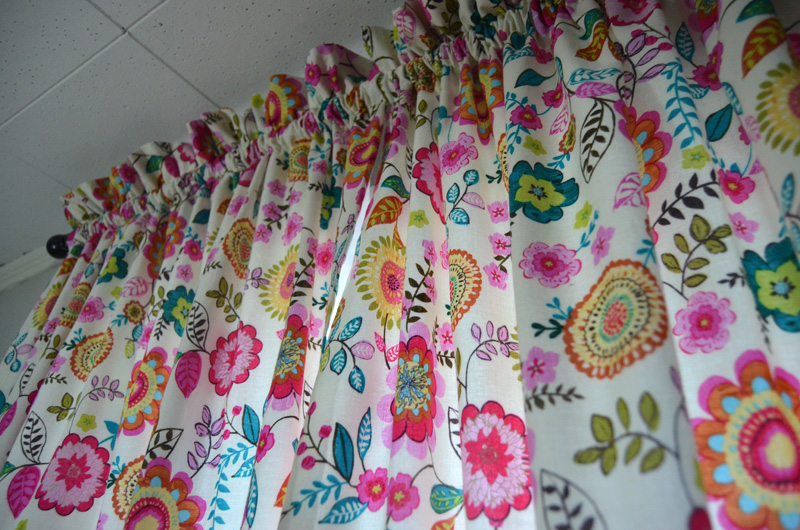
Basically, my method is sewing the fabric panel to the lining panel, right sides together, at the long edges and then turning it right side out. What makes this work is that I cut the lining fabric narrower than the curtain fabric. After the curtain is turned right side out and pressed, it looks just like a professionally-made curtain panel. See for yourself!
Here’s are step-by-step instructions for how I made my lined curtains:
Supplies:
- curtain fabric
- lining fabric
- pins
- rotary cutter
- cutting mat
- straight edge
- measuring tape
- iron
- ironing board
- sewing machine
- thread
Step One:
Cut two curtain panels. Determine the length of the curtain fabric by adding the desired finished curtain length with the length of the header and hem plus 2″. I am making 2 curtain panels for a narrow window in the baby’s nursery, so I cut two 84″ lengths of 44″ wide fabric to make curtains that measure 77″ long.
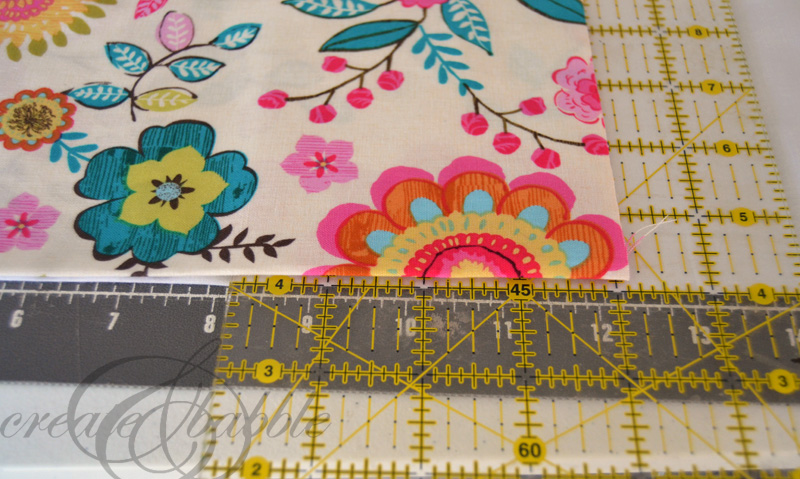
Cut two lining panels. Cut the lining panels 2″ narrower and 4″ shorter than the curtain panels.
Tip for cutting long lengths of fabric: keep the fabric folded lengthwise (just as it comes off the bold) fold in half twice, keeping fold edges aligned.
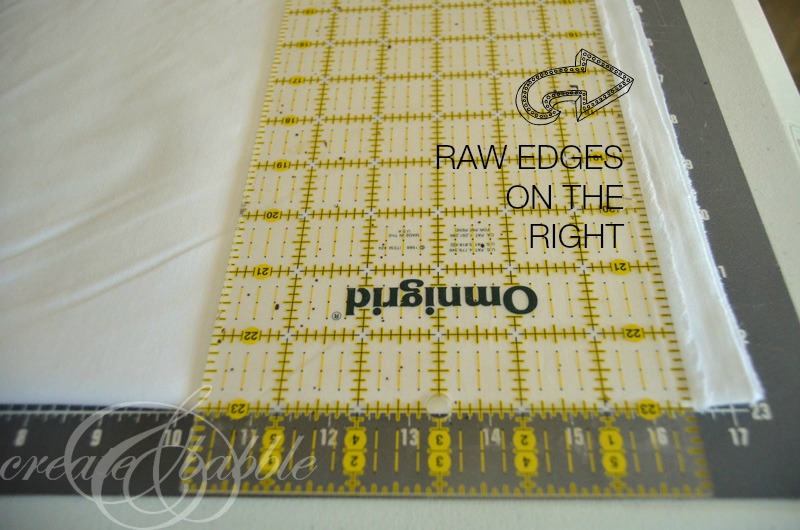
Line up the clear measuring grid (what is that thing called???) and use a rotary cutter with a sharp blade and cut to desired width. Well actually cut it to HALF of the desired width since it’s folded in half. I needed my lining to measure 42″ so I lined up the fabric on my cutting grid and cut at 21″.
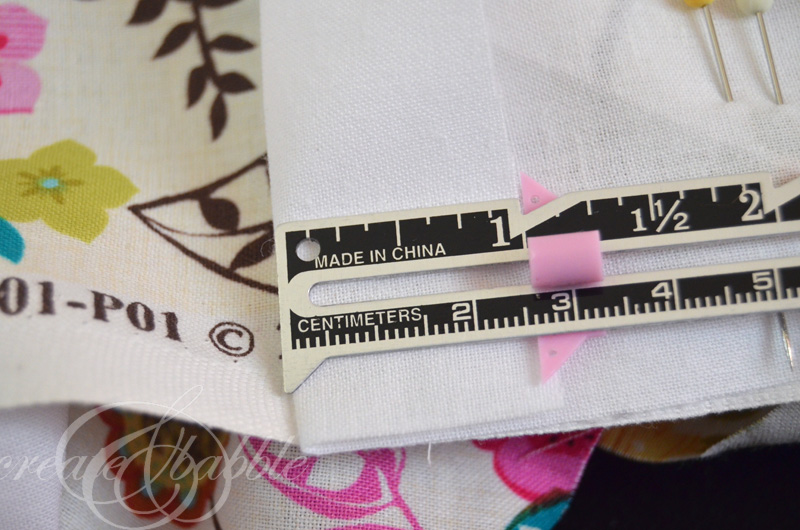
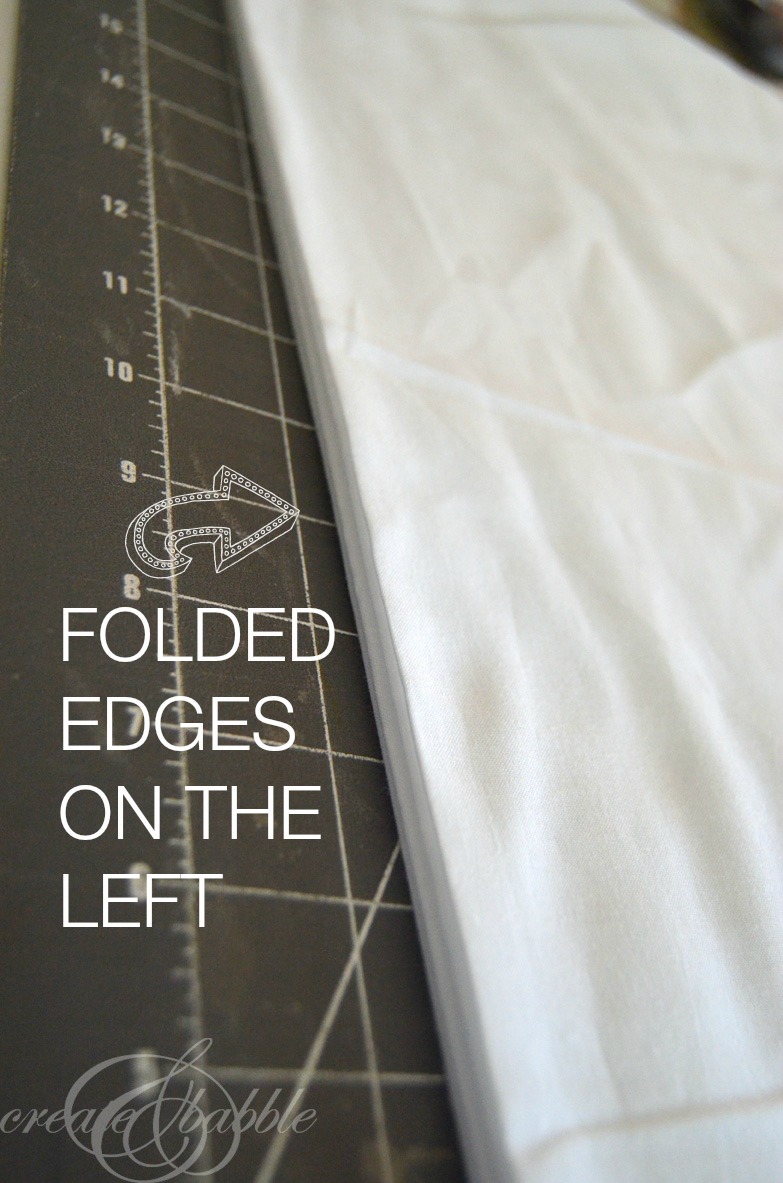
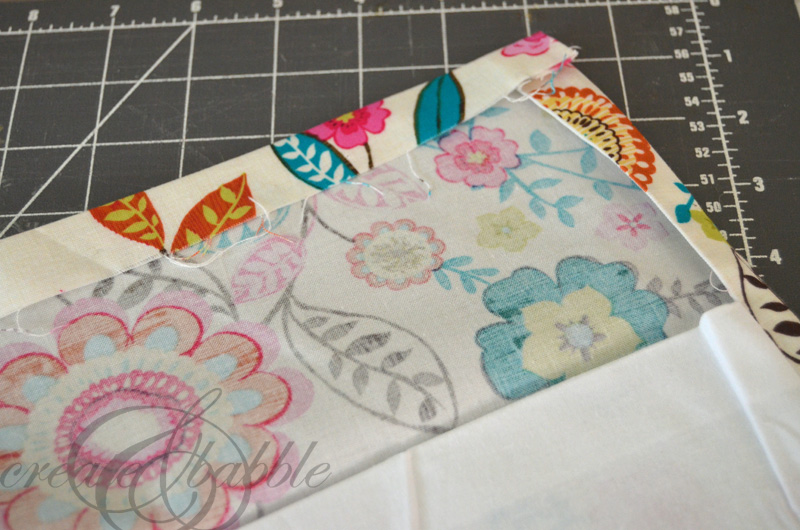
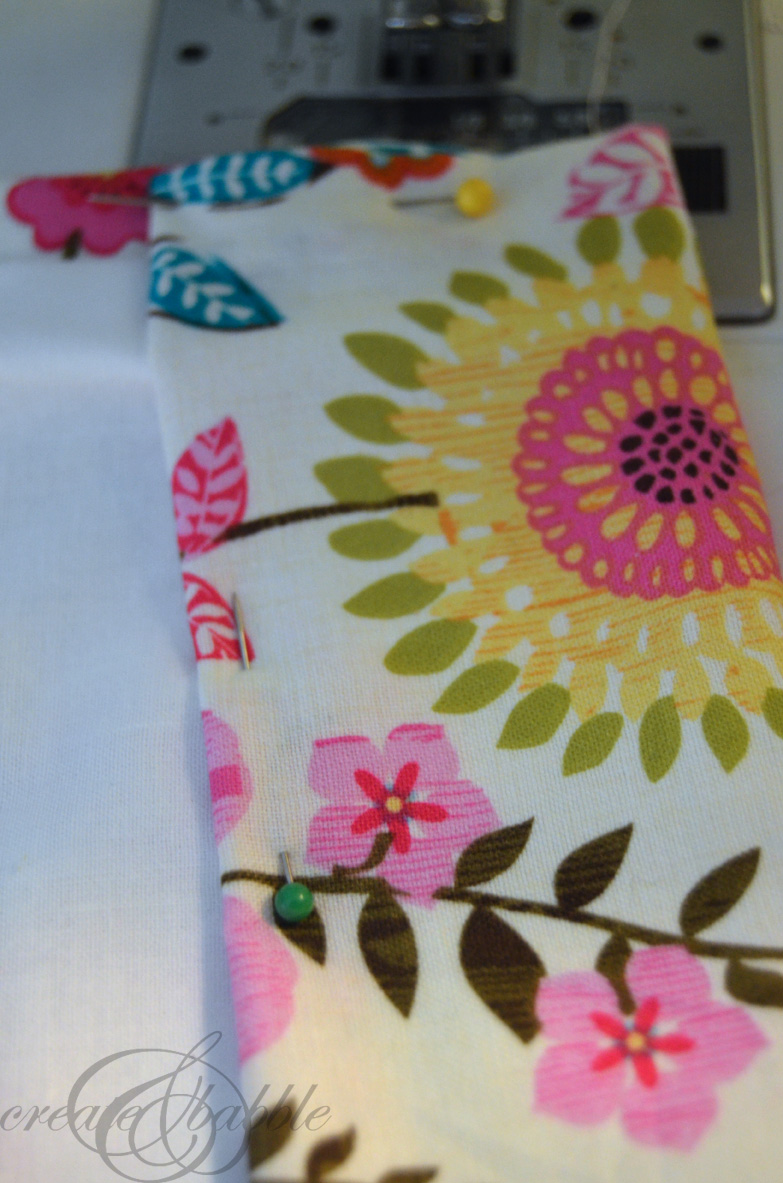
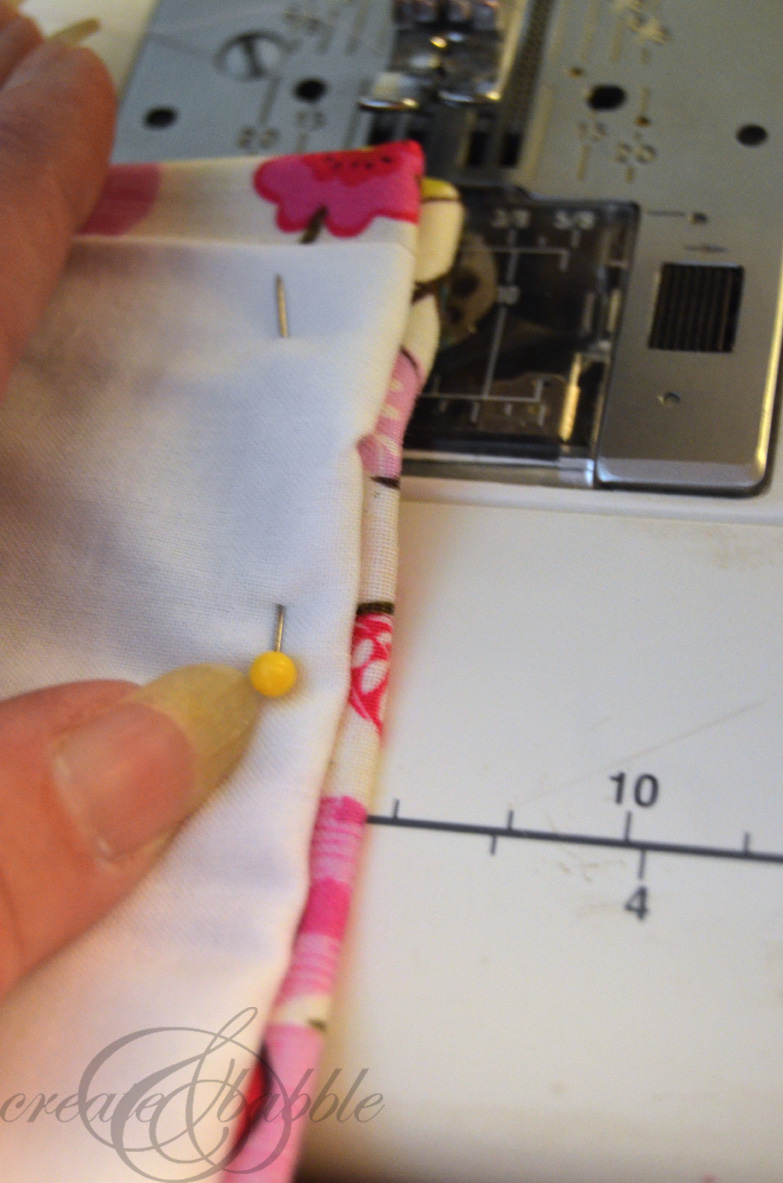
Open up your folded lining fabric and then fold down 1″ and press on both ends of the lining fabric. Fold and press again. Now line up and pin the long edges of the curtain fabric and the lining fabric right sides together and folds facing out. Stitch both sides.
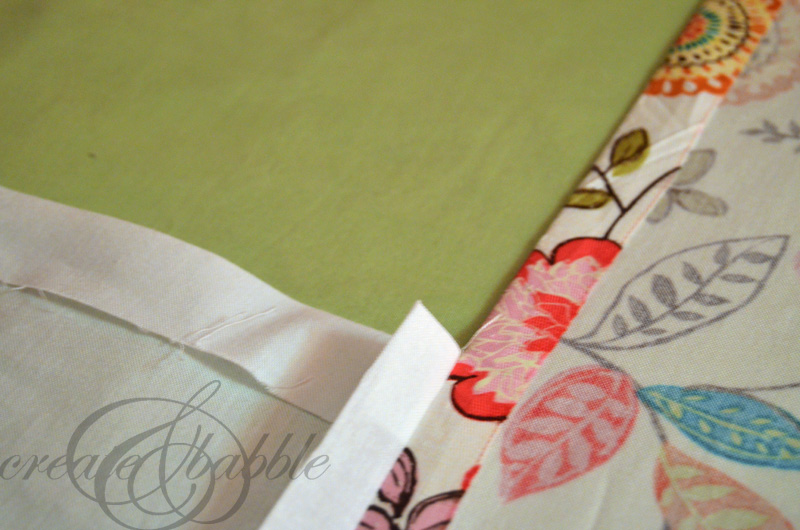
Before turning the panel right side out, press open both seam allowances.
Turn sewn panel right sides out and press.
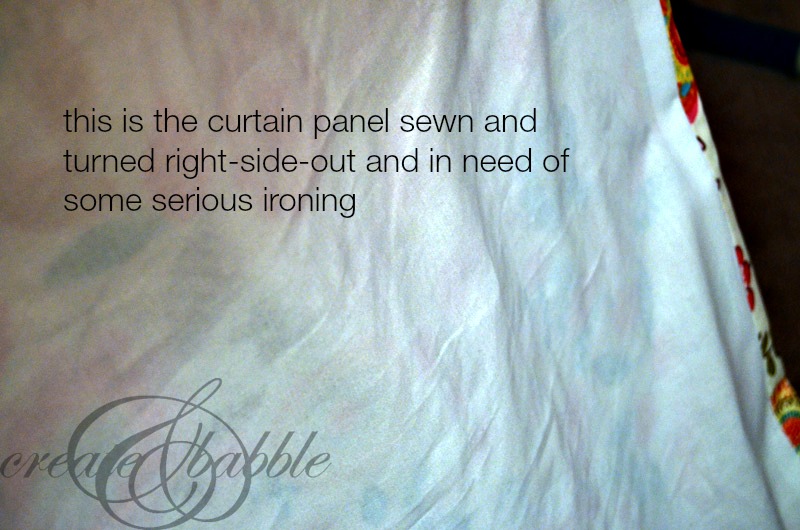
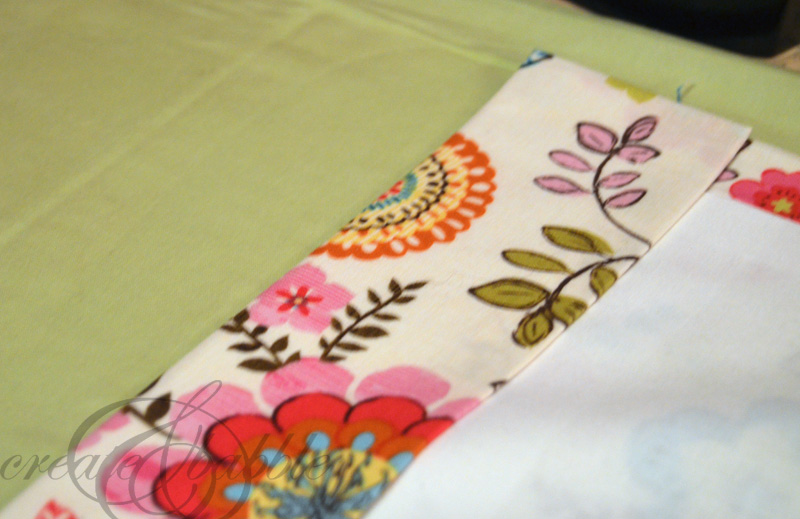
Now you have a nice, clean (and wrinkle-free ; ) lined curtain panel. Now, what about those ends??? I’m glad you asked!
Fold and press down about an inch from the end on the curtain fabric where the lining is shorter. This is going to be your bottom hemmed edge.
Fold up again and pin. Now you can sew in the hem by hand (what!?!?) or do what I do and use the blind hem stitch on your sewing machine. Or you could sew a straight stitch. But after going to all this trouble of making beautiful, lined curtains, you don’t really want to do that, right? Right!
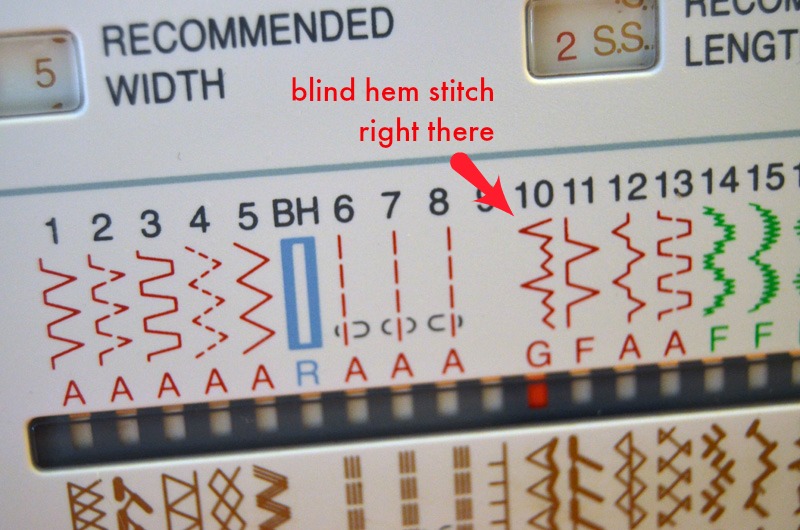
I could be wrong but don’t all sewing machines have a blind hem stitch? Ever use it? I do. Ever since I learned to sew many, many … a few decades years ago ; )
Well in case you haven’t used your blind hem stitch, here’s a little picture tutorial:
With the lining side up, fold the hem to the back leaving a small amount peeking out on the right.
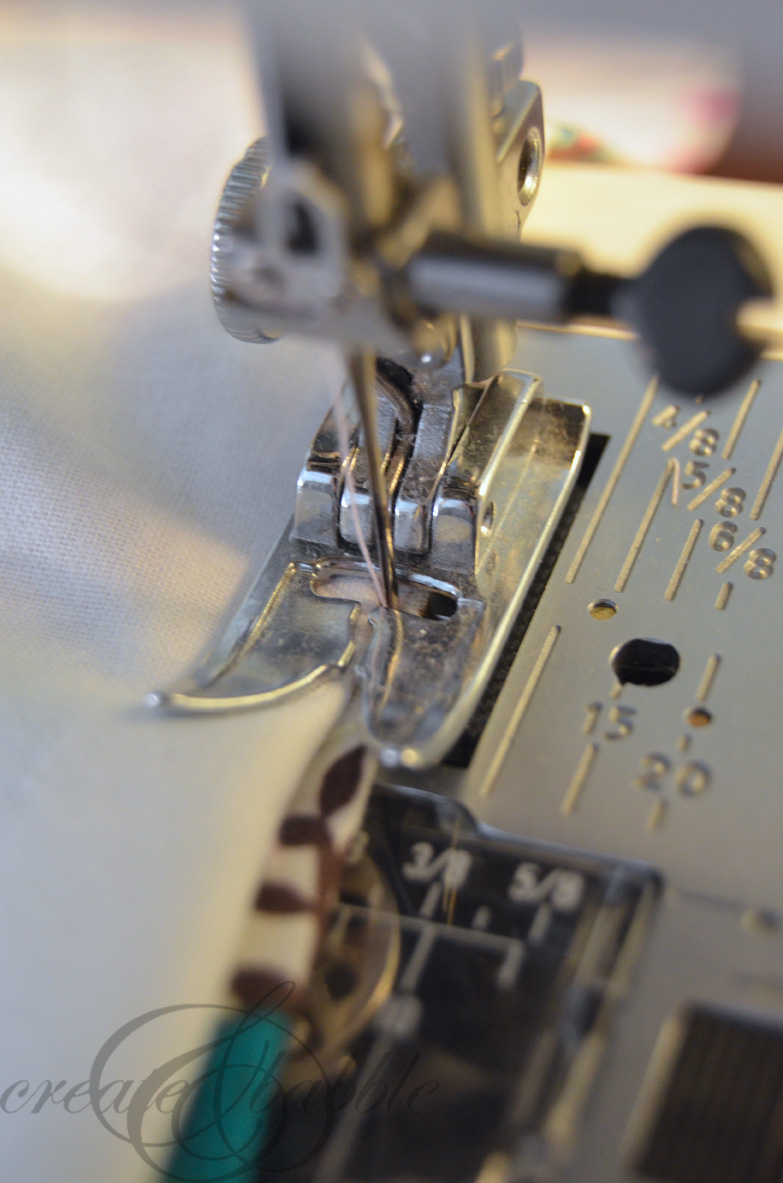
Make sure you’re using the designated foot (my machine just requires a zig-zag foot) and your machine settings are set up correctly. Slowly lower needle into the fabric on the right. The machine will stitch a few times there and then hop over to the left to catch for one stitch.
Once you’re done, take your curtain over to the ironing once again and press. If you did it right, you won’t see the hem stitch at all!
Now for the header end of the curtain. Once you have the curtain fabric folded and pressed, mark where you want the stitching lines for the pocket for the curtain rod.
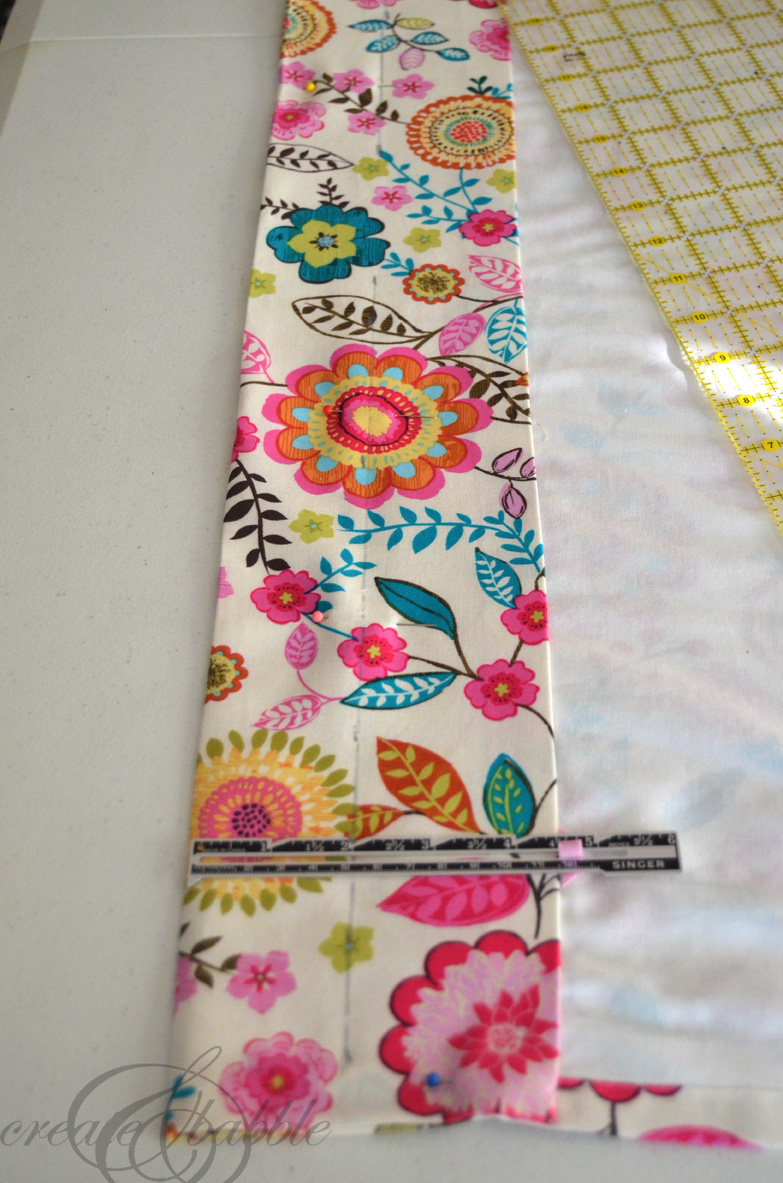
Since I’m going to be hanging these curtains on a 1″ curtain rod, I stitched two rows 1-1/2″ apart to form the pocket.
Insert your curtain and hang your lovely, new lined curtains!
The nursery makeover will (hopefully) be done on Saturday and I can show off the entire room here on Sunday. I can’t wait! And then it will be time to move on to other projects in my house. After all, it is March and Dan is planning his out-of-town business trip. If you’ve been following me for a while, you know what that means! If not, I’ll clue you in: Every March, Dan is sent on an out-o-town business trip for about a week. I take this as my cue to start a renovation project. The first year (pre-blog), I painted the walls and vanity in the master bathroom. The next year, I painted the kitchen cabinets, and last year I made over the staircase. I think I know what this year’s project will be, but I like to keep this a secret from Dan. He likes surprises – NOT! ; )


I worked in a custom drapery shop many years ago and this is similar to how we did it. We hemmed the lining and we hemmed the face fabric and then did the stitched the side hems like this tutorial shows. This way the lining hangs free at the bottom.
Oh, I didn’t think of that! I’ll have to try that on the next curtains that I made. Thank you!
This is how I made all my curtains. It’s the best way.
Great tutorial. I am getting ready to make a pile of curtains and this was very helpful.
Thanks Diane! And you’re going to save a ton of $ by making them, too!
Thank you so much for sharing this tutorial Jeanie! I started sewing a few months ago and have been looking for a good tutorial on how to make lined curtains. Glad I found you:-)
Katie
Hi Katie! I’m so happy that you started sewing. You’re going to save so much money by making the curtains!
Such beautiful fabric for a nursery! I try to avoid sewing if at all possible, but I will save this for a future day when I’ll need lined curtains. I know it will happen eventually! And thanks for showing me what the blind stitch setting is for! Good luck with your next renovation. 🙂
Thank you!
Thank you for your tutorial!! I have to make curtains for our first floor window soon but have been dragging my feet. You’ve inspired me!
Thank you Katie! I’m glad this has inspired you. We all need a nudge now and then. I have so many unfinished projects that I should get done ; )
Thank you for this great tutorial! My house is in desperate need of some curtains! So glad that you shared it with us at #FoodieFriDIY! Sharing!
Thank you Michelle. I need to make more myself!
Great tutorial… Pinning!
Thank you so much for linking up with us!
xo
Thank you very much Desiree!
I liked your tutorial and learned a lot, but I really LOVE the fabric! It is just what I have been looking for to use in my kitchen. Can you share where you found it and what it was called? I am getting ready to paint my kitchen cabinets white and I think this fabric will really pop!
Thanks!
I really like the fabric, Do you know whom made it ?
Thank you! Your tutorial is still teaching…and will be a time saver for the 9 pairs of curtains I will be making next week.
I just copy and pasted your tutorial … thank you for sharing.
Where did you find that fabric? Does it have a name?
These are really helpful insights, and they definitely help a lot. (Especially to someone like me – who has never actually sewn anything!) Thanks,
It’s amazingly an average and pleasing snippet of data. I’m fulfilled that you presented this satisfying data to us. You should keep us trained thusly. Grateful to you for sharing.
Great tutorial. What type of fabric for lining a cotton curtain would you recommend? Thank you so much!
Informative tutorial, I love the way you explain making lined curtains. It’s very interesting and looking stunning. I am planning to install these types of curtains for my home. Thanks for sharing an amazing article!!
Great tutorial! I’m a completely novice sewer & still learning sewing lingo & techniques. Gratifying to find a tutorial so easy for a beginner, like me, to follow. These will be my 2nd set of curtains. Can’t wait to get started! Will post again after I finish my curtains. Wish me luck!
I have a question. I’m using your tutorial to make a lined valance, so my valance is wide and short. When putting the lining and fabric together right side together am I matching the top of the fabric with the folded edge of the lining? Hope this question is clear. Thanks.
Thanks for a great tutorial!
I have a couple of questions. I tried this yesterday, and I wasn’t sure what to do with the long sides of the curtain fabric and lining fabric before sewing them together. Is it those sides I’m supposed to fold in and iron one inch and then another inch? So the lining will end up being a total of 4” narrower when I sew the layers together? And then the seam where I sew the layers together on the long sides—that should be a 1” seam allowance?
When I tried this with one curtain yesterday, just sewing the long sides together without doing the folding and pressing first, there was only a very narrow strip of curtain fabric turned to the back—not a nice wide strip like in your photos. I had to rip those seams and start over, and I’m still wondering whether I should start out like you again and start with the lining folded in two inches on each side. I still have two more curtains to sew.
Thanks for any advice you can give me!
Thank you for this awesome tutorial! I love the way you explain making lined curtains.
Clear as mud.
I am a little bit lost in your tutorial. I cut my fabric accordingly, then continued to iron my lined fabric. I wasn’t sure whether I should also iron my decorative fabric before pinning the right sides together .
I did iron my decorative fabric and now I’m not sure how to pin and sew my right sides together so that I can unfold my hem again. I little help please ?
This information is so amazing and helpful for me thanks for sharing the knowledge it is a great post this site is alternative https://beautifulwindowselgin.com/
Thank you Jeanie. I like to work on DIY projects on weekends. Yesterday, I made lined curtains for my clinic quickly after reading your detailed guide. I wish I could share the image here of how beautiful they’re looking on my clinic window
Thank you Jeanie. I like to work on DIY projects on weekends. Yesterday, I made lined curtains for my clinic quickly after reading your detailed guide. I wish I could share the image here of how beautiful they’re looking on my clinic window
i just took a job making lined valances and curtains today and I had no idea how to even begin to start them…..until I read this comment. Your detailed instructions was very helpful in understanding how to do this. I think I can master this job now. Thank you so very much for your helpful tips.
i just took a job making lined valances and curtains today and I had no idea how to even begin to start them…..until I read this comment. Your detailed instructions was very helpful in understanding how to do this. I think I can master this job now. Thank you so very much.
actually, I’m finding this a bit confusing. You don’t say what to do with the sides of the curtain panel at all in terms of a seam. you say to fold over the edges of the lining and pin it to the panel right sides together and stitch. Do you fold over the panel and stitch a seam there before pinning and sewing the lining to the panel? I’ve tried to figure it out by looking closely at the provided pictures but even the pictures do not provide a good illustration of what to do. Can you help?
I am an experienced dressmaker but never done curtains. My best friend asked me to make her some curtains for a caravan. You tutorial Geometry Dash was so easy to follow and the finished was amazing. Thank u