• Home
  • About
  • Contact
  • Partner
  • Privacy Policy
    • Facebook
    • Instagram
    • Pinterest
    • Twitter
    • YouTube

Create and Babble

  • DIY
    • Home Improvement
    • Upcycle
    • Furniture Makeovers
    • Build It
  • Craft
    • Silhouette
    • Sewing
    • Wedding DIYs
    • Seasonal
    • Gifts
  • Lifestyle
    • Bicyling
    • Travel
    • shopping

STAY UP TO DATE

Get the latest crafting and DIY tips, tricks and tutorials delivered straight to your inbox!

Wooden Easter Eggs

March 17, 2016

If you like it, please share it!Share on pinterest
Pinterest
Share on facebook
Facebook
Share on twitter
Twitter
Share on stumbleupon
Stumbleupon
Share on google
Google
Share on linkedin
Linkedin
Share on reddit
Reddit

Spring is in the air!!! The days are longer, the daffodils have bloomed, and the tulips are peaking up! This is my favorite time of year. You can keep Fall. I’ll take Spring any day! Another reason I love Spring is Easter. Easter is definitely my favorite holiday. It’s comes in my favorite season, so win-win! In honor of Spring and Easter, I made these Wooden Easter Eggs:

How to make Wooden Easter Eggs for Easter decor

When I found out that “Spring” is the theme of this month’s Power Tool Challenge I went to Pinterest to look for inspiration when I saw this pin, I knew immediately that I was going to make my own version of these wooden Easter eggs.

Wooden Easter Eggs are super easy to make. Let me show you how I made mine:

Here’s what I used: (includes affiliate links)

  1. scrap wood (3/4″ thick)
  2. card stock
  3. patterned scrapbook paper
  4. mod podge
  5. paint brush
  6. egg-shaped template
  7. jig saw
  8. sander or sand paper
  9. dark furniture wax
  10. ribbon

Steps:

The first thing I needed was a flat-bottomed egg shape so I made one. Well I made three. With my Silhouette Cameo®. I don’t know what I would do without that machine! If you have a Silhouette, just make an oval and cut off the bottom. If you don’t have a Silhouette® machine, I can send you a PDF of my egg-shaped template.

flat-bottomed egg shapes made using Silhouette Cameo

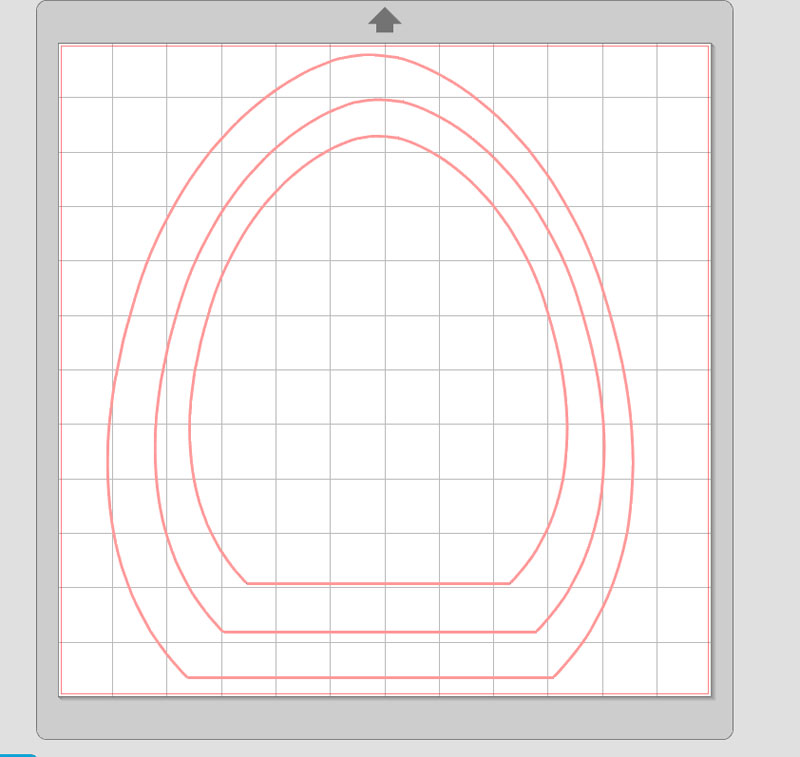
I cut three different sized egg shapes out of the card stock. I also cut these same shapes out of the patterned scrapbook paper that will be used to decorate the wooden easter eggs.

Trace egg shape onto wood to make wooden easter eggs

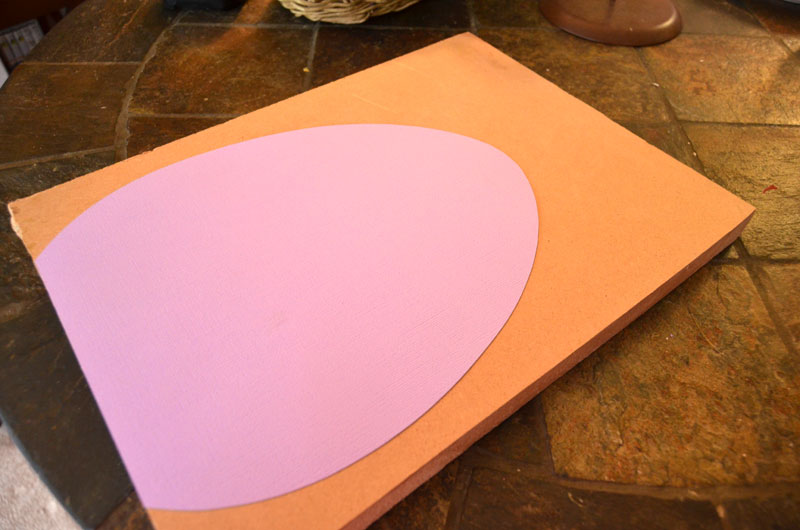
The I traced the egg shapes onto my pieces of scrap wood.

My scrap wood has some grooves cut into the back of it (I was practicing making dato cuts on it ; ). The grooves are on the back and aren’t noticeable from the front. Besides, why let perfectly good wood scraps go to waste!

use a jig saw to cut wood into egg shapes for decorated wooden easter eggs

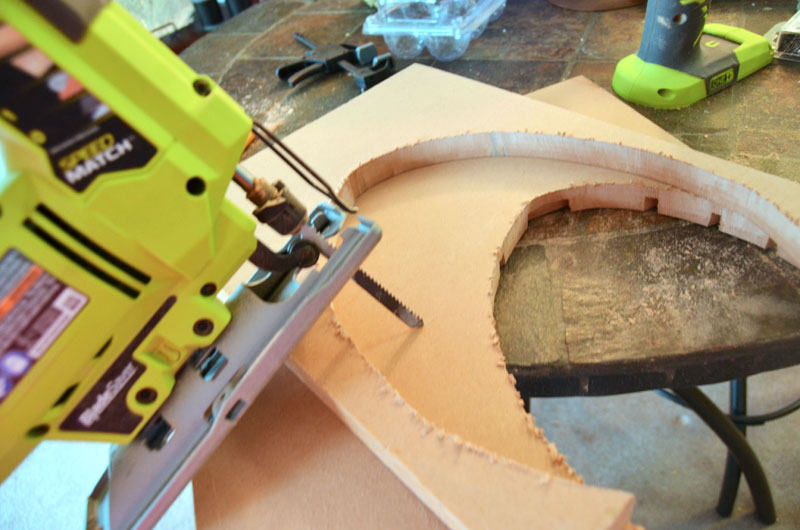
Next it was time to cut out the eggs with my jig saw. I have noticed that the more I used the jig saw, the better I get at it ; )  After the wood is cut, sand the edges smooth.

How to make decorative wooden easter eggs with wood and scrapbook paper

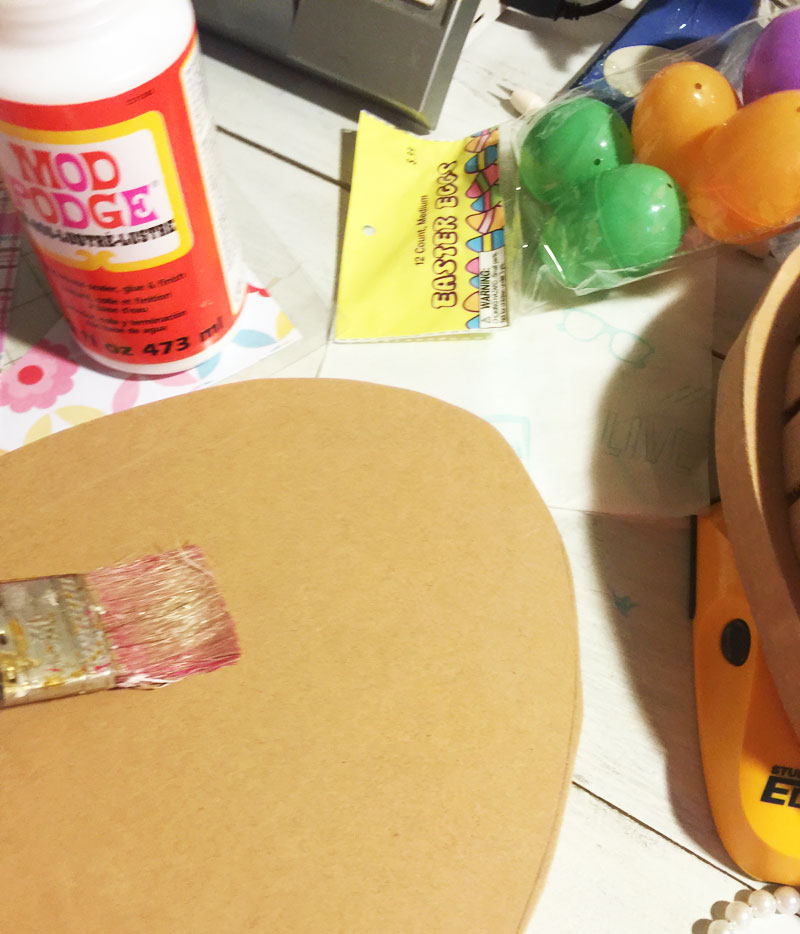
Once the eggs were cut and sanded smooth, I brushed on a coat of Mod Podge to one side of each wooden egg. Then I carefully laid the patterned scrapbook paper egg shape onto each wooden egg and brushed on another generous coat of Mod Podge and then let the eggs dry.

How to make decorative wooden easter eggs. Use patterned scrapbook paper to decorate the wooden eggs.

Once the eggs were dried, I went over them carefully with my sander. You could also use a sanding block or sponge for this part.

How to make decorative wooden easter eggs.

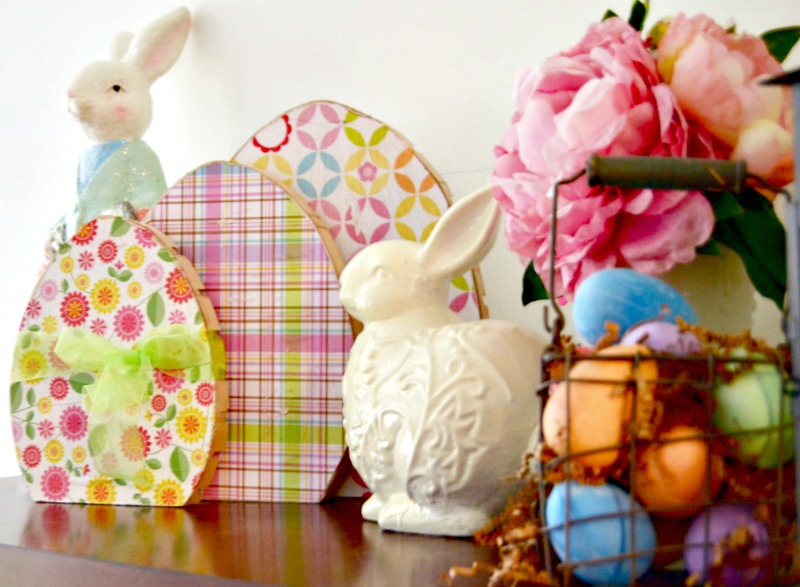
I wanted my eggs to have a shabby/worn look so I added a small amount of antiquing wax to darken up the edges just a bit.


DIY Wooden Easter Eggs are made with wood scraps and scrapbook paper

I love how they turned out. What do you think? I especially like that I didn’t spend a dime to make these decorative wooden Easter eggs since I used supplies and scrap wood that I already had.

I party here.

If you like it, please share it!Share on pinterest
Pinterest
Share on facebook
Facebook
Share on twitter
Twitter
Share on stumbleupon
Stumbleupon
Share on google
Google
Share on linkedin
Linkedin
Share on reddit
Reddit

Filed Under: Build It, DIY, Easter, Home Decor

« It Is Well With My Soul T-shirt Design
Last Minute Easter Decoration – Free Printable and Cut File »

Comments

  1. Paula@SweetPea says

    March 17, 2016 at 8:29 am

    These eggs are so cute! I love that you made them in three sizes and also love the cute scrapbook paper designs that you used. I want to make these for my house!

    Reply
  2. Victoria @DazzleWhileFrazzled says

    March 17, 2016 at 8:43 am

    Very creative use of a piece of wood! Visiting from DIY Like a Boss party.

    Reply
  3. Larissa ~ Prodigal Pieces says

    March 17, 2016 at 10:55 am

    These are adorable! So fresh and so spring! 🙂

    Reply
  4. Cher @ Designs by Studio C says

    March 17, 2016 at 11:12 am

    Super-cute idea – I especially love the patterns of the paper you chose… Very bright and Spring-y!

    Reply
  5. Marie, The Interior Frugalista says

    March 17, 2016 at 12:00 pm

    These are really cute Jeanie! I love the scrapbook paper patterns and colors that you used and wrapping a cute bow makes them extra cute.

    Reply
  6. Maryann @ Domestically Speaking says

    March 17, 2016 at 2:58 pm

    So cute and I love the colors and patterns you picked!

    Reply
  7. Christy@Confessions of a Serial Do-it-Yourselfer says

    March 17, 2016 at 11:03 pm

    These are so cute, and you can’t beat free!! XO

    Reply
  8. Wendi @ H2OBungalow says

    March 18, 2016 at 7:31 am

    Darling! I’d love these by my front entry table. I’m falling in love with my Silhouette too, although I’m not nearly as good with it as you are!

    Reply
  9. Debbie @ Refresh Restyle says

    March 18, 2016 at 8:45 pm

    Awesome eggs! Love the paper choices!! Such a great spring project!

    Reply
  10. Kim (TheKimSixFix) says

    March 19, 2016 at 10:05 pm

    I love these Jeanie. A little collection of them on a shelf.. just in time for Easter. They are darling!

    Reply
  11. Emmy says

    March 30, 2017 at 5:29 pm

    These look great Jeanie! Not too experienced doing this kinda stuff but I’d like to!

    Reply
  12. Jame says

    November 20, 2017 at 11:08 am

    Those are creative and adorable. Hope to see more posts from you.

    Reply
  13. JaneEllen says

    March 4, 2018 at 12:19 am

    So perfect for Easter/Spring. Altho we don’t have any small grand kids (all grown up,darn it)I still enjoy making decorations for Easter. Since we don’t have any wood to cut out the eggs will use cardboard and watercolor paper for eggs, little substitution which I do often. We live out in rural area so don’t run to town for every little thing. Like to see how I can make projects without having to buy things, make do. These eggs will decorate our shutter shelf along with other decorations from thrift stores and other times have made them. It’s just Mr.Furry and I to enjoy. Your wood eggs are wonderful with pretty papers.
    Happy Easter and Happy Sunday

    Reply
  14. Pam says

    March 4, 2018 at 9:54 am

    Hi, These are adorable and look very DIY friendly!
    I would love for you to send me the pattern.
    Thank you so much!

    Reply
  15. Kathryn Griffin says

    March 5, 2018 at 10:49 am

    Oh, goodness! These are so cute! Thanks for sharing! I would love it if you would share this at our Make it Pretty Monday party at The Dedicated House. Here is the link to this week’s party: http://www.thededicatedhouse.com/make-pretty-monday-week-245/ Hope to see you at the shindig! Have a lovely week ahead! Toodles, Kathryn @TheDedicatedHouse

    Reply
  16. Sara @ Magical Mama Blog says

    March 8, 2018 at 10:07 am

    These are adorable! I am new to Texas and have been trying to find some fun farm house type of decor for each holiday and everything Eastery has been very plastic. This would be the perfect addition to my mantel! Thanks for sharing with #ArtsyFartsy

    Reply
  17. Sheltie Times says

    March 8, 2018 at 12:13 pm

    Beautiful decorations

    Reply
  18. Rhonda says

    March 9, 2018 at 7:54 am

    I loved the way the eggs turned out. They would make a beautiful center piece in a Tablescape too. Thanks for sharing on Sunday’s Best.

    Reply
  19. Sheri says

    March 12, 2018 at 11:22 am

    I’m in love with these and am excited to feature them this week in the To Grandma’s House We Go DIY, Crafts, Recipes and more Wednesday Link Party! Yay!

    Reply
  20. Beverly Ditzel says

    March 12, 2018 at 9:13 pm

    Love these and would like to make a set for myself and my daughter. If you would be so kind as to send me the template.

    Reply
  21. Kerryanne says

    March 15, 2018 at 6:44 am

    Jeanie, these wooden eggs are so perfect for Easter and what a lovely DIY project.
    Thank you for sharing this project at Create, Bake, Grow & Gather on Shabby Art Boutique this week. I’m delighted to be featuring it at tomorrow’s party and pinning too!!
    Hugs ~ Kerryanne

    Reply
  22. Roseann Hampton says

    March 15, 2018 at 7:56 pm

    Love these! Sharing them on my Merry Monday roundup this week! Stop by to check it out!

    Reply
  23. Colleen Howell says

    January 12, 2020 at 5:43 am

    These are adorable, would love the patterns so I can make some for my school décor.

    Reply
  24. Barb says

    January 23, 2021 at 12:30 pm

    What is the reason for sanding over the patterned paper, especially since you said a sponge could be used? Thanks.

    Reply
  25. Catherine says

    March 30, 2021 at 10:46 pm

    I would love the pattern for these please. Thank you!

    Reply
  26. Dany Duhamel says

    March 11, 2023 at 10:41 am

    Bonjour j aimerais avoir votre modèle œufs j aimerais faire un

    Reply

Trackbacks

  1. Wood Slice Rolling Plant Stand - My Repurposed Life™ says:
    March 17, 2016 at 8:00 am

    […] Wooden Easter Eggs by Create And Babble […]

    Reply
  2. Wooden Swing Shelf - Domestically Speaking says:
    March 17, 2016 at 8:01 am

    […] Wooden Easter Eggs by Create And Babble […]

    Reply
  3. How To Turn A Drawer Front Into A Planter | Confessions Of A Serial Do-it-Yourselfer says:
    March 17, 2016 at 1:45 pm

    […] 5. RestyleWooden Easter Eggs by Create And Babble […]

    Reply
  4. DIY Rustic Metal Tile Wall Decor! ~- Designed Decor says:
    March 17, 2016 at 2:59 pm

    […] Wooden Easter Eggs by Create And Babble […]

    Reply
  5. Repurposed Easter Cross - Prodigal Pieces says:
    February 14, 2017 at 1:31 pm

    […] Wooden Easter Eggs by Create And Babble […]

    Reply
  6. Easter Cross made from Repurposed Materials - Prodigal Pieces says:
    October 18, 2017 at 8:37 am

    […] Wooden Easter Eggs by Create And Babble […]

    Reply
  7. DIY, Crafts, Recipes and More! Wednesday Link Party #78 - Hazel + Gold Designs says:
    March 14, 2018 at 12:01 am

    […] Wooden Easter Eggs by Create and Babble […]

    Reply
  8. Create, Bake, grow & Gather Party #306 - Shabby Art Boutique says:
    March 16, 2018 at 4:05 am

    […] Find out how to make these gorgeous wooden Easter eggs at Create and Babble. […]

    Reply
  9. Easy DIY Easter Decor - from www.thisautoimmunelife.com says:
    March 18, 2018 at 9:00 pm

    […] Wooden Easter Eggs via Create & Babble PIN IT […]

    Reply
  10. Simple Easter Decor Craft Ideas - A Wonderful Thought says:
    March 18, 2018 at 9:09 pm

    […] DIY Wooden Easter Eggs | Create and Babble […]

    Reply
  11. 50 Best DIY Easter Wood Crafts - Prudent Penny Pincher says:
    February 13, 2019 at 9:10 am

    […] Wooden Easter Eggs from Create and Babble […]

    Reply
  12. 10+ DIY Easter Decorations You'll Love, For Under $10 | For Another Time says:
    January 20, 2020 at 5:22 pm

    […] Found on Create & Babble […]

    Reply
  13. DIY Rustic Metal Tile Wall Decor! - Designed Decor says:
    October 10, 2021 at 4:54 pm

    […] Wooden Easter Eggs by Create And Babble […]

    Reply
  14. Build a Fruit and Vegetable Bin | Designs by Studio C says:
    March 22, 2022 at 2:12 pm

    […] Wooden Easter Eggs by Create And Babble […]

    Reply

Leave a Reply Cancel reply

Your email address will not be published. Required fields are marked *

About Jeanie

About Jeanie

Welcome to Create & Babble. This is where I share my loves: crafting, hiking and camping

Read more about me here

Categories

Archives

AntiqueFarmHouse
Zots Craft Adhesive Dots

Amazon Associates Disclosure

Jeanie Hevener Emmert is a participant in the Amazon Services LLC Associates Program, an affiliate advertising program designed to provide a means for sites to earn advertising fees by advertising and linking to amazon.com.


hobby lobby

Copyright © 2025 · Site by Pretty Pink Studio

Copyright © 2025 · Glam Theme on Genesis Framework · WordPress · Log in

This website uses cookies to improve your experience. We'll assume you're ok with this, but you can opt-out if you wish.Accept Reject Read More
Privacy & Cookies Policy

Privacy Overview

This website uses cookies to improve your experience while you navigate through the website. Out of these, the cookies that are categorized as necessary are stored on your browser as they are essential for the working of basic functionalities of the website. We also use third-party cookies that help us analyze and understand how you use this website. These cookies will be stored in your browser only with your consent. You also have the option to opt-out of these cookies. But opting out of some of these cookies may affect your browsing experience.
Necessary
Always Enabled
Necessary cookies are absolutely essential for the website to function properly. This category only includes cookies that ensures basic functionalities and security features of the website. These cookies do not store any personal information.
Non-necessary
Any cookies that may not be particularly necessary for the website to function and is used specifically to collect user personal data via analytics, ads, other embedded contents are termed as non-necessary cookies. It is mandatory to procure user consent prior to running these cookies on your website.
SAVE & ACCEPT