


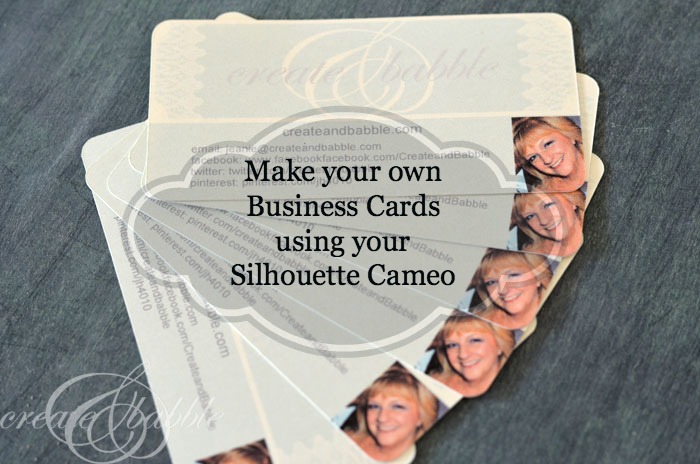
 There have been so many times that I had wished I had business cards for my blog. Being a relatively “newer” blogger, I don’t need them for conferences….yet. But when I go to locally owned businesses to buy supplies, I want the owners to go to my blog and see what I’ve made with the purchases from their store. Writing down my URL on a piece of scrap paper isn’t too professional! I thought about ordering them, but since I’m slated for a new blog design within the next month and will probably have a new logo, I didn’t want to invest money in cards that will be outdated soon.
So what’s a crafty blogger to do? Make her own, of course, using her Silhouette! If you have a Silhouette, here’s one way to make your own business cards:
Open up a new page in the Silhouette software and make a rounded rectangle shape. The standard business card size is 3.5″ wide x 2″ high. Since I’m not “standard”, I made mine 4.210″ wide x 2.085″ high. You can make it any size or shape you want. That is what is so fun about making your own – make it your own!
Next, open up the jpegs of your logo and photo. Copy and paste them into the same page as your rectangle shape.
Using the text tool, type in your blog name and any other information you want on your card.
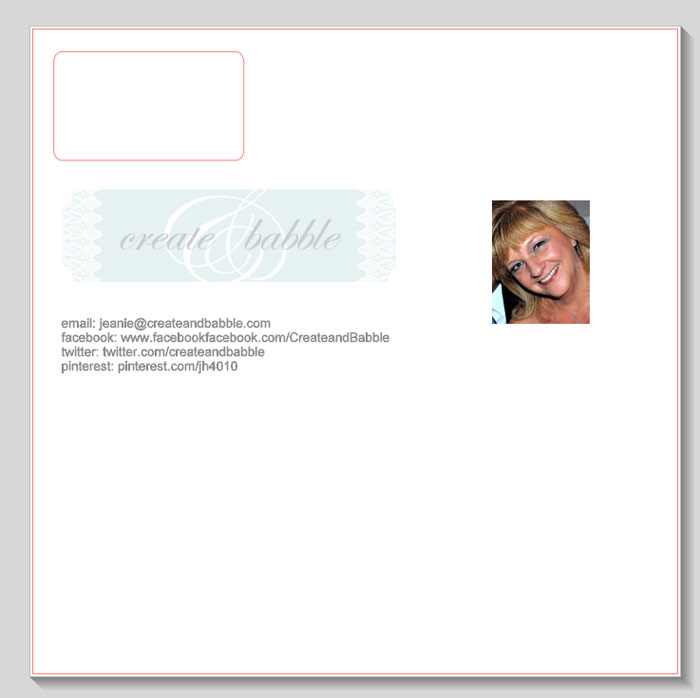
You can then use the color picker to color fill the shapes of the letter to match your logo. I also filled in the bottom half of my card to match the blue in my logo. Resize the logo, photo and text to fit within your rectangle. Don’t forget to turn off the cut lines for everything except for the rectangle.
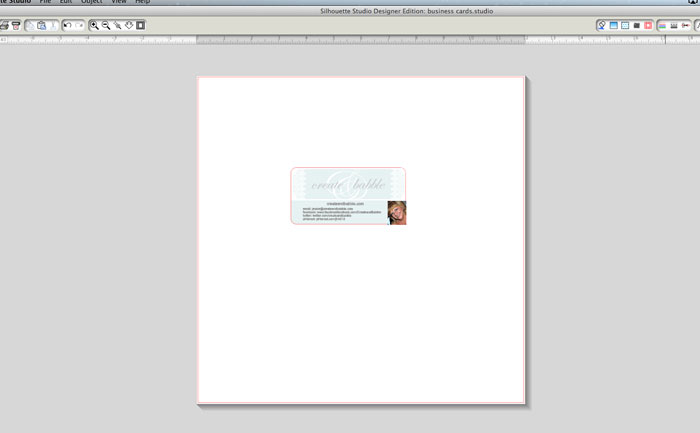
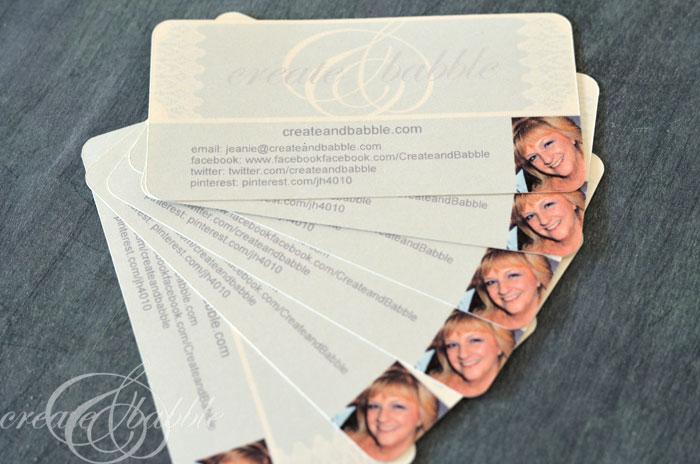
Turn on the register marks, fill your page using the Replicate button and send to the printer. I used a nice, heavy cardstock that I had left over from the Wedding Programs that I made last year.
All that’s left to do, is to cut your brand-spankin’ new business cards.
I am very excited to participate for the first time in the Silhouette Challenge Group Posting Event. Click on the links below to visit the projects shared by my Silhouette Challenge buddies:
Make Your Own “Rubber” Stamps by Coley’s Corner
Where Home Is: A Gift for a Military Family by Suburble
This Month’s Facebook Silhouette Challenge by Tanya’s Creative Space
3D Tea Gift Box Download by Creative Turn
File Cabinet Makeover by Super Sweet Life
Jewelry Box Creation by Joy & Gladness of Heart
Retro Chair Silhouette by Tried & True
Toddler Train T-Shirt by The Thinking Closet
First Silhouette Project! 3-2-1 Blastoff Shirt by de Jong Dream House
Placecard & Card Medley by An Elegant Touch
Using my Silhouette in the Shower (Bathroom Organization) by Whole New Leaf
Pretty & Personal Birthday Bundle by The House on Hillbrook
Linking up here


Wow, such a cool idea. I never thought of using Silhouette studio as a design program, but that would work really well. I love your design as well.
Thanks Laura! It’s amazing what can be made with the Silhouette Studio software!
Your cards look so professional. I know I’ve said this before… I need to get a Silhouette!
Well done! I don’t have any card yet, and it didn’t even occur to me to give them to my new best friends (aka, craft store employees!). Adding this to my to-do list!
Thanks Jen! I want to see yours when they’re done!
These are fabulous, Jeanie! And what a great idea to give them out. I always feel insanely shy talking about my blog, but sometimes I will and you’re so right, it does feel odd just jotting the url down. Love that they have your beautiful photo on them, so people can match the name to the face. Might be fun to add a QR tag for iphones too. :o)
Mel, thank you so much! Good idea to add a QR tag! I (shamelessly) handed these out at my yard sale this past Saturday : )
Holy awesomeness, Batman! Jeanie, these look AMAZING! What a resourceful project. This is just another great reminder that I need to get over my intimidation of print-and-cut and give it a go…you make it sound so easy-and-do-able. These really have such a professional look to them (I love the muted colors, rounded edges, and photo in the corner). Pinning like RIGHT NOW!
Thank you sooo much Lauren! I love print and cut, you just gotta try it!
Jeanie, what a great project. The colors are so soft. I totally love the print and cut feature!
Thank you so much Tanya. I love the print and cut feature of the Silhouette. The possibilities are endless!
Very cool! I really need one of those machines, you guys keep tormenting me with all of your cool projects 🙂 I feel so left out.
Thanks Lisa, and I agree – you must get one! 🙂 you will love it!
Fabulous idea! I’ve been waiting for there to be a free promo to get some business cards but this is a really cool idea to make a small set.
Thanks for sharing!
Thanks so much Beth!
This is a really cool idea! And I love the idea that someone else mentioned of adding a QR code! I love seeing the different ways that people use their Silhouette! We’ll be featuring this at Someday Crafts tomorrow 🙂
Hi Miranda! Thank you very much for the sweet comment and the feature!!!
This is just a great idea. I don’t know how many times I have thought the same thing. The scrap of paper just is an invitation to throw it out. The card on the other hand, is something that they are more likely to hang onto. Thanks for the great idea.
Thanks Lynne! Yes, now I can’t wait to hand them out….no more scrap paper!
This is definitely one of those “Why didn’t I think of that?!” moments! I ran out of business cards but need some immediately. Great way to fill the need until the replacements arrive!
I didn’t even think of that Vanessa….to make them when you run out and are waiting for the refill order! Thank you so much for stopping by and commenting!
Those are fabulous Jeanie! I need to get a Silhouette! 😉 They look very professional, love them. I just recently got my first set of business cards for my blog because I so agree, writing your blog name down on a piece of paper is not the most professional! (and exactly what I’d been doing too)
Sharing and Pinning!! Thanks so much for sharing on Project Inspire{d} 🙂
Nancy
Hi Nancy! I’m glad I wasn’t the only one handing out pieces of paper…sheesh, how embarassing, lol! And yes you need to get a Silhouette! ; ) Thank you so much for commenting, pinning and sharing!!!
Looks great! I’ve used my silhouette to make business cards for myself before too. I love it! I struggled to get the QR code on the back though and line it up with the front. When you figure that out, let me know!
Thanks Rachel! I’ll give it a try!
I never would have thought to make business cards with my Silhouette, but yours look fabulous. I’ve always wanted to do die-cut business cards in the shape of a speech bubble, since that’s part of my blog logo, but it was too expensive. But not with my Silhouette.
I love my Silhouette and have made so many things with it. (You can see some of my projects here: http://www.attagirlsays.com/?s=silhouette)
I’d love to hear more about the Silhouette Challenge. That sounds like something I’d love to be involved with the next go around. Did I just invite myself? Didn’t mean to be rude. It just sounds like a super-cool thing to be involved in.
Amy, a speech bubble would be perfect for your business cards! And we’d love to have you join us in the Silhouette Challenge group. To join, all you need to do is email thethinkingcloset {at} gmail {dot} com. I hope you join us and thank you so much for the kind comment!
I really have to get myself one of these Silhouette machines! These look amazing Jeanie!
I know, I don’t know what I did before I got one!
no way! What a great idea! I’d love for you to come link this up at the Weekly Creative Link Party that just went live this morning!
Smiles, Melanie
Reasons To Skip The Housework
The Weekly Creative Link Party
Thanks Melanie! I linked up!
These are great, Jeannie!
Hi, Jeanie! I love all that I already know that my CAMEO does, but there is sooo much more to learn – and this would one more thing! These cards are Amazing, and I look forward to following your tutorial and trying to make some in the near future, as the ones I have are almost all gone. Thanks!
Lynden
http://aneleganttouch-lynden.blogspot.com
https://www.facebook.com/pages/An-Elegant-Touch-/162889457132788
https://www.facebook.com/pages/Lyndens-Cookie-Lee-Jewelry/209062415911124
These are great – so professional!
Thank you Sharon!
What a great project idea! Thanks so much for sharing at All my Bloggy Friends – I can’t wait to see what you share this week!
Great idea…totally going make me some! Now I need to take a picture of myself that looks good. Haha.
That was the hardest part for me! Thanks for stopping by!
I will be now not constructive the spot where you are getting ones information, however excellent theme. My partner and i ought to invest a bit examining additional or maybe knowing far more. Appreciation for great information I was seeking this data in my objective.
Its such as you read my mind! You seem to understand soo much approximately this, like you wrote the
ebbook in itt or something. I believe that you just
can do wwith a few p.c. to drive the message home a bit, but instead oof that, that is wonderful blog.
A fantastic read. I’ll certainly be back.
my webpage – wedding card
Unquestionably believe that which you stated. Your favourite justification seemed to
be at the internet the simplest thing to take into accout of.
I say to you, I definitely get irked at the same time as people consider concerns that they plainly don’t know about.
You managed to hit the nail upon the top and outlined out the whole thing with no
need side effect , other folks can take a signal.
Will likely be again to get more. Thank you
Feel free to visit my site indian wedding invitation
Hmm it looks like your site ate my first comment (it was extremely long) so I guess I’ll just sum it up what
I wrote and say, I’m thoroughly enjoying your blog. I as well am an aspiring blog writer but I’m still new to everything.
Do you have any suggestions for rookie blog writers?
I’d genuinely appreciate it.
Hi, I happen to find your blog while searching for information on making business cards. Thank you, for the great information. I do have a quick question tho, after you’ve created the card, you said, “all that’s left do is cut out your cards”. How do I do that using my silhouette?
Thanks,
Patti
Hello,
I really need to invest in some cards before I travel again. Will deffo be using Moo.
Hello,These are all such cute and creative ideas for business cards. I really liked the transparent camera business card. What a great way to advertise for a photographer.
Thanks
Best Free Collection Modern Templates Business Cards Mockup Design
Cool idea, the silhouette design is neat. I’m just worried about the visibility. Is it okay if I add a silver stroke to the text? Thanks.
Thank you so much! I’m so happy you like them. I just love making things that I can keep and use myself.
It’s also worth noting that investing in real estate requires a significant amount of capital, whether through purchasing property outright or securing financing. As with any investment, it’s important to do thorough research and carefully consider the risks and potential rewards before making a decision. Belize Real Estate
Adding a personal touch to a card wallet makes it stand out from generic options. Whether it’s initials, a name, or a special message, the customization adds sentimental value and shows that you put thought into the gift. Personalised card wallet men
Include your name, title/company, contact details (phone, email, website), and optionally a QR code linking to your online profiles.
Stand out: Use bold colors, unique fonts, or a personal photo (optional) to reflect your brand or personality. how to fix my credit to buy a house
This tutorial is fantastic for anyone looking to create personalized business cards with a unique touch! DIY projects like this are not only cost-effective but also allow for so much creativity. For those who prefer to explore pre-made options or evaluate services before committing, I’d suggest checking out PissedConsumer. It’s a helpful resource for reading reviews about various businesses, ensuring you make informed decisions when shopping for professional services or supplies.
This DIY business card tutorial is really helpful and creative. Making custom cards with Silhouette is a smart way to save money and keep designs flexible. I believe Business is better for Job because personal branding with business cards can open many opportunities.
There are many programs available to help you organize your business, and one of them, precoro.com will sort out problems and automate the process of creating orders and sending them to suppliers, compare received goods with the order at the time of receipt, manage the supplier database and contracts with them, and provide you with other useful actions. This magical program, Precoro!