• Home
  • About
  • Contact
  • Partner
  • Privacy Policy
    • Facebook
    • Instagram
    • Pinterest
    • Twitter
    • YouTube

Create and Babble

  • DIY
    • Home Improvement
    • Upcycle
    • Furniture Makeovers
    • Build It
  • Craft
    • Silhouette
    • Sewing
    • Wedding DIYs
    • Seasonal
    • Gifts
  • Lifestyle
    • Bicyling
    • Travel
    • shopping

STAY UP TO DATE

Get the latest crafting and DIY tips, tricks and tutorials delivered straight to your inbox!

Burlap and Tulle Wreath

March 15, 2013

If you like it, please share it!Share on pinterest
Pinterest
Share on facebook
Facebook
Share on twitter
Twitter
Share on stumbleupon
Stumbleupon
Share on google
Google
Share on linkedin
Linkedin
Share on reddit
Reddit

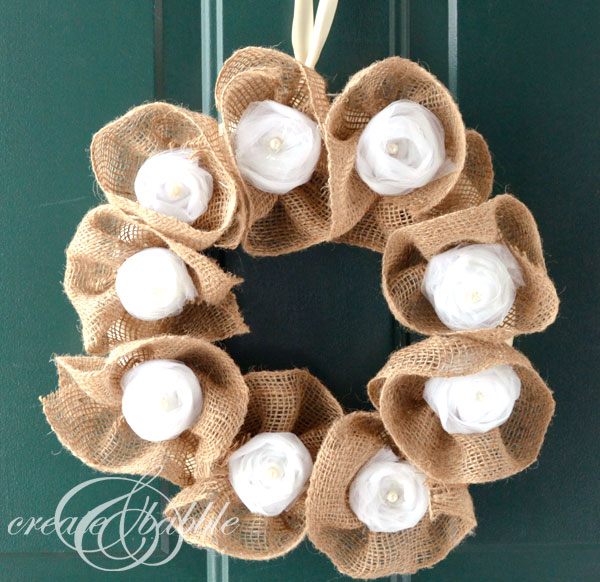
I’ve been in the middle of a DIY kitchen makeover for the past 10 days, but took some time out today to make this burlap and tulle wreath.

burlap-and-tulle-wreath-createandbabble

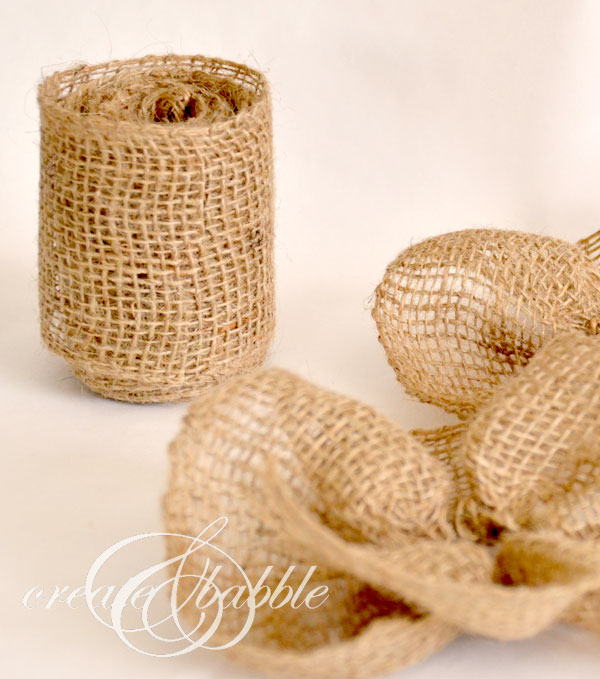
I have had this roll of burlap ribbon sitting on my desk for the last several weeks, taunting me. I got it in the last Pick Your Plum grab box. For weeks, I kept staring at that burlap wondering “what can I make with you?”. I tried wrapping it around a wreath form, but I wanted something different and more dimensional. Then finally an idea came to me last night, or I should say this morning at 2:00 am. No, it wasn’t keeping me up. I’ve been working second shift (3:30 pm to midnight) and was painting kitchen cabinets. I hope to show them to you soon. Back to the wreath.  I made these burlap  flowers and I’m really pleased with how they turned out. I’ll show you how I made them.

burlap-ribbon-wreath-createandbabble

Burlap Flowers

Materials:

  1. burlap ribbon
  2. scissors

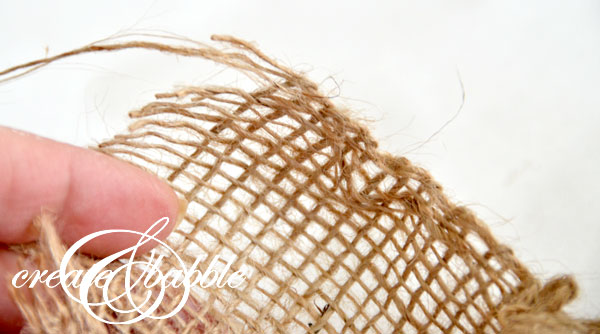
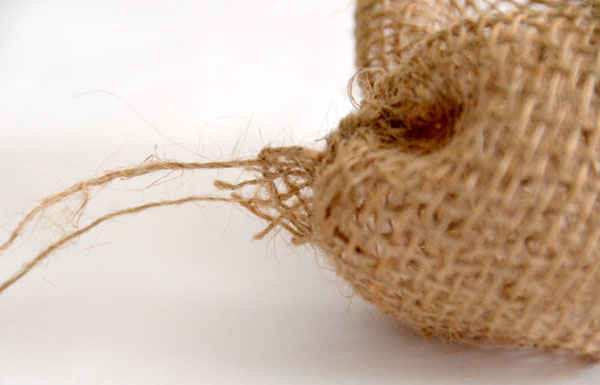
Cut a length of burlap ribbon to about 18″. Pull out and cut off two vertical burlap threads from each end. This will leave the ends fringy.

burlap-ribbon-wreath-createandbabble

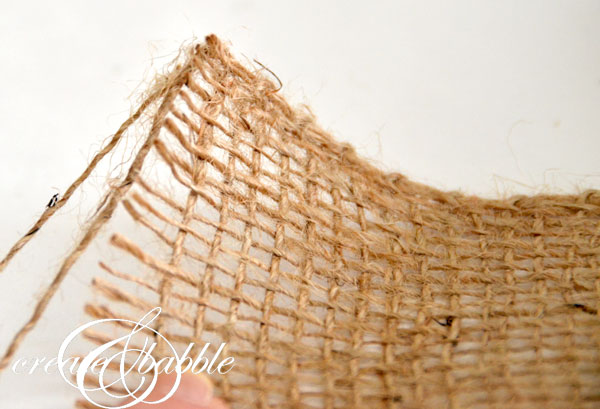
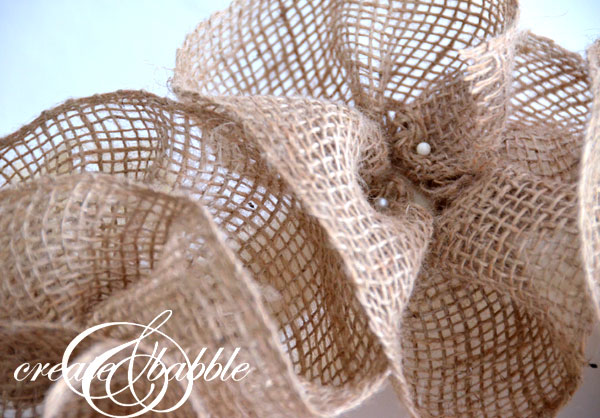
Now grab the third horizontal burlap string from the top and start gathering the ribbon along this thread. Gather until you reach the middle of the length of ribon. Do the same on the other end. It will look like the second photo below:

burlap-tulle-wreath-createandbabble

Tie the two ends together and cut off the excess strings.

burlap-tulle-wreath-createandbabble

Now you have  burlap flowers. Fast and easy, right?

Now onto the wreath:

I pinned the burlap flowers onto my foam wreath form – the one I used for Valentine’s Day. Since I used pearl head pins to make my wreaths, it was easy to remove the paper rosettes and attach the burlap ones. The form was already covered in ivory ribbon which works great with this project and saved time since I didn’t have to cover the form.

burlap-ribbon-flower-wreath-createandbabble

Next I made some rolled rosettes from leftover wedding tulle. I tried making the tulle rosettes the same I do for any other fabric: twist, roll, glue – you know the one. Well, that doesn’t work so great with tulle. Unless you don’t mind burning off the top layer of skin of your fingers. So here’s what I came up with and it works great!

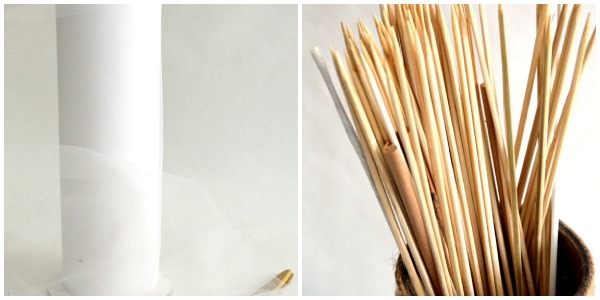
Rolled Tulle Rosettes on a Skewer

Materials:

  • bamboo skewers
  • glue gun
  • tulle (My tulle is the 9″ wide on spool kind from AC Moore)
  • pearls

burlap-tulle-wreath-createandbabble

Instructions:

  • Cut or break off a 2-3″ section of the pointy end of the skewer
  • Tie one end of the tulle to your now mini skewer – make sure it’s tight. (I didn’t measure and cut off a length of tulle because I didn’t know how much I’d need)
  • Start wrapping the bunched up tulle around and around the center knot, twisting along the way and adding tiny amounts of hot glue to secure.
  • Once your rosette is the desired size, cut the tulle and glue down the end.

Since the rosette is secured to a mini skewer, all you have to do is push that pointy end into the foam wreath! I hot-glued a pearl to the tip of the skewer that was showing.

burlap-tulle-wreath_createandbabble

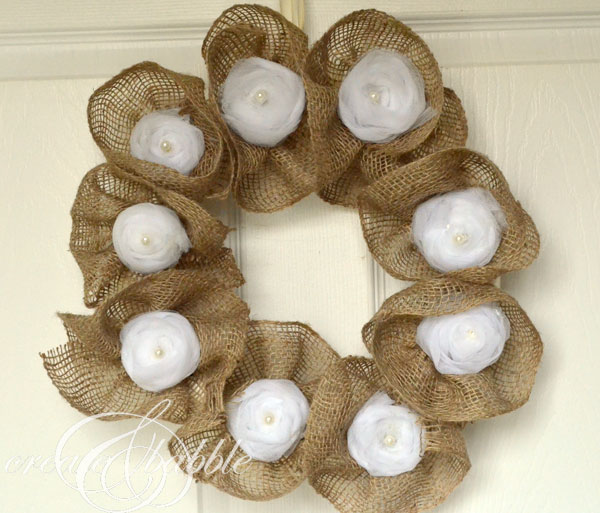
Finished and on the door.

burlap-and-tulle-wreath-createandbabble

To me, it’s a transitional wreath. Since it’s neutral, I can add more embellishments to match whatever season or holiday I want. For now, I think I’ll leave it as is. I really like the combination of burlap and tulle. How about you? Would you add color or bling? Or leave it as is?

burlap-and-tulle-wreath-createandbabble


Linking up here:

The Shabby Nest
See Vanessa Craft
Whipperberry


I Heart Nap Time

DIY Show Off
Keeping It Simple


nap-time creations
Home Stories A2Z
Featured here:

nap-time creations
If you like it, please share it!Share on pinterest
Pinterest
Share on facebook
Facebook
Share on twitter
Twitter
Share on stumbleupon
Stumbleupon
Share on google
Google
Share on linkedin
Linkedin
Share on reddit
Reddit

Filed Under: Home Decor, Tutorials

« Cookie Table
Kitchenaid Mixer Makeover {A DIY} »

Comments

  1. shabby chic life-silvia says

    March 15, 2013 at 5:16 pm

    Love it, very nice.

    Reply
  2. Consie @ Atop Serenity Hill says

    March 15, 2013 at 9:56 pm

    Definitely leave it as it is! I love the natural colors and the pearl is your bling!
    Popping in from Tatertots and Jello link party.

    Happy Weekend!

    Reply
    • Jeanie says

      March 15, 2013 at 10:12 pm

      Thanks Consie! I’ll take your advice!

      Reply
  3. Beverly says

    March 17, 2013 at 9:30 am

    I love these burlap flowers. I have some green burlap ribbon that has been starring at me, maybe it will become your burlap flowers.
    The wreath is fine just like it is – love the natural colors. It looks clean and fresh to me.
    Have a nice week,
    Bev
    @http://eclecticredbarn.blogspot.com

    Reply
    • Jeanie says

      March 18, 2013 at 2:13 pm

      Thanks Bev! Ooo, green burlap – that would make some pretty and spring-like flowers!

      Reply
  4. Megin says

    March 18, 2013 at 1:21 pm

    Jeanie
    So pretty! I just love burlap and lace together.
    I found you today at the I Heart Naptime Linky. I hope you can stop by my blog and leave a comment, too!
    ~ Megin of Vmg206
    http://www.vmg206.blogpsot.com

    Reply
    • Jeanie says

      March 18, 2013 at 2:14 pm

      Thanks for stopping by Megin!

      Reply
  5. Kelly @ View Along the Way says

    March 18, 2013 at 8:09 pm

    Beautiful! Loving the little tulle flowers. Thanks so much for linking up to Monday Funday!

    Reply
    • Jeanie says

      March 18, 2013 at 10:39 pm

      Thank you Kelly!

      Reply
  6. T'onna says

    March 18, 2013 at 9:36 pm

    Adorable wreath!!! I love the tulle flowers!

    Navy Wifey Peters @ Submarine Sunday Link Party
    http://www.usscrafty.blogspot.com/2013/03/submarine-sunday-23.html

    Reply
    • Jeanie says

      March 18, 2013 at 10:40 pm

      Thank you T’onna!

      Reply
  7. emily says

    March 19, 2013 at 10:15 am

    LOVE it!!! So perfect for spring, but like you said.. embellishments could make this wreath go for other holidays too. I host a Tuesday link party that I would love for you to join! http://www.nap-timecreations.com

    Reply
    • Jeanie says

      March 19, 2013 at 10:49 am

      Thank you Emily! I’ll go link up!

      Reply
  8. D@TheShadyPorch says

    March 20, 2013 at 10:12 pm

    HI Jeanie! I have a thing for wreaths and your caught my eye. I like the rosettes in wrapped burlap. I pinned it to my wreath board. I would love to have you share it at my party the Rock ‘N Share going on now.

    Reply
  9. emily says

    March 25, 2013 at 1:23 am

    So cute! I love it! You are being featured at this weeks tasteful tuesday party! Would love for you to put my featured button on this post! It will open 8:30 PM monday night. see you there! http://www.nap-timecreations.com/2013/03/tasteful-tuesday.html

    Reply
  10. Lori @ A Bright and Beautiful Life says

    March 26, 2013 at 1:40 pm

    Hi Jeanie. I thought I left you a comment when I saw your wreath last week. It is so lovely. A little bit rustic blended with a feminine touch. Today I saw it featured on the Naptime Creations link party. Congrats.

    Reply
  11. alice says

    January 9, 2020 at 10:49 am

    I totally agree with you that this wreath can be used all year round as it is a very versatile design. I love that you shared how to make it and going to pin it for later as I have lots of burlap at home but no tulle. I thought about buying some but then didn’t know what I would make with it. have you thought to make a how-to video for this?

    Reply

Trackbacks

  1. Domestically Speaking: Roundup of Spring Wreaths says:
    March 25, 2013 at 8:31 am

    […] Life Satin Flower Wreath, Architecture of a Mom Origami Wreath, Opulent Cottage Gingham Wreath, Create and Babble Burlap and Tulle Wreath, A Pretty Life in the Suburbs Yarn Wreath, House of Rose Easter Egg Wreath,  Love of Family and […]

    Reply
  2. 70 Gorgeous DIY Wreaths says:
    September 26, 2013 at 6:00 am

    […] Burlap and Tulle Wreath from Create and Babble […]

    Reply
  3. 70 DIY Wreaths - Do Small Things with Love says:
    September 26, 2013 at 7:25 am

    […] Burlap and Tulle Wreath from Create and Babble […]

    Reply
  4. 3plumbing says:
    January 12, 2022 at 8:32 pm

    2capillary

    Reply
  5. Lots of Fabulous Spring Wreaths - Domestically Speaking says:
    January 29, 2023 at 1:27 am

    […] Life Satin Flower Wreath, Architecture of a Mom Origami Wreath, Opulent Cottage Gingham Wreath, Create and Babble Burlap and Tulle Wreath, A Pretty Life in the Suburbs Yarn Wreath, House of Rose Easter Egg Wreath,  Love of Family and […]

    Reply

Leave a Reply Cancel reply

Your email address will not be published. Required fields are marked *

About Jeanie

About Jeanie

Welcome to Create & Babble. This is where I share my loves: crafting, hiking and camping

Read more about me here

Categories

Archives

AntiqueFarmHouse
Zots Craft Adhesive Dots

Amazon Associates Disclosure

Jeanie Hevener Emmert is a participant in the Amazon Services LLC Associates Program, an affiliate advertising program designed to provide a means for sites to earn advertising fees by advertising and linking to amazon.com.


hobby lobby

Copyright © 2025 · Site by Pretty Pink Studio

Copyright © 2025 · Glam Theme on Genesis Framework · WordPress · Log in

This website uses cookies to improve your experience. We'll assume you're ok with this, but you can opt-out if you wish.Accept Reject Read More
Privacy & Cookies Policy

Privacy Overview

This website uses cookies to improve your experience while you navigate through the website. Out of these, the cookies that are categorized as necessary are stored on your browser as they are essential for the working of basic functionalities of the website. We also use third-party cookies that help us analyze and understand how you use this website. These cookies will be stored in your browser only with your consent. You also have the option to opt-out of these cookies. But opting out of some of these cookies may affect your browsing experience.
Necessary
Always Enabled
Necessary cookies are absolutely essential for the website to function properly. This category only includes cookies that ensures basic functionalities and security features of the website. These cookies do not store any personal information.
Non-necessary
Any cookies that may not be particularly necessary for the website to function and is used specifically to collect user personal data via analytics, ads, other embedded contents are termed as non-necessary cookies. It is mandatory to procure user consent prior to running these cookies on your website.
SAVE & ACCEPT