• Home
  • About
  • Contact
  • Partner
  • Privacy Policy
    • Facebook
    • Instagram
    • Pinterest
    • Twitter
    • YouTube

Create and Babble

  • DIY
    • Home Improvement
    • Upcycle
    • Furniture Makeovers
    • Build It
  • Craft
    • Silhouette
    • Sewing
    • Wedding DIYs
    • Seasonal
    • Gifts
  • Lifestyle
    • Bicyling
    • Travel
    • shopping

STAY UP TO DATE

Get the latest crafting and DIY tips, tricks and tutorials delivered straight to your inbox!

How to Make Fabric Silverware Christmas Stocking Holders with Cricut Maker

December 10, 2017

If you like it, please share it!Share on pinterest
Pinterest
Share on facebook
Facebook
Share on twitter
Twitter
Share on stumbleupon
Stumbleupon
Share on google
Google
Share on linkedin
Linkedin
Share on reddit
Reddit

Hello Friends! I am so excited about today’s post. Ever since I got my Cricut Explore Air 2 and then the Cricut Maker, I have been wanting to do a monthly blog group challenge-type post with some of my fellow Cricut-loving blogging friends. I asked Michelle from Weekend Craft to co-host this monthly event with me. We think these type of posts give you, our wonderful readers, lots of ideas and inspiration.

Craft & Create with Cricut

So here we are! Our inaugural Create & Craft With Cricut group event! Welcome and enjoy the ideas from this very talented group of bloggers. We have some great ideas in store for you. Today we are focusing on Christmas of course. There are lots of Christmas creations to get your Cricut creative juices flowing!

How to Make a Christmas Stocking Utensil Holder with Cricut Maker

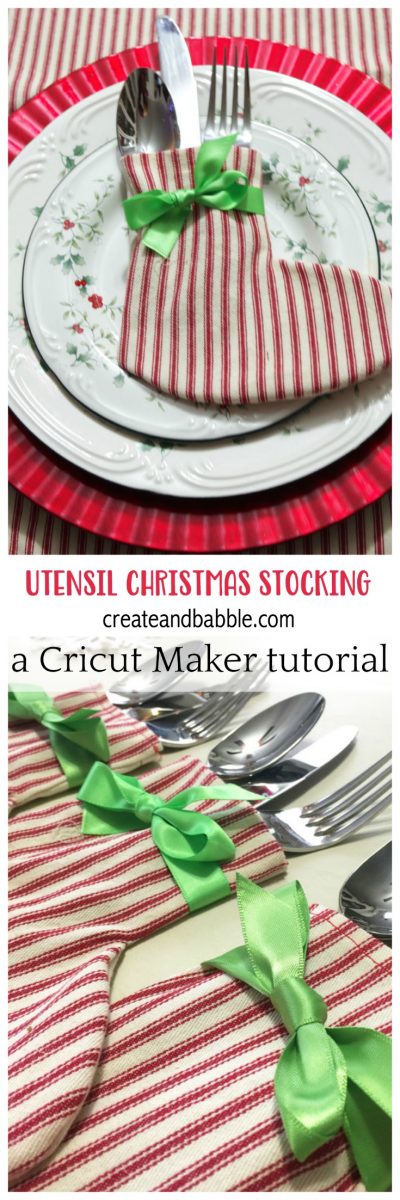
I had so many Christmas project ideas that I wanted to share but ultimately decided on these cute and useful Fabric Silverware Christmas Stocking holders. I made these stockings with my Cricut Maker, but if you don’t have a Maker yet, don’t worry, you can still make them! The Maker just makes it go faster!

The supplies I used to make the utensil Christmas Stocking holders:

  • Cricut Maker
  • fabric for stockings
  • ribbon
  • chipboard
  • sewing machine
  • thread
  • scissors
  • iron

Step One – Cut out stocking shapes

I designed the stocking shape and chipboard insert in Design Space. Here’s a link to that design.

How to Make a Christmas Stocking Utensil Holder with Cricut Maker

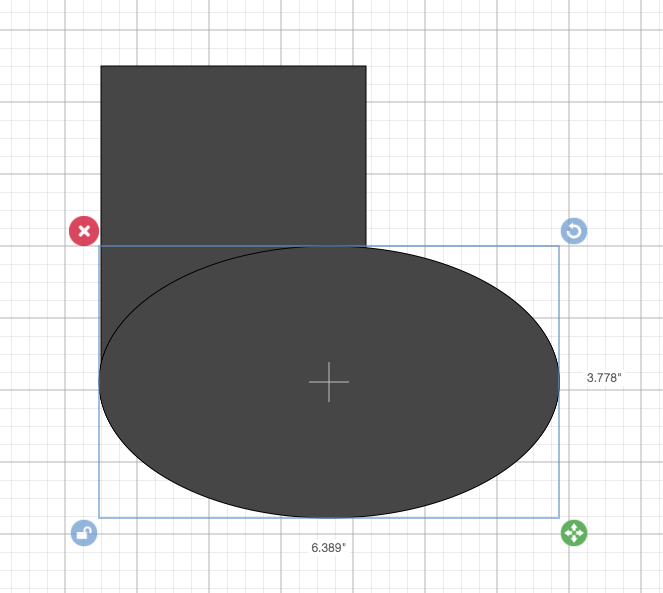
The shape was very easy to make. I just welded together a rectangle and an oval. That’s it!

How to Make a Christmas Stocking Utensil Holder with Cricut Maker

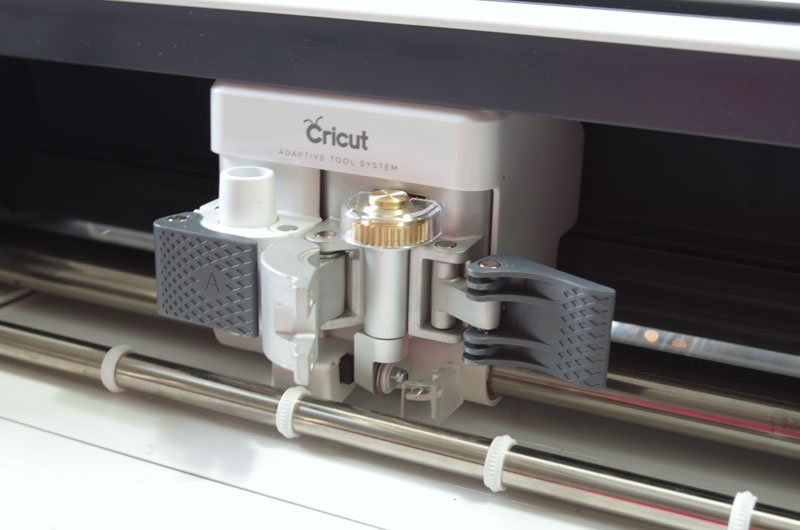
The photo above shows the fabric rotary blade inserted.

How to Make a Christmas Stocking Utensil Holder with Cricut Maker

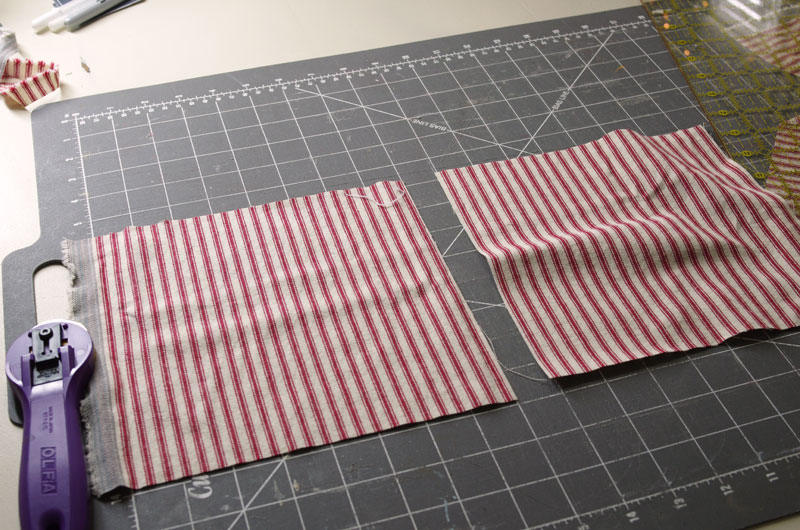
First cut the fabric into rectangles to fit onto the cutting mats. I used a rotary cutter and cutting mat.

How to Make a Christmas Stocking Utensil Holder with Cricut Maker

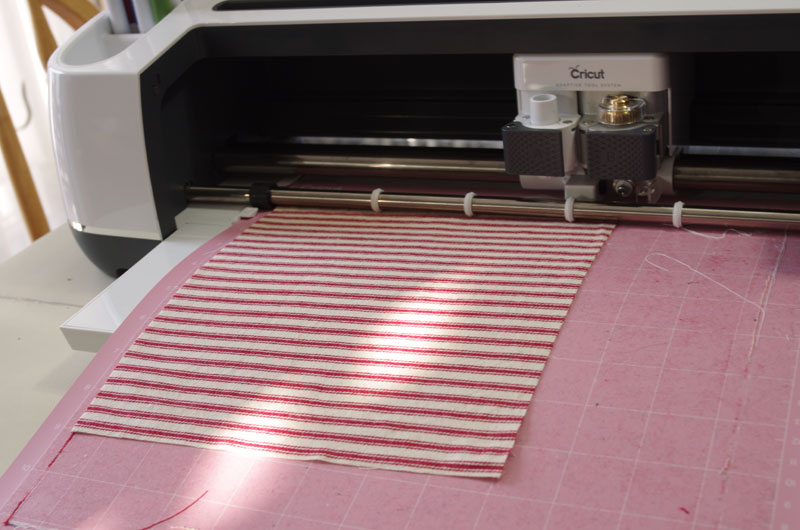
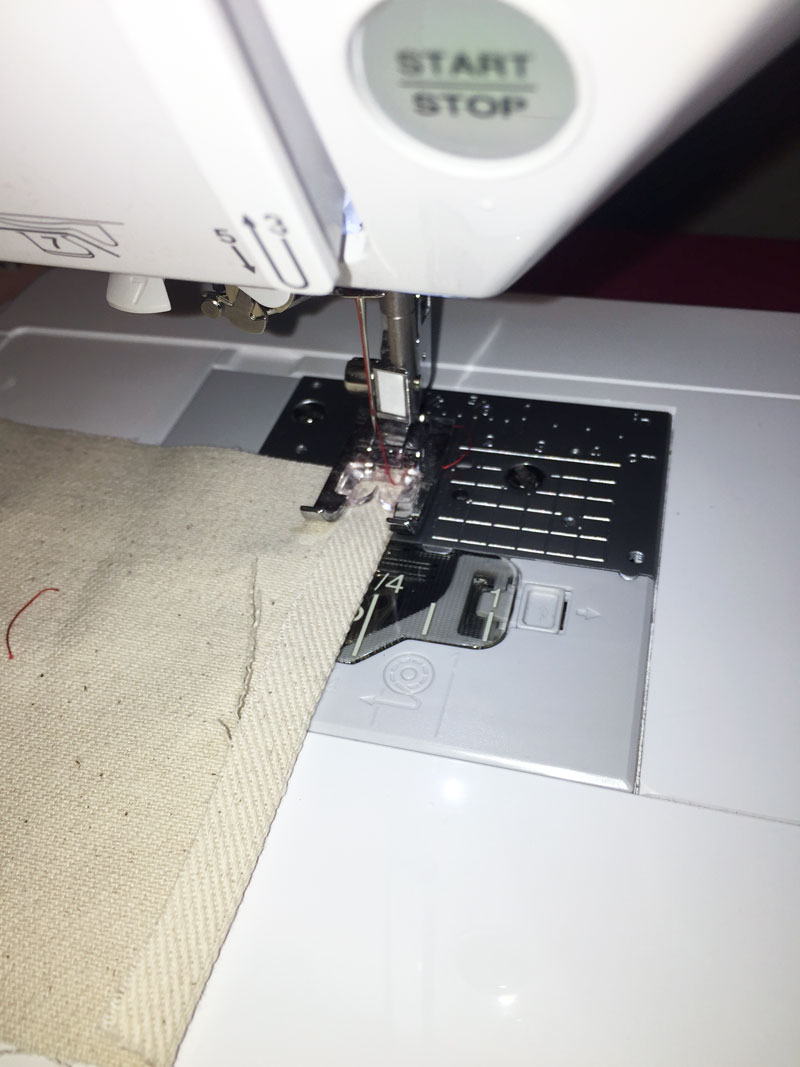
Then attach the fabric to the pink fabric mat and insert into the Maker. The Maker cuts through the fabric like butter! It really does. I showed it cutting on a Facebook Like video last week.

How to Make a Christmas Stocking Utensil Holder with Cricut Maker

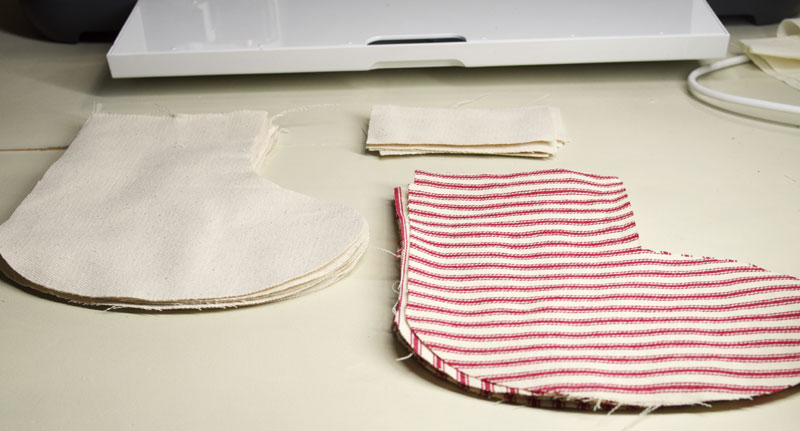
Here are the pieces for my stockings. (Ignore the rectangles above the right stocking shapes. I was going to use them but decided against it and used ribbon instead.) You’ll see what I mean later in the tutorial.

How to Make a Christmas Stocking Utensil Holder with Cricut Maker

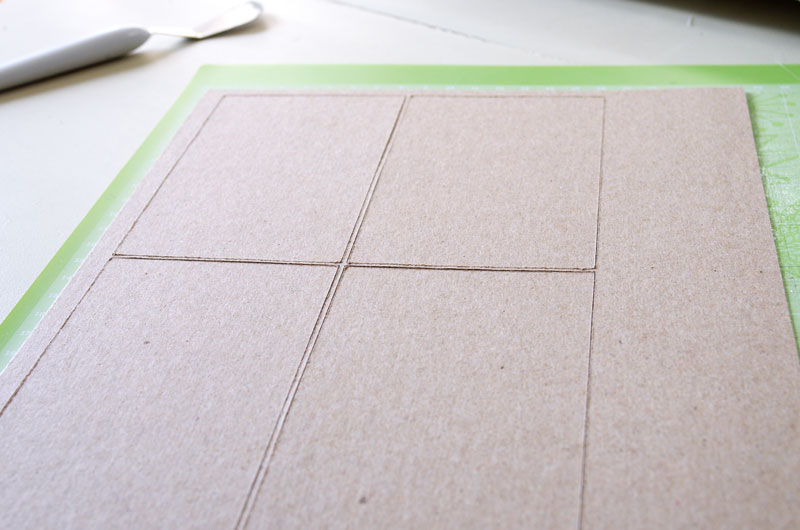
Next, cut the chipboard. The chipboard rectangles are inserted into each finished stocking to add stability.

Step Two – Sew stockings together

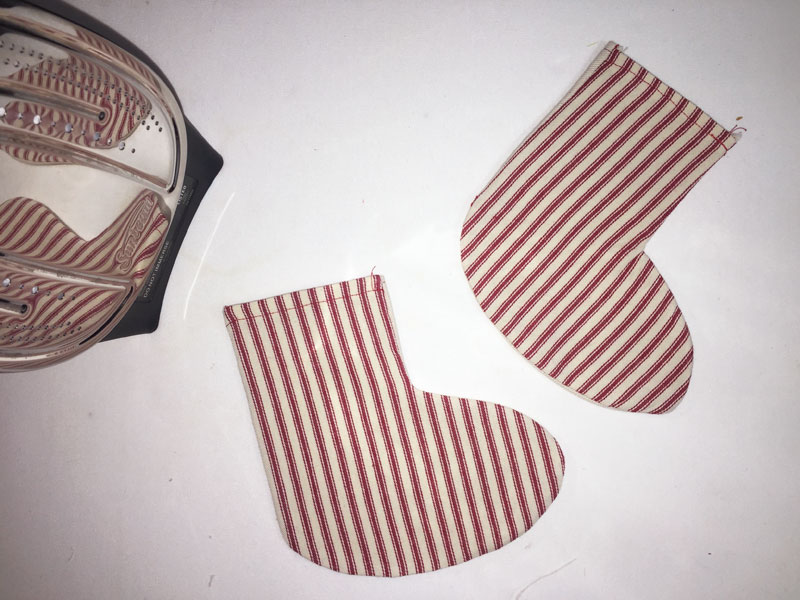
Before you sew the front and back of the stockings together, hem the top edges first.

How to Make a Christmas Stocking Utensil Holder with Cricut Maker

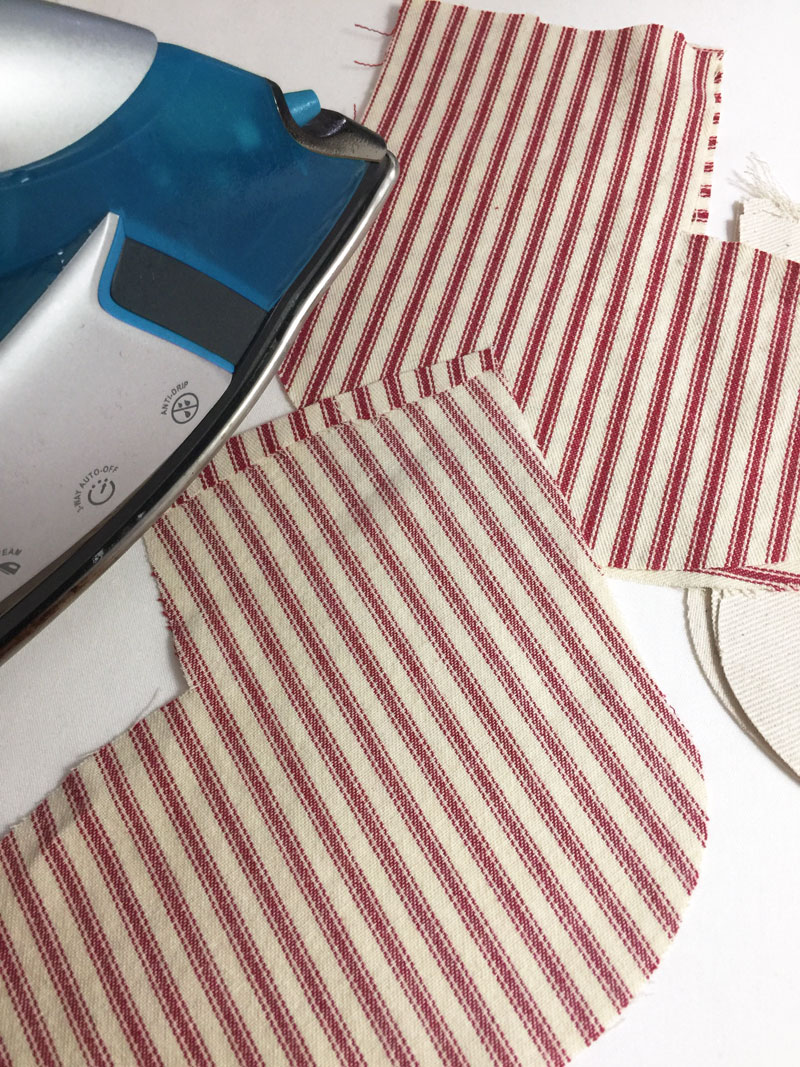
For the top hem, you should really turn twice, press, then stitch. I was lazy (and in hurry) so I only turned the fabric once. My home ec teacher mom would not have approved!

How to Make a Christmas Stocking Utensil Holder with Cricut Maker

Or, if you don’t want to sew that top hem, you could also use an iron-on tape.

How to Make a Christmas Stocking Utensil Holder with Cricut Maker

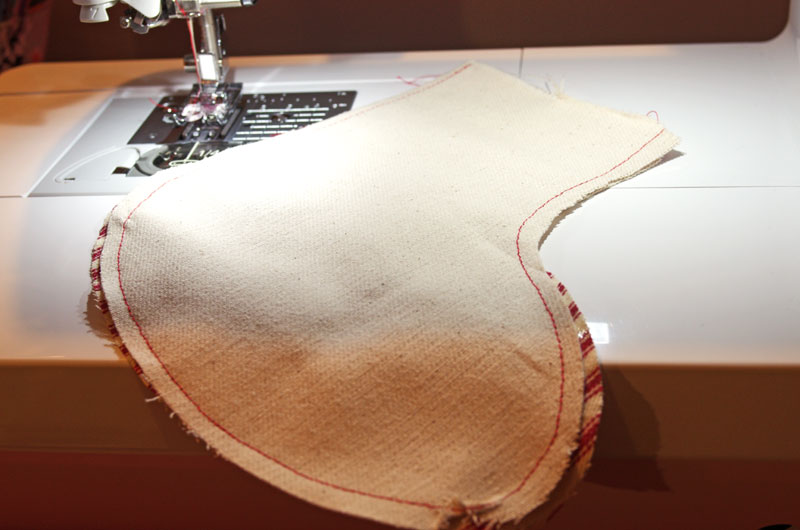
Now it’s time to sew the front to the back. With right sides together sew the pieces together with a 1/2″ seam allowance.

How to Make a Christmas Stocking Utensil Holder with Cricut Maker

Press to set the seam, trim seam allowance, clip the curves, then turn right side out. Press again. Trim any loose threads.

How to Make a Christmas Stocking Utensil Holder with Cricut Maker

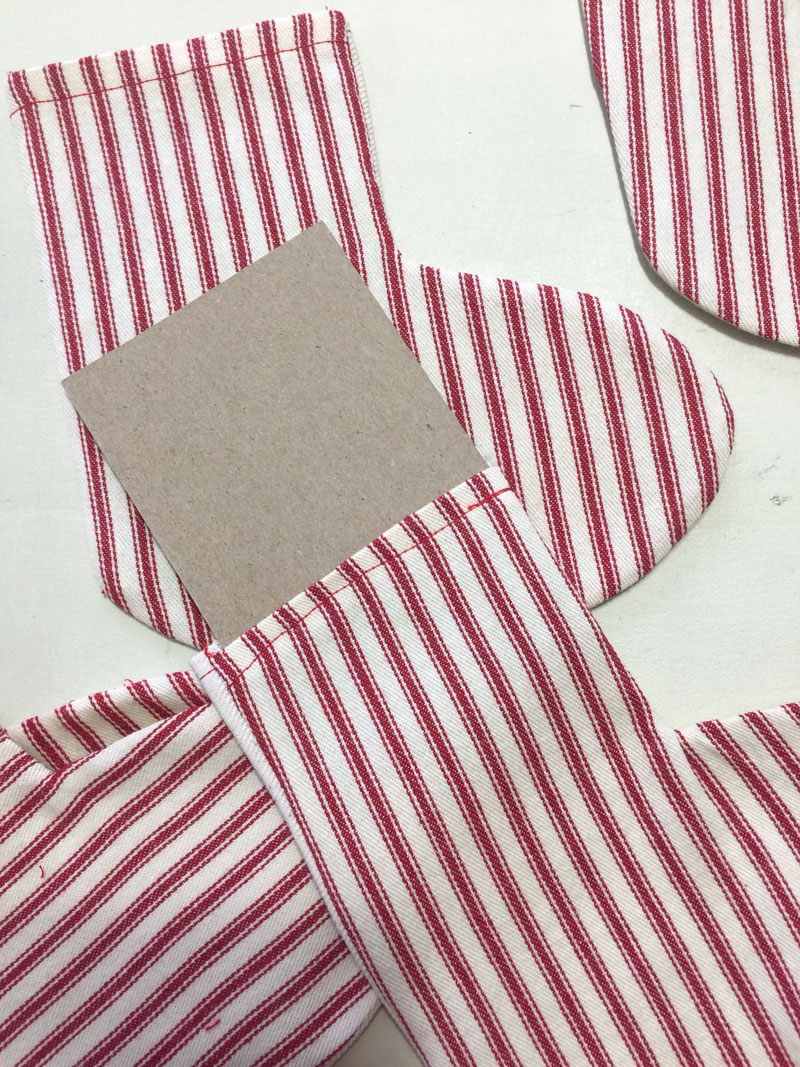
Now you can insert the chipboard pieces, your flatware, and then tie a ribbon around it.

How to Make a Christmas Stocking Utensil Holder with Cricut Maker

How cute!

You could even take this a step further and use that rectangle piece as a name tag on each stocking. I was even thinking about cutting out each guest’s name in heat transfer vinyl but I ran out of time. Maybe next year!

How to Make a Christmas Stocking Utensil Holder with Cricut Maker

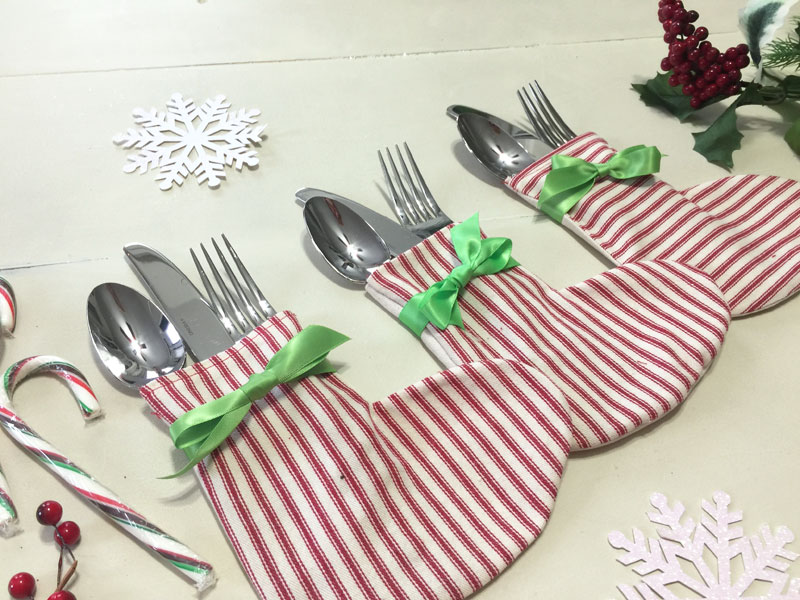
I am very pleased with how these turned out and they really didn’t take long to make.

The advantage to using the Maker to cut out these shapes is that the shapes are EXACTLY the same. If you are a sewist, you know how important that is. Espcially for small projects such as this. Which is precisely why I bought the Maker. It is impossible to get two pieces cut out by hand exactly the same.

How to Make a Christmas Stocking Utensil Holder with Cricut Maker

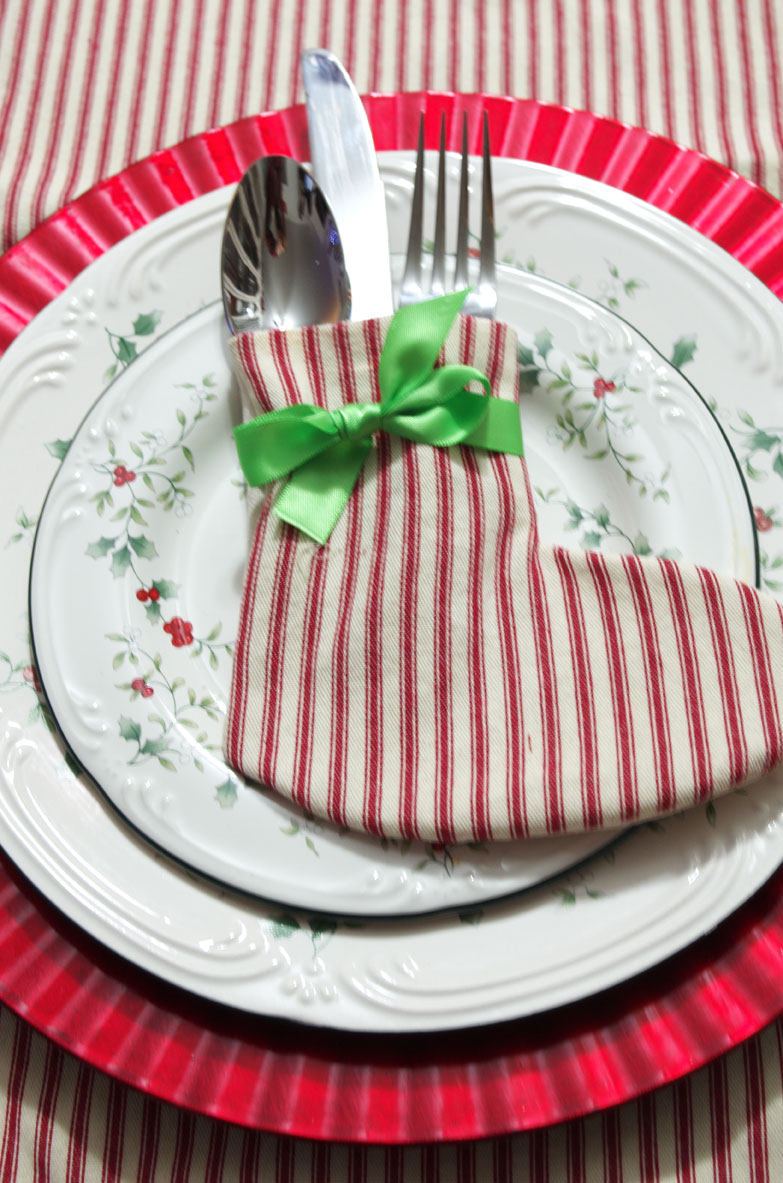
Be sure to read about the rest of the place setting here.

If you like this Cricut project, you may also like the following:

over sized wooden magnetic christmas ornament

Oversized Magnetic Refrigerator Ornament

DIY Christmas Serving Tray

Farmhouse Christmas Serving Tray

Rae Dunn-inspired Ornaments

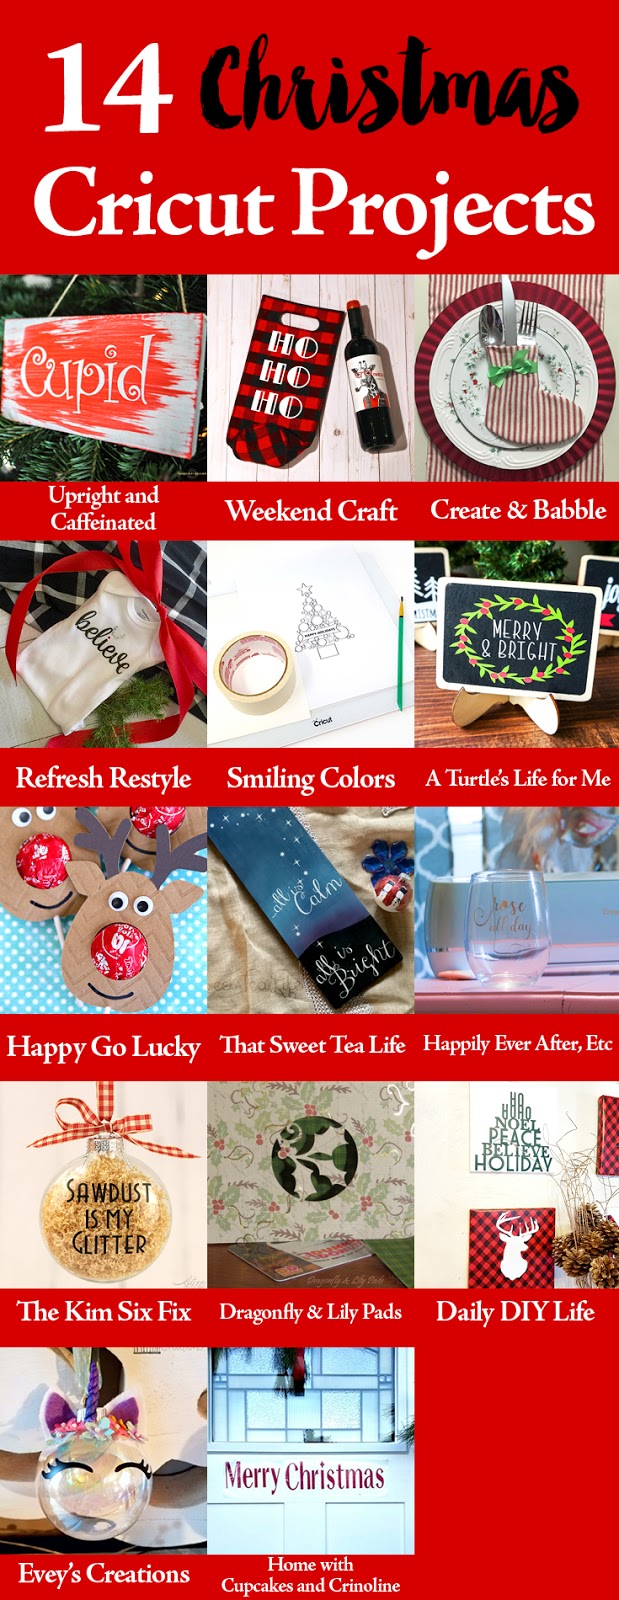
Now let’s see what my friends have made! (Simply click on the names in the image below to be taken to their Christmas project)

Reindeer Names Christmas Ornaments DIY HTV Christmas Wine Gift BagHow to Make Fabric Silverware Christmas Stocking Holders with Cricut MakerChristmas Baby OnsieDIY Watercolor CardsReindeer LollipopsHow to Create Simple Christmas Plank ArtDIY Christmas Chalkboard SignsQuick and Easy Holiday Gift Idea: Sassy DIY Wine GlassesSawdust is My Glitter OrnamentsChristmas Gift CardsFestive and Easy Buffalo Plaid Holiday Wall ArtUnicorn Ornament TutorialMerry Christmas Welcome
If you like it, please share it!Share on pinterest
Pinterest
Share on facebook
Facebook
Share on twitter
Twitter
Share on stumbleupon
Stumbleupon
Share on google
Google
Share on linkedin
Linkedin
Share on reddit
Reddit

Filed Under: Christmas, Crafts, Cricut, Seasonal

« Christmas Table Setting
How to Decorate a Small Front Stoop for Christmas »

Comments

  1. Michelle from Weekend Craft says

    December 10, 2017 at 10:19 am

    OMGosh you are making me want a Maker. I can’t believe it cuts the fabric without any backing and that easily! Thank you so much for wanting to co-organize this Cricut monthly challenge with me. I am so pleased with the turn out and everyone’s projects. I cannot wait for next months. Happy Holidays!

    Reply
  2. vivienne westwood perfume says

    January 9, 2019 at 11:03 am

    I am going to go ahead and bookmark this article for my brother for their study project for class. This is a beautiful web page by the way. Where did you pick up the template for this web page?
    vivienne westwood perfume http://www.viviennewestwoodesale.com

    Reply

Trackbacks

  1. Merry Christmas Welcome with Cricut ⋆ Home with Cupcakes and Crinoline says:
    December 10, 2017 at 8:14 am

    […] the month? Click each name below to get the details: Upright and Caffeinated | Weekend Craft | Create & Babble Refresh Restyle | Smiling Colors | A Turtle’s Life for Me Happy Go Lucky | That Sweet […]

    Reply
  2. Reindeer Names Ornaments Using a Cricut - Upright and Caffeinated says:
    January 16, 2018 at 9:38 am

    […] and Caffeinated | Weekend Craft | Create & Babble Refresh Restyle | Smiling Colors | A Turtle’s Life for Me Happy Go Lucky | That Sweet […]

    Reply
  3. How to Create Simple Christmas Plank Art – That Sweet Tea Life says:
    March 5, 2018 at 1:08 pm

    […] Upright and Caffeinated | Weekend Craft | Create & Babble […]

    Reply
  4. How to Make Felt Flowers Using Cricut Maker - Create and Babble says:
    August 12, 2018 at 11:52 am

    […] made using felt flowers. I have also used the Cricut Maker in the past to make fabric coasters and silverware holders. Both of those articles have thorough, step-by-step instructions on how to cut fabric using the […]

    Reply
  5. Christmas Cricut Projects Every Crafter Needs to Make! - Leap of Faith Crafting says:
    September 16, 2018 at 3:39 pm

    […] Check out these cute silverware holders from Create and Babble […]

    Reply
  6. Halloween Crafts Made with Cricut Maker - Create and Babble says:
    September 19, 2018 at 5:30 pm

    […] projects. While I’ve used the rotary blade for fabric projects in the past (here and here), this is the first time I’ve used the scoring wheel and it won’t be the last! […]

    Reply
  7. DIY Sign Christmas Blended Paint Art • That Sweet Tea Life says:
    September 24, 2018 at 11:43 am

    […] Upright and Caffeinated | Weekend Craft | Create & Babble […]

    Reply
  8. Why you NEED a Cricut Maker - Create and Babble says:
    October 17, 2018 at 4:49 pm

    […] a Cricut Maker. Have you seen any of the fabric projects that I have made during the past year? Christmas Stockings, Heart Coasters, Halloween Coasters, and my favorite: Felt Flowers on a […]

    Reply
  9. DIY Holiday Home Decor with Cricut - Cozy Traditional Home says:
    December 1, 2018 at 6:01 am

    […] Christmas Stocking Utensil Holders | Create & Babble […]

    Reply
  10. DIY Christmas Table Runner - Create and Babble says:
    December 5, 2018 at 7:48 pm

    […] be bring out the utensil Christmas Stocking holders that I made last year with the Cricut Maker! These stockings were one of the first projects I made […]

    Reply
  11. DIY HTV Christmas Wine Gift Bag - Weekend Craft says:
    June 12, 2020 at 8:44 pm

    […] and Caffeinated | Weekend Craft | Create & Babble Refresh Restyle | Smiling Colors | A Turtle’s Life for Me Happy Go Lucky | That Sweet Tea […]

    Reply
  12. 1benchmark says:
    January 12, 2022 at 8:12 pm

    2immeasurable

    Reply
  13. DIY Christmas Baby Onesie - Refresh Restyle says:
    March 7, 2023 at 8:14 pm

    […] and Caffeinated | Weekend Craft | Create & Babble Refresh Restyle | Smiling Colors | A Turtle’s Life for Me Happy Go […]

    Reply

Leave a Reply Cancel reply

Your email address will not be published. Required fields are marked *

About Jeanie

About Jeanie

Welcome to Create & Babble. This is where I share my loves: crafting, hiking and camping

Read more about me here

Categories

Archives

AntiqueFarmHouse
Zots Craft Adhesive Dots

Amazon Associates Disclosure

Jeanie Hevener Emmert is a participant in the Amazon Services LLC Associates Program, an affiliate advertising program designed to provide a means for sites to earn advertising fees by advertising and linking to amazon.com.


hobby lobby

Copyright © 2025 · Site by Pretty Pink Studio

Copyright © 2025 · Glam Theme on Genesis Framework · WordPress · Log in

This website uses cookies to improve your experience. We'll assume you're ok with this, but you can opt-out if you wish.Accept Reject Read More
Privacy & Cookies Policy

Privacy Overview

This website uses cookies to improve your experience while you navigate through the website. Out of these, the cookies that are categorized as necessary are stored on your browser as they are essential for the working of basic functionalities of the website. We also use third-party cookies that help us analyze and understand how you use this website. These cookies will be stored in your browser only with your consent. You also have the option to opt-out of these cookies. But opting out of some of these cookies may affect your browsing experience.
Necessary
Always Enabled
Necessary cookies are absolutely essential for the website to function properly. This category only includes cookies that ensures basic functionalities and security features of the website. These cookies do not store any personal information.
Non-necessary
Any cookies that may not be particularly necessary for the website to function and is used specifically to collect user personal data via analytics, ads, other embedded contents are termed as non-necessary cookies. It is mandatory to procure user consent prior to running these cookies on your website.
SAVE & ACCEPT