


Remember when I updated the craft room? And I made a shutter for the window? I said back then that I would write about that shutter. I never did. Well I made two more of those shutters. The Power Tool Challenge theme for this month is Home Improvement so it’s seems like the perfect time to show you how to make indoor shutters.
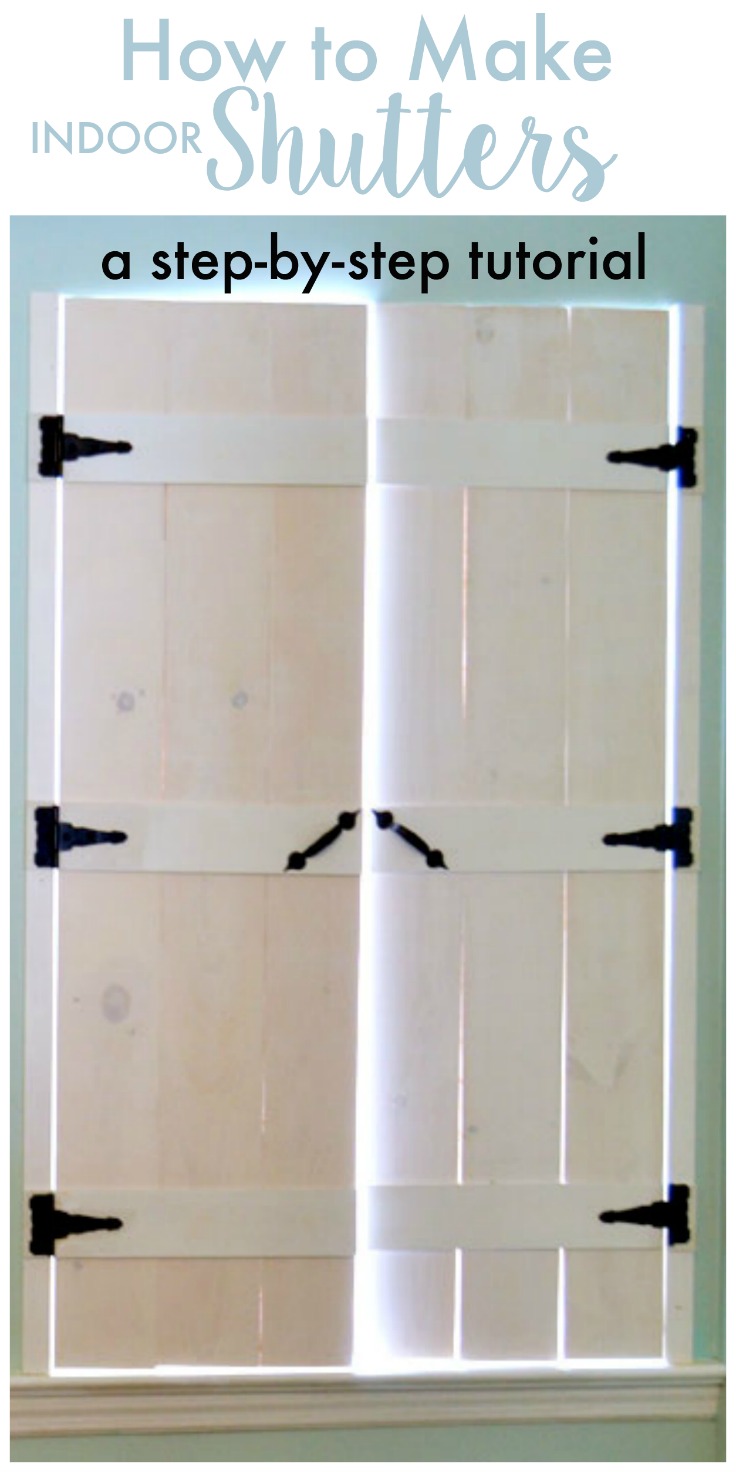
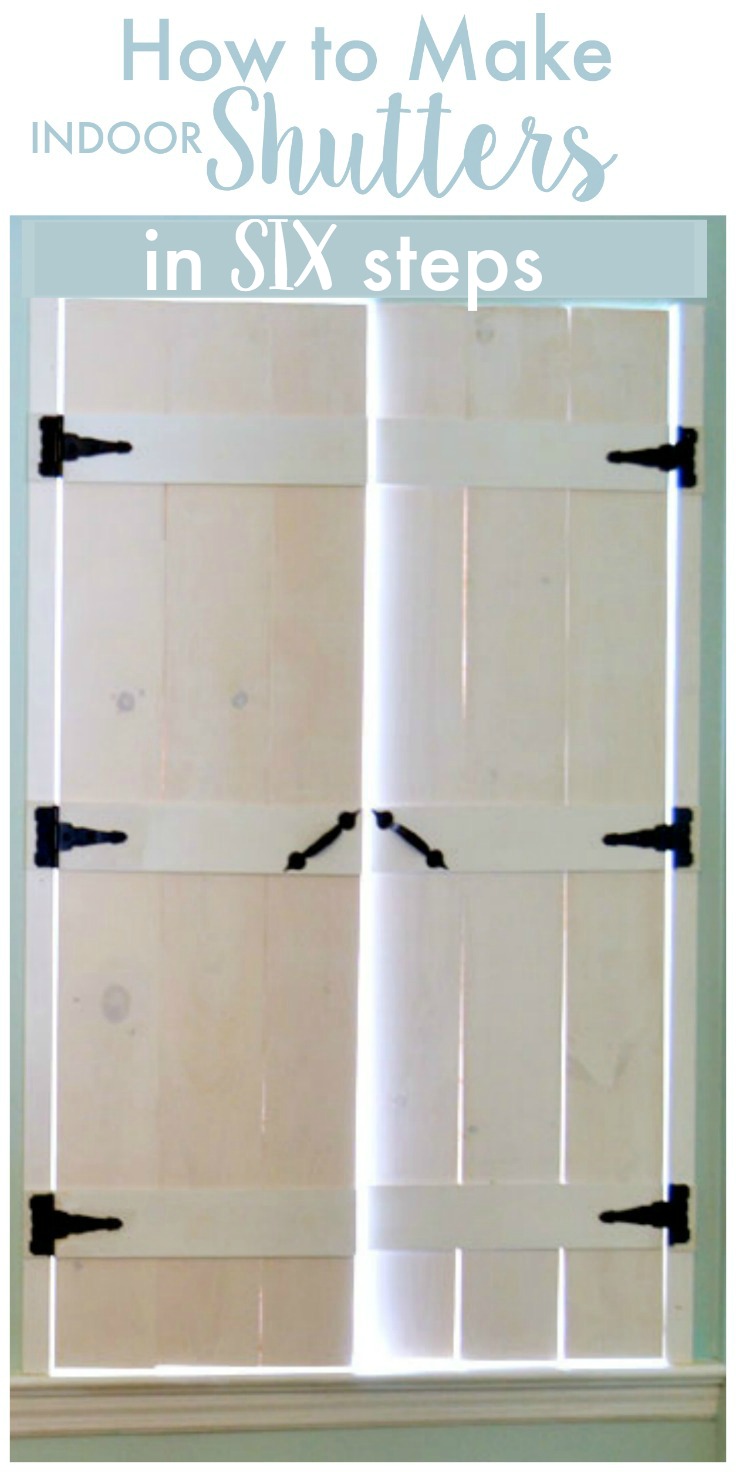
How to Make Indoor Shutters
Materials Used (affiliate links included):
- wood boards (I used 1 x 2’s for the end frames, 1 x 6’s for the actual shutters, and 1/4″ x 4″ x 48″ hobby boards for the braces)
- wood filler
- wood glue
- tee hinges
- drill/driver
- drill bits
- brad nailer
- paint
- small paint roller
- stir stick
- sanding sponge
- table saw
- miter saw
- measuring tape
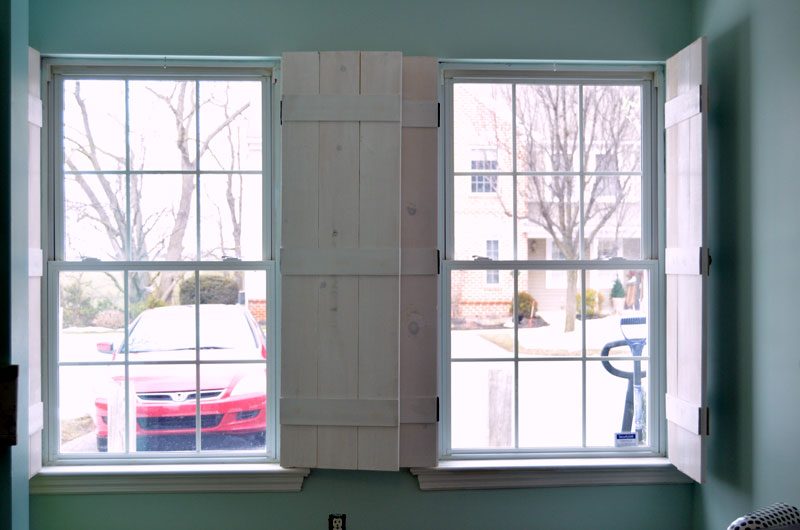
Step One – Measure window
My window measured 56″ tall x 33″ wide. This meant that each of my shutters needed to be 56″ tall. Since the width measured 33″ half of that is 16-1/2″. I subtracted a half inch to allow for clearance on each side of the shutter: on the hinge side and also where it meets the other shutter in the middle.
Okay, so the 56″ tall is easy enough. My 1 x 2″ boards and 1 x 6’s boards needed to be cut to 56″.
But how many 1 x 6’s would I need for each shutter? Since 1 x 6’s are actually 5-1/2 inches, 3 of them together side-by-side would measure 16-1/2″. This would be perfect if I didn’t want to swing open the shutters. I would need to cut 1/2″ off of the width of one of the 1 x 6’s to allow for clearance for each side of the shutter.
Step Two – Cut the wood (keep in mind that I have two windows)
I cut four 1 x 2’s to 56″. These are the side rails or frames that the shutters will be attached to.
I used my table saw to cut 1/2″ off of the width of four 56″ long 1 x 6’s.
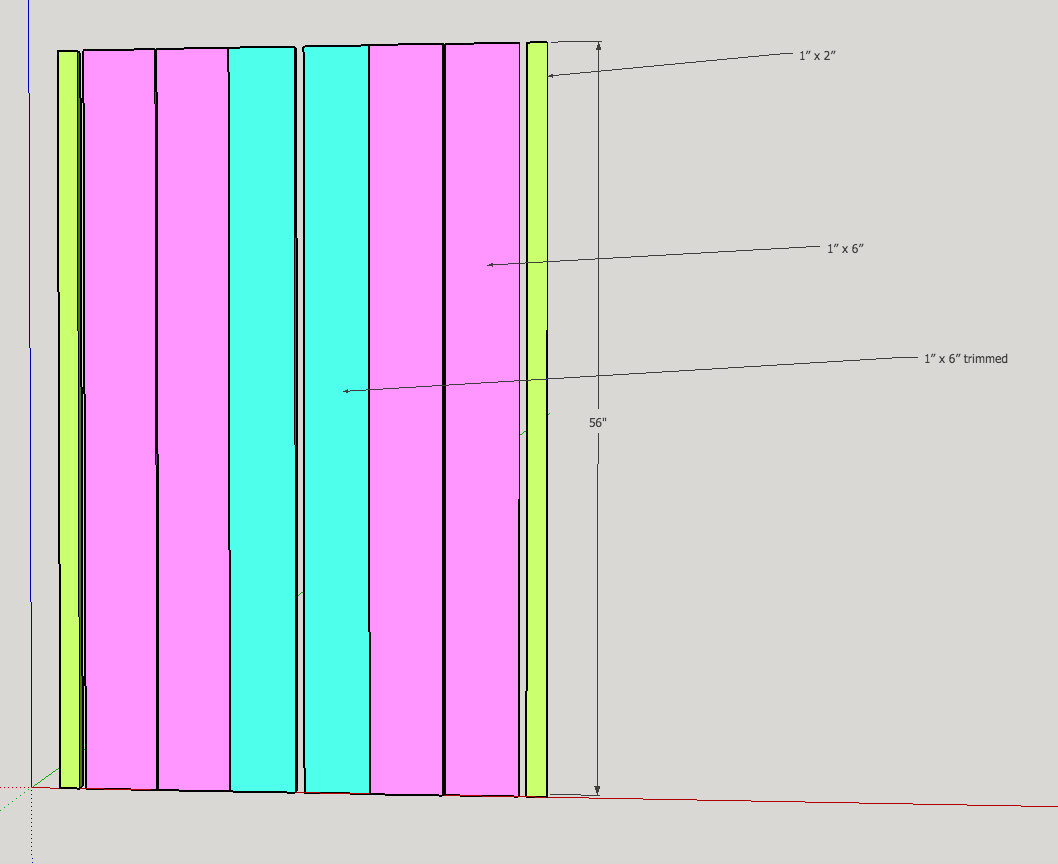
I cut 16″ lengths of the hobby boards for the braces. I also cut 1-1/2 lengths of the hobby boards for the ends of the braces that are on the frames.
Step Three – Paint the wood
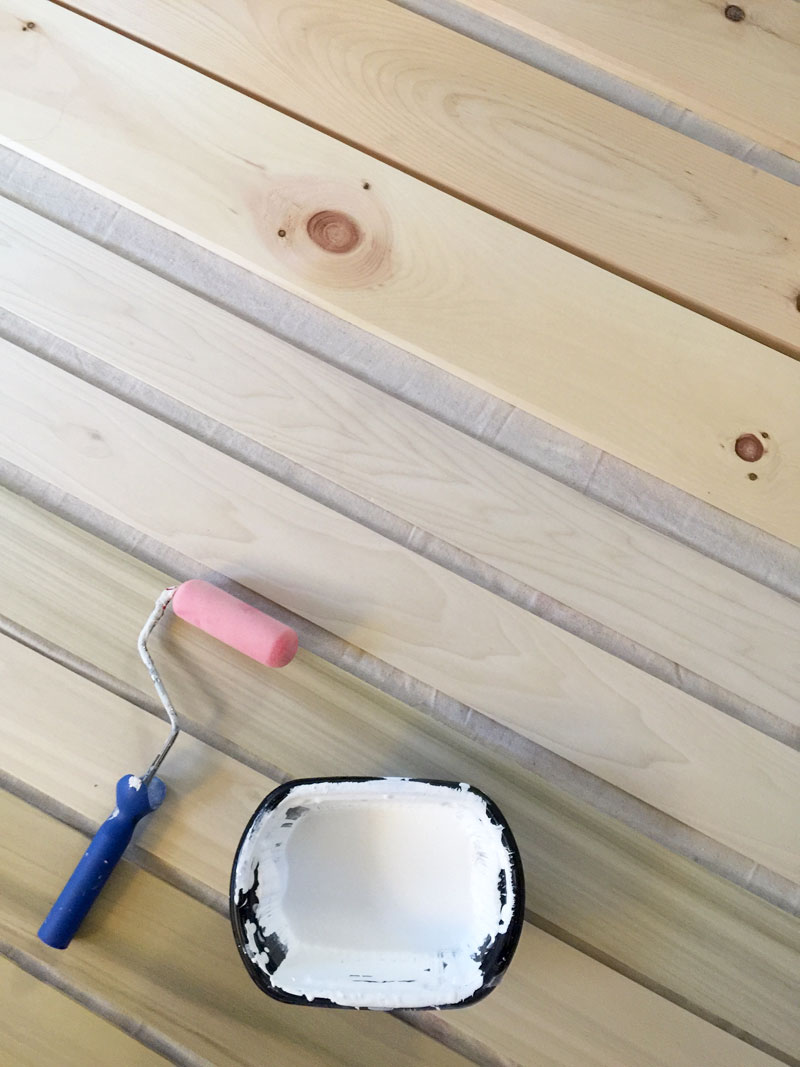
Painting the boards before assembling will save time and headaches. Trust me ; ) By the way, to get the white wash appearance that I used, just water down white paint and only apply one coat. It’s that easy!
Step 4 – Attach the frame
Attach a 1 x 2 to the each side of the window opening.

I used my brad nailer with 1-1/4″ nails to attach the 1 x 2’s to the wall.
Assemble the shutters

My boards are all painted, dry, and ready to assemble.
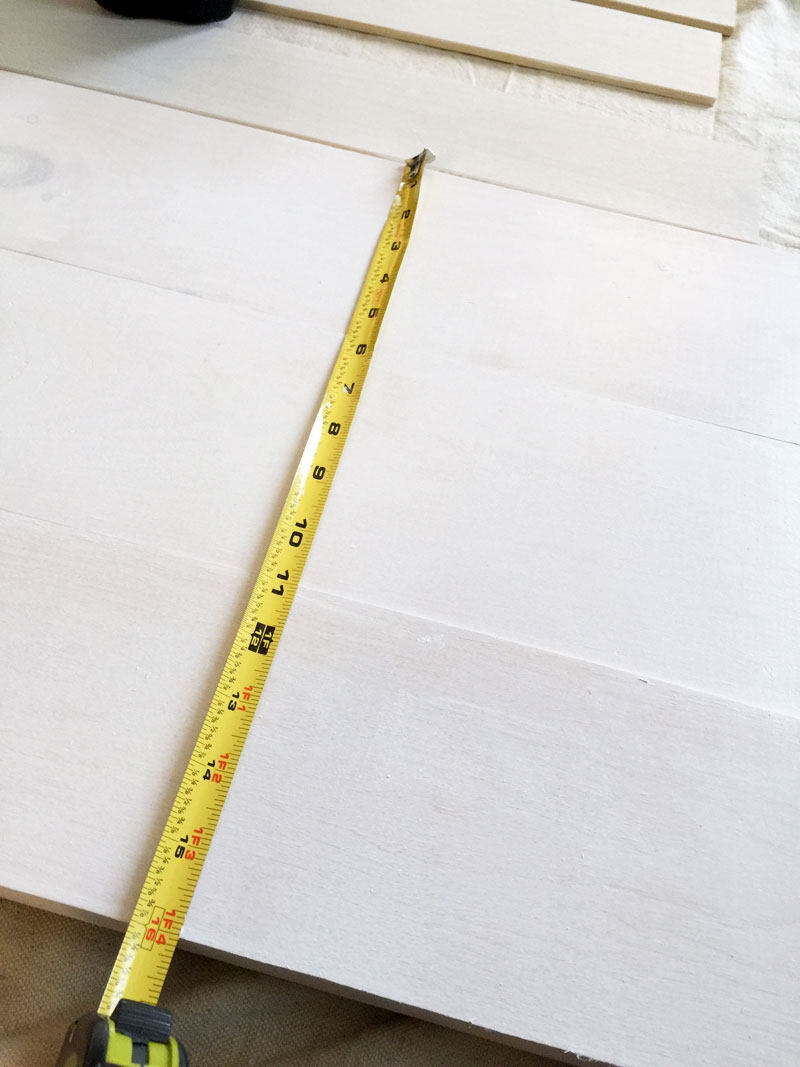
Lay three 1 x 6’s together (one of them will be a little narrower – remember we trimmed 1/2″ off on the table saw).
 I used wood glue between the boards and then attached the braces using my brad nailer with 1″ brad nails. The braces on the ends were placed 6″ away from the ends and the middle brace was attached to the middle ; ) The braces were attached on both sides of the shutters.
Step 5 – Attach the hinges
This is super easy. I attached the hinges to the shutters first.
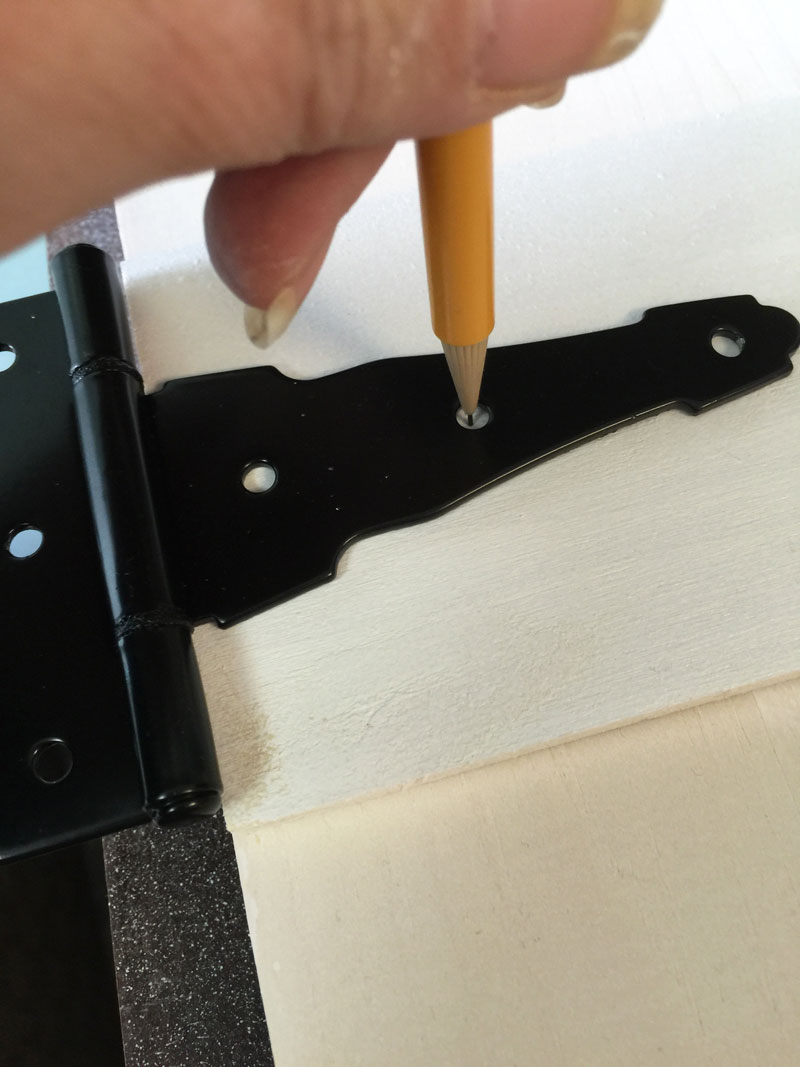
I started by lining up the edge of the hinge with the edge of the shutter and marked the holes with a pencil for drilling.
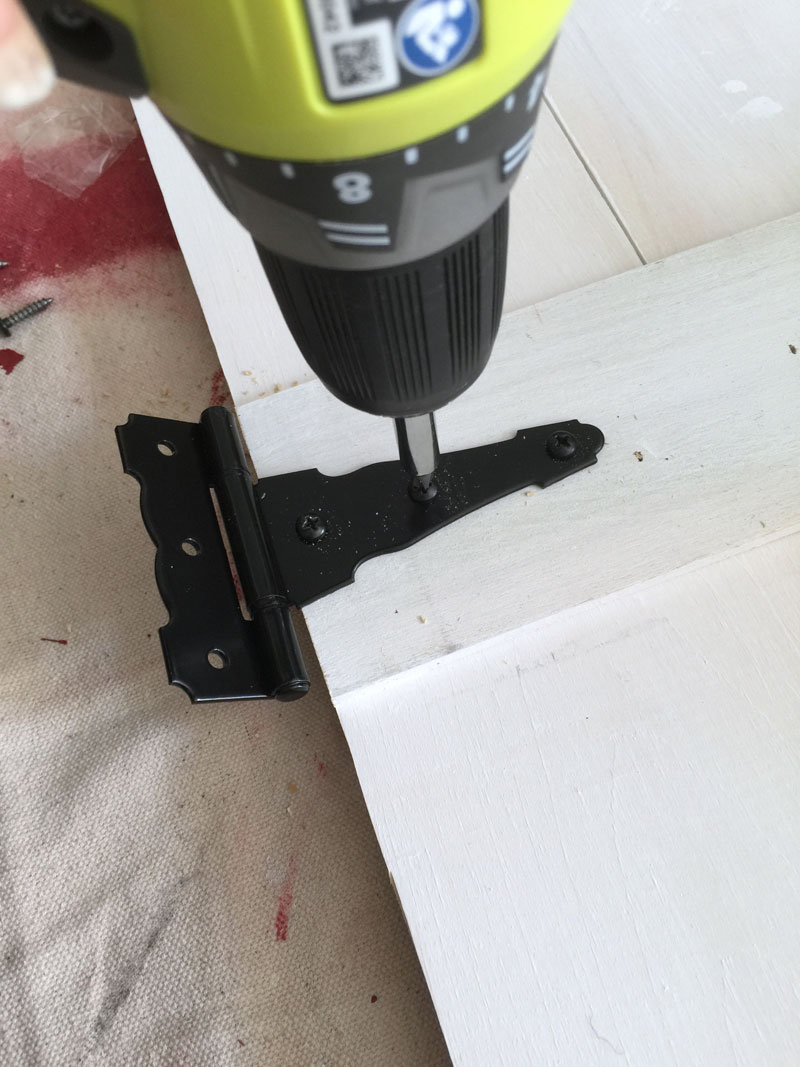 I then drilled pilot holes for the screws before driving in the screws.
Step Six – Attach shutter to frame
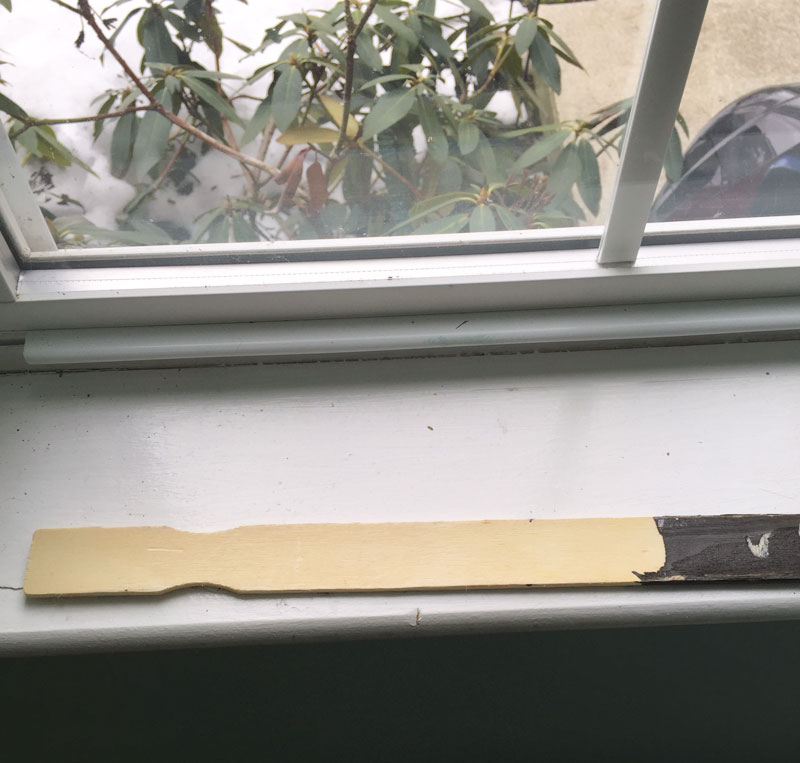
Here’s a little trick: I placed a paint stir stick on the window sill and placed the bottom of the still unattached shutter on it. Once the shutter is attached, it will swing freely.
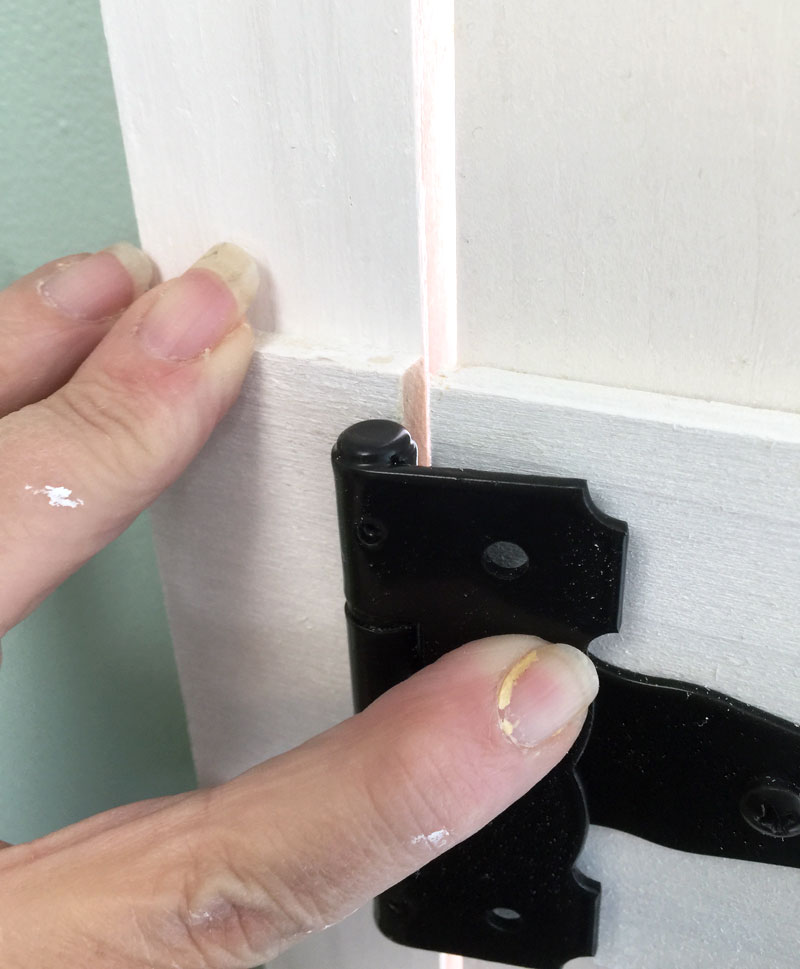
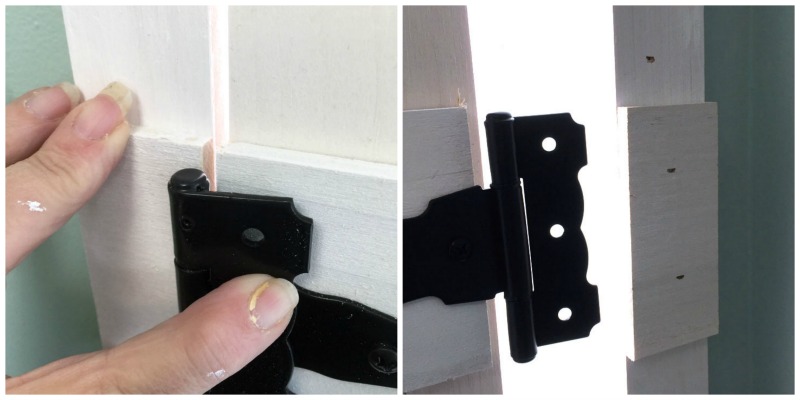
Now it’s time to attach the frame brace pieces (those little 1-1/2″ pieces of the hobby boards) onto the frame.
Since I had two windows and had to make two sets of these shutters . . let’s just say I learned from a few mistakes on the first one that I made ; ) and these instructions include those lessons learned! Like waiting until you “dry fit” the shutter before attaching those little frame brace pieces. As shown in the photos above, line up the frame brace pieces with the braces on the shutters, then nail in those pieces and then make the drill marks and attach that other end of the hinge!
DONE!
Now go get a manicure – you’re gonna need it ; )
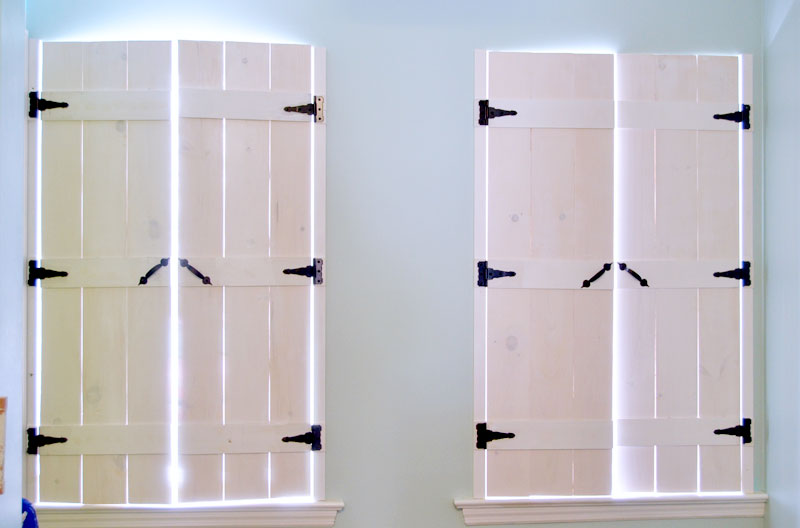
Since I live in a condo community, I’m loving the privacy that these shutters provide. Plus I think they look really awesome!

I think for next month’s Power Tool Challenge I need to make something in a different room. January’s project was also in the kitchen: inside cabinet door storage. Maybe the hallway. I recently made a coat rack out of a cupboard door and it looks great in the there. But it got me thinking about other storage ideas. Hmmm.
Now it’s time to see the projects that my friends were working on:
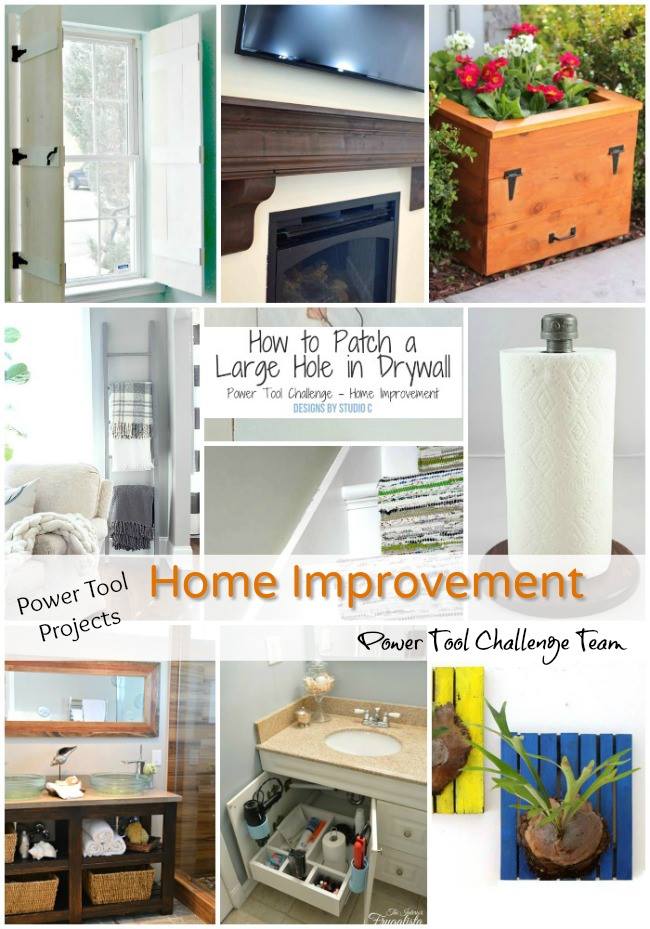
DIY Fireplace Mantel Shelf Her Tool Belt
Industrial Paper Towel Holder by Virginia Seweet Pea
Blanket Ladder by Refresh Restyle
Cedar Hose Planter by Kim Six Fix
DIY Vanity Sliding Drawer by Interior Frugalista
How To Patch A Hole In Drywall by Designs By Studio C
Wall Mount Staghorn Fern by A Piece Of Rainbow
DIY Painted Stairs Makeover by Thrift Diving
DIY Modern Rustic Mirror by H2OBungalow
Linking up here and also at Wow Us Wednesdays


Super project! They are stunning against the color of the wall with the pretty hardware. Love your little trick to install them with enouh clearance to open too. Smart:)
I love the look of shutters, Jeanie! And this doesn’t look difficult to do at all. What would be cool is to even make faux shutters on a wall that’s bare and have something interesting to frame them around! 🙂
I simply love these. The hinges are great. I’d almost be tempted to hang these outside since I have two windows in need of framing. You got skills, girl !
Love your shutters Jeanie, so cute.
Absolutely beautiful! I have a hard time picking curtains and the shutters are the perfect solution!
Jeanie, these are awesome! The the tutorial!
Debbie
Excellent tutorial Jeanie – they look great!
Jeanie,
I love your shutters! I wish I had a place to put some. I could do them in my bedroom… but there is one window where they just won’t work, so it might not look like to have them on the other two windows. 🙁
super tutorial!
pinning!
gail
Wow these shutters add so much charm, love them! XO
these shutters are so pretty Jeanie!! beautiful colors and hinges!!
So pretty! These are going to be great for privacy and I like them so much better than regular old blinds.
I’ve always wanted to learn how to do indoor shutters. This really helps. Thanks.
Thanks for submitting your recipe to the RTSTH community! It has been published and will be a part of our social media sharing! Feel free to submit any recipes you’d like shared with our readers! -Melanie|RTSTH
I absolutely love your DIY shutters. I wanted to make some for a bathroom we were working on but we didn’t have the space to do it. I know they don’t take much space but when open the shutter would have been in the shower. lol
Nyc Hey guys! It’s Jamin. I’m back, and I thought we would begin the process of explaining how we transformed our back yard from this…
This is amazing, indeed ^_^ Once I tried, but failed. :p But I am going to make another try. This time I got a new miter saw, I am sure, this attempt will not fail. And yes, I am sharing this on facebook. This is really impressive.
Love your blog and I like your DIY shutters. Thanks for providing us step by step guide from which we can make indoor shutters.
I have read your blog its really good and awesome. I want to ask which company is providing Wood Blinds?
This is a very well written post. Everything is very concise and clear. Thanks for sharing.
Shutters Gold Coast
Last few days, i am searching for a person who make shutters for me and i was failed. Then i try to do that myself and got this article. It was awesome and fun.
Thanks
Really A Helpful DIY tricks for Shutters.
teşekkürler
I have read your post. Thanks for such a nice post, It’s really informational.Really A Helpful DIY tricks for Shutters. Thanks For sharing article.
Amazing Post! Thanks you for sharing it.
This is very nice post thanks for updating this information. And thanks for your attention to us.
Wow! Thank you for this guide!
This easy and fun Instructable will show you how to make an indoor shutter. With just a few simple steps you can make an indoor shutter that is perfect for using in your home. high end home builders melbourne
If you’re looking for a quick and easy way to keep your home locked up and safe, an indoor shutters may be the perfect solution. Our shutters are made of durable plastic and are easy to fit and use, making them perfect for any home. Solar Panels Joondalup>
1. Width: Width is important because it affects how wide the shutter can open. A wider shutter will allow more light in, which will make your home warmer and more comfortable. pre purchase building inspection newcastle<
How to make indoor shutters. This is a how-to guide for anyone who wants to make their own shutters. Whether you’re a beginner or an experienced homeowner, this guide will help you get started. Electrician Manly>
1. Start by measuring your window’s width and height. These are the dimensions of your room, so make sure they’re accurate before starting.
2. Next, cut the insulation away from your window’s frame using a drill. You can use a saw to do this if you want. Dental Crowns Willoughby
You Know there are many commercial ceiling provider companies available in the market but if you want the best ceiling services with the latest look, find the best out of them. The best provider is wadav.com.I would love to advice you all who want to make there house and offices secure with ceiling then must visit wadav.com
Step into a world where quality is not just a promise but a commitment. At Doors by Regency, we believe in delivering excellence in doors, service, and windows—all at a competitive price. With a wealth of experience spanning over 20 years in both commercial and residential construction, our families deeply understand the intrinsic value that steel front doors and windows bring to your living space.
Whether you’re looking to replace old doors with new iron ones or seeking contemporary front doors, iron railings, custom steel doors and windows, or garage doors, we have an array of solutions tailored to meet your needs. Our expertise extends to companies in need of new storefront doors, where we provide commercial iron doors that seamlessly blend functionality with aesthetic appeal.
I recently had steel doors installed by Regency Steel Doors in Austin, and I’m thrilled with the results. Their team was professional and attentive, delivering exceptional quality and stylish, secure doors. Highly recommend for anyone seeking top-notch steel doors!
https://doorsbyregency.com/
In Austin, steel doors offer exceptional durability, security, and energy efficiency. They withstand harsh weather conditions, provide superior protection against break-ins, and require minimal maintenance. Additionally, these doors can be customized to match the city’s diverse architectural styles, making them an ideal choice for both residential and commercial properties.
If you’re in Austin and looking for premium steel doors, OMG Steel Doors has you covered! Our doors combine strength, security, and style, offering the perfect solution for both homes and businesses. From custom designs to top-notch craftsmanship, we ensure your property gets the best in durability and aesthetics. Contact us today to elevate your space with our high-quality steel doors!
#SteelDoorsAustin #CustomSteelDoors #HomeSecurity #OMGSteelDoors #DurabilityAndStyle #Austin
Get a superior grip and protection with high-quality boxing gloves from Uniswift.pk. Whether you’re training for fitness or preparing for competition, our gloves are crafted for durability and comfort, allowing you to train harder and perform at your best.