


This year’s “While Dan is Outatown” project is just about done! You may remember when I shared with you how Dan goes out of town on business every March and I start a DIY project while he’s away. Last year I painted the kitchen cabinets. This year I tackled the staircase. It was in dire need of a makeover. It was especially evident after I renewed the grout lines on the slate floor. Since the floor looked so new, it made the tired, old staircase look even worse. The carpet on the steps was matted and stained and the wood trim needed repaired and painted. This project actually got started when I restained the bannister. Dan was still home when I did the bannister but had no idea what I was going to do when he went away on his trip!
Want to see how I did it? I admit it took some time, but it wasn’t hard at all.
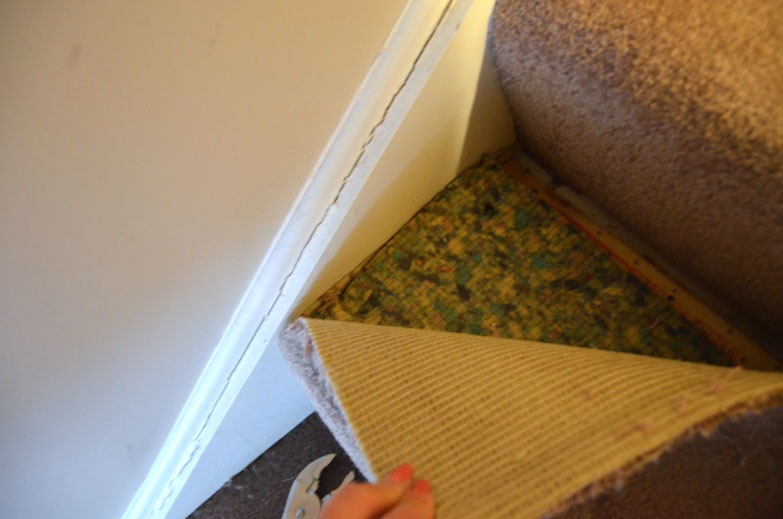 As soon as Dan was out the door, I grabbed a pair of plyers and pulled back a corner of carpet on the top step to see what was underneath: padding. No surprise there. Thankfully the carpet came off very easily. No horror story here about thousands of staples.
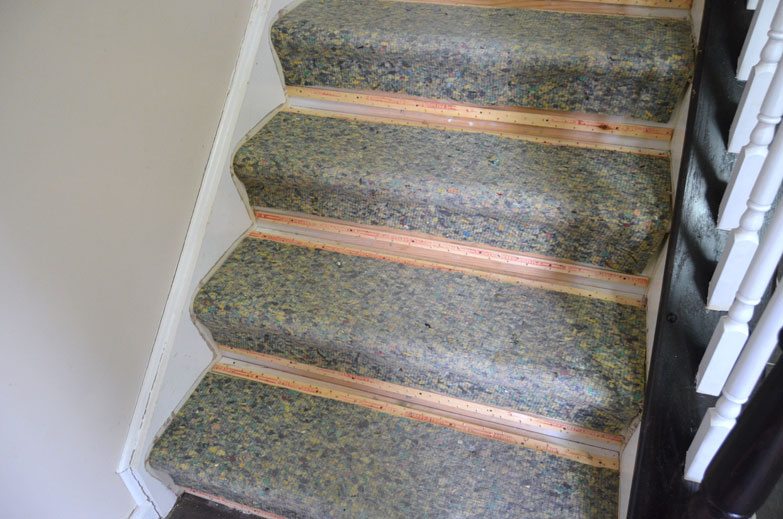 Even removing the tack strip wasn’t as bad as I had thought it would be. Just a few taps of a hammer onto a small crow bar did the trick.
 There were a few staples to remove, but that part went quickly, too. I had read horror stories about this part, but I was lucky. It seems that whomever installed that carpet didn’t go crazy with stapling.
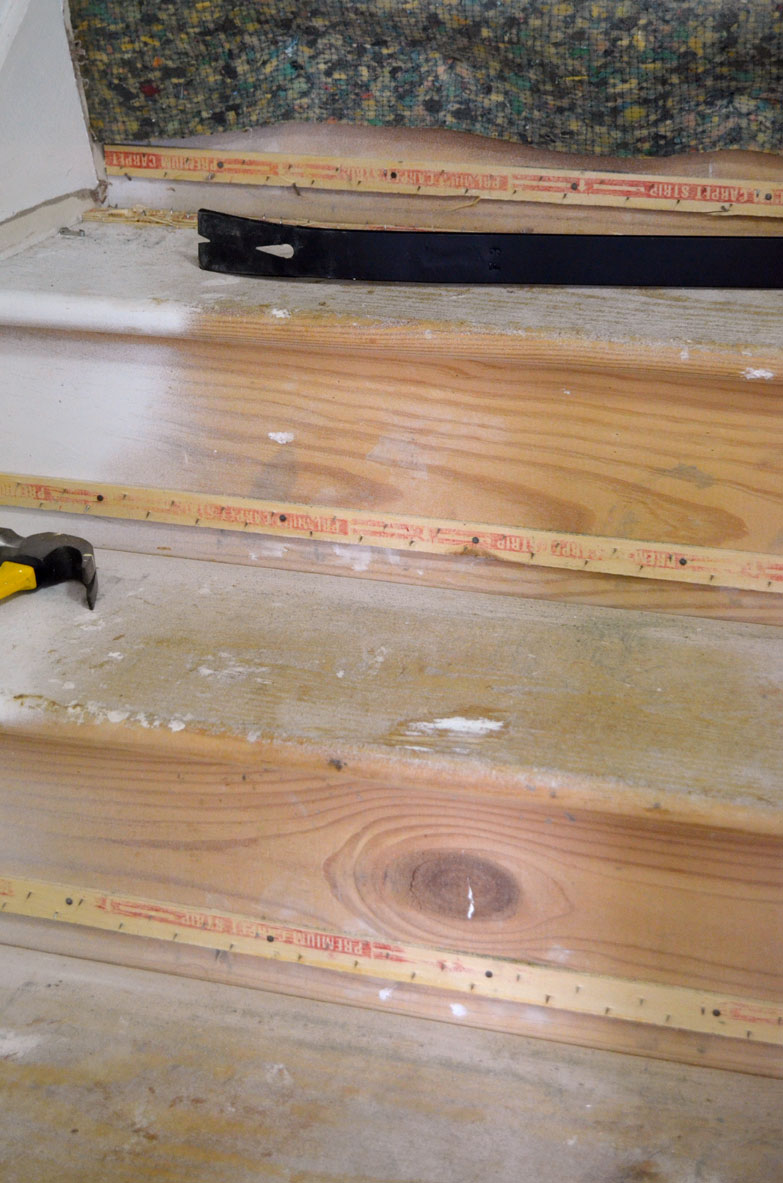
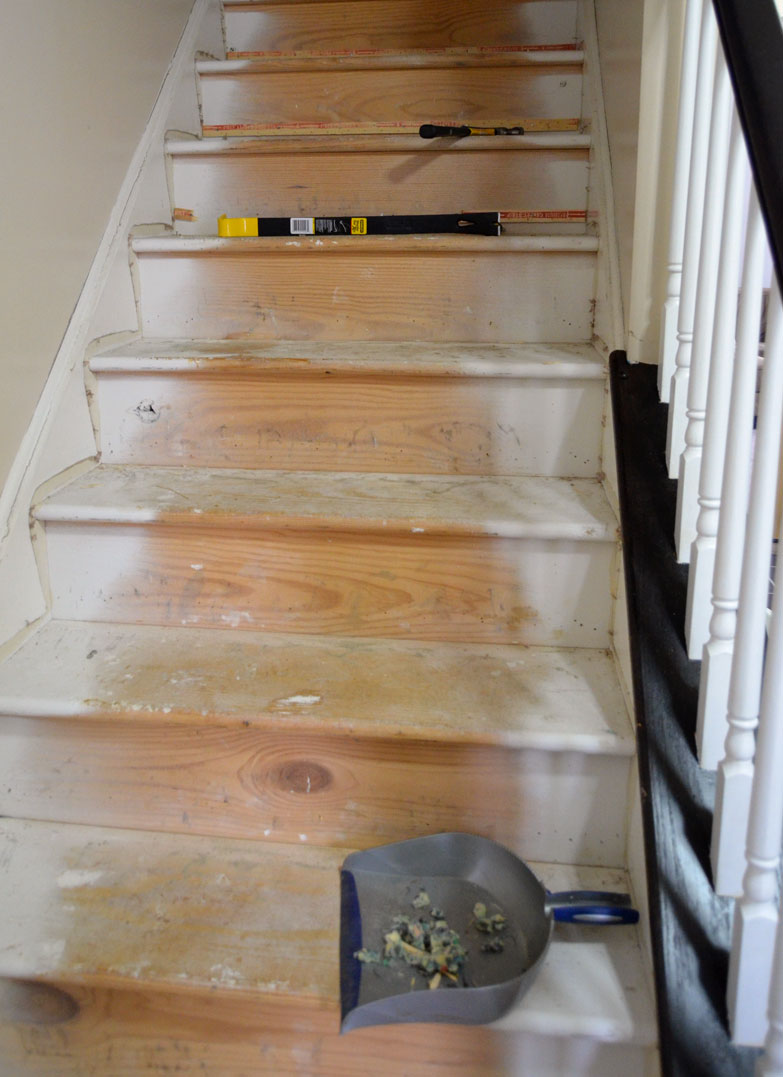 This photo shows what I hadn’t planned on. It seems that a paint sprayer was used when the house was built and there was overspray on the ends of the steps. Now what?
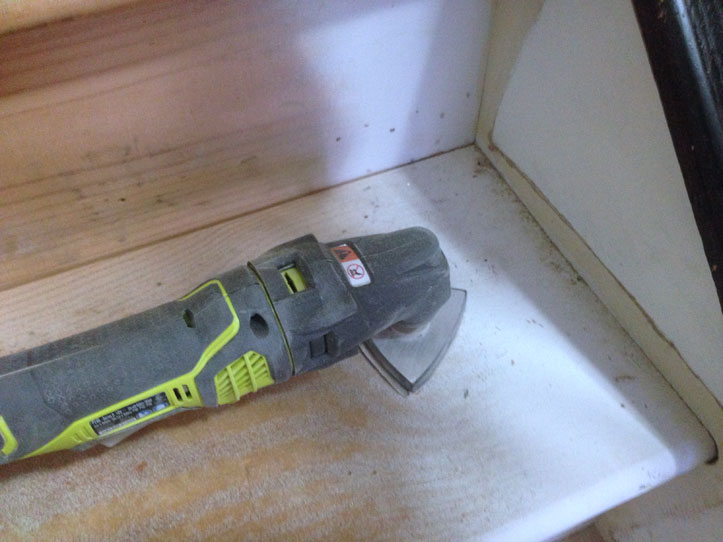 So I was off to Home Depot to get a sander. Even though the layer of paint was light, it was too much for a sanding sponge. I needed a little power behind some sand paper. I got the Ryobi Job Plus base that came with a triangle shaped sanding head: perfect! It took a few hours to sand off the pained and smooth out the finish on the walls.
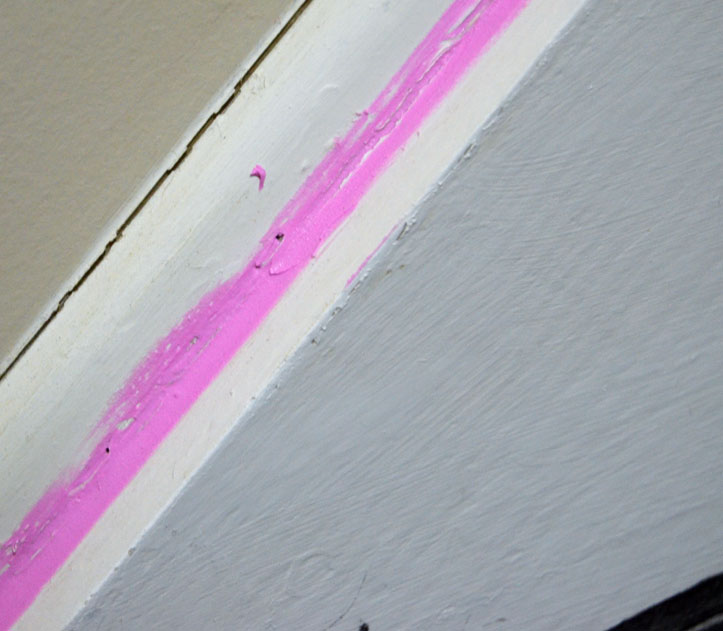
I found a tube of spackle at Home Depot that goes on pink and turns white once it dries. I used that to fill all the nail holes, staples holes and cracked molding. Now I don’t know if there’s a “right” way to do this. Paint first? Stain first? I decided to paint first. Since the side moldings were already white, they only needed one coat of paint. I used the same paint that I used on the kitchen cabinets because it goes on so nicely, plus it’s durable.
Since the risers were bare wood, I gave them two coats of primer first, then two coats of the white paint. I waited a few days before I started staining the treads. I used Minwax Wood Finish Ebony. Since these steps are used every day, I went with the every other step method. This part took a few days because I only worked on them about an hour a day. Once the staining was done, I added two coats of polycrylic to seal them.
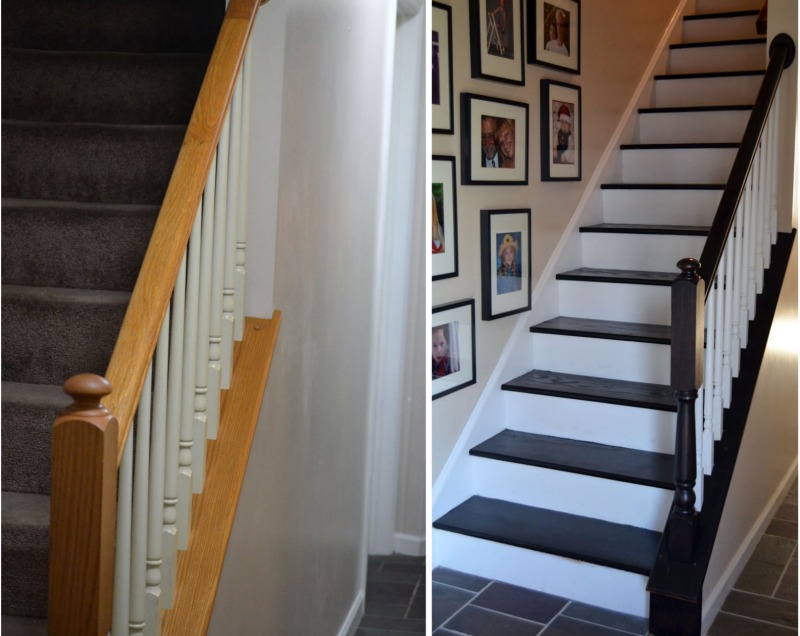
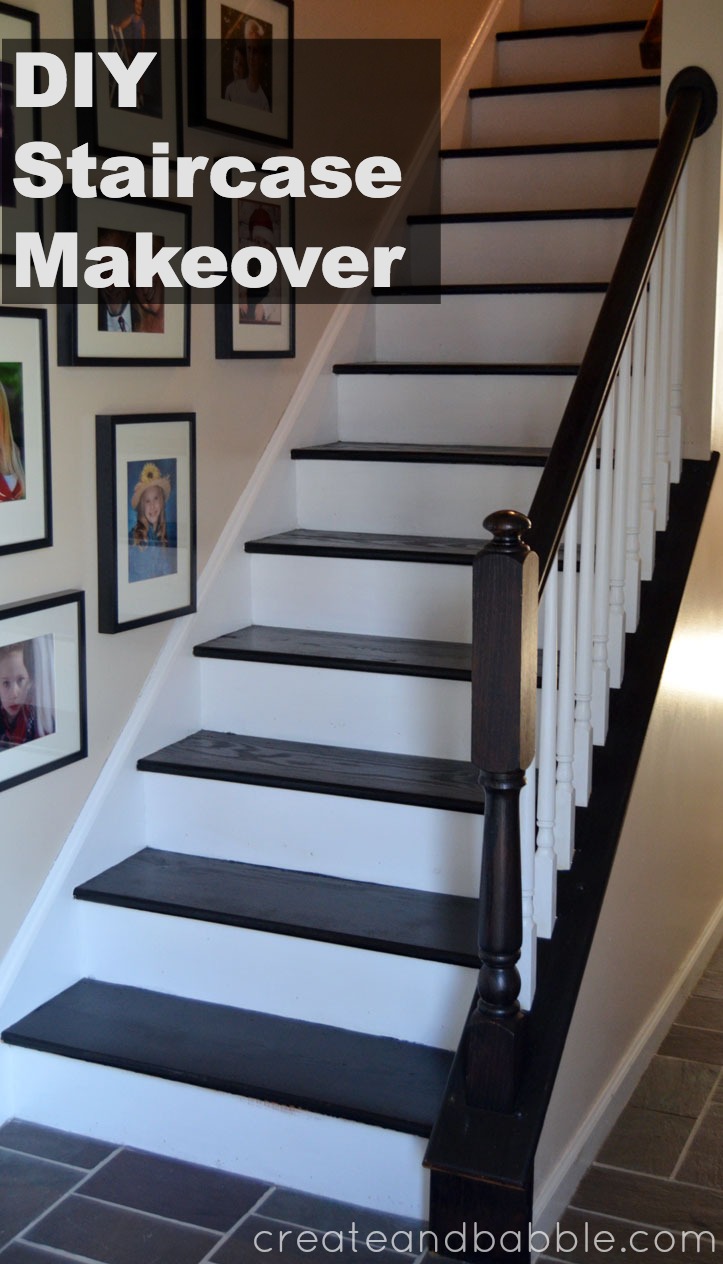
Here’s a before and after to show what a difference this had made to my hallway!
 Before…
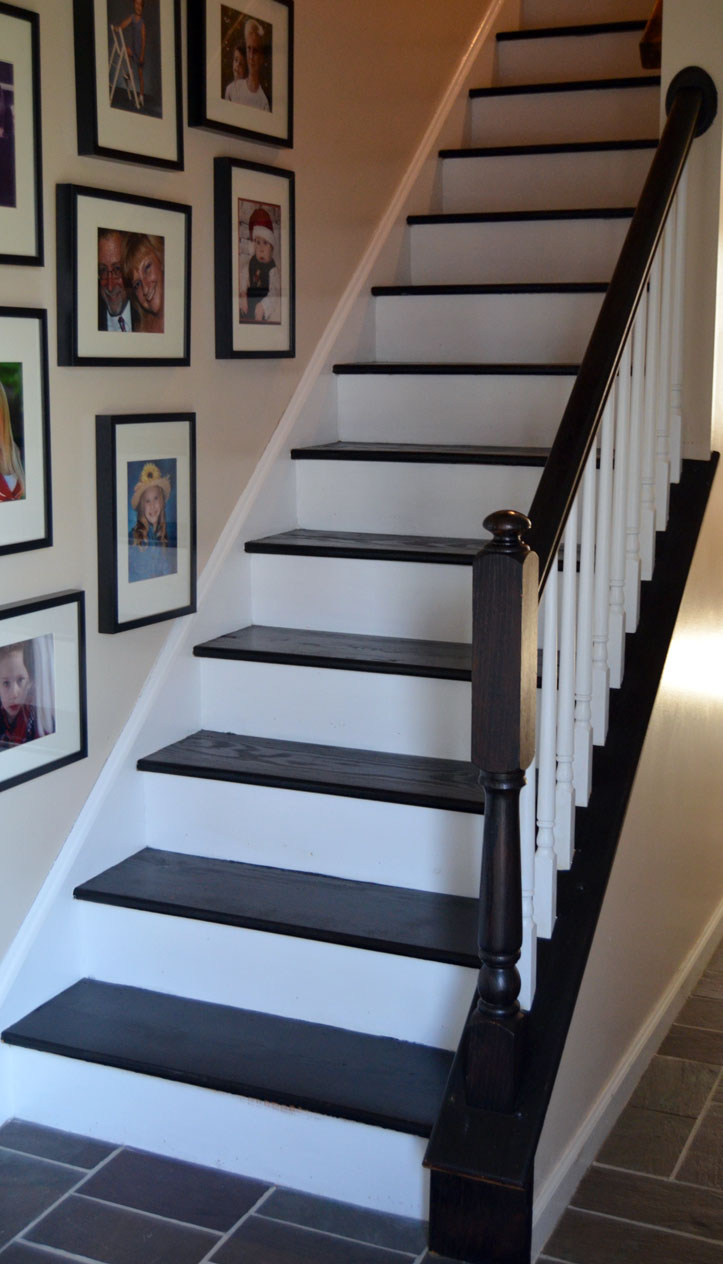 And now! I still have a few touchups to make but I’m so pleased with how this turned out! Since I don’t get a lot of natural light in this space, it’s hard to capture how much brighter this space is after the makeover, so you’ll have to take my word for it ; )
Tell me, have you removed carpet from a staircase? Was it a staple horror story? We removed the carpet off the steps in my daughter’s house and it was a nighmare! It took four of us all day to remove all those staples. I got lucky with this one!
Disclosure: This posts contains affiliate links meaning that if you make a purchase through one of these links, I may earn a small commission at no additional cost to you.
Sharing at Remodelaholic.


Looks amazing! Makes me want to tackle my staircase this morning while the hubby is at work.
Thanks Susan! Go for it, you’ll be glad you did!
Wow! You did such a great job! I love how it came out, it looks so modern. I could never tackle a project like this myself…I would make a huge mess!
Thanks Karen! I know what you mean – I’m a messy DIYer myself!
It looks gorgeous!!!!!!! I love the updated, fresh, bright, clean look ~ and not as heavy as with the carpet. Great job, Jeannie. I’m impressed.
Thanks Lori! It did make a huge difference. I wish I had done it sooner!
I just found you on Home Talk and had to hop over and check out your blog. I did this same project a little over a year ago. I thought I would never get all those staples out and pulling off the carpeting was a lot harder than I expected. Thanks goodness I had my husband’s muscles to count on! I love how my stairs look now. I am not a carpet fan. Your staircase looks beautiful! I am sure you will enjoy it as much as I do mine. 🙂
Thanks Lisa! I really do love it. I think I got really lucky with the whole staple thing! I’m glad you had your husband to help you.
You did an amazing job!! Love it!!! I am really thinking of doing this project. I finished my kitchen cabinets last December. We have a very large kitchen so it took me two months to complete by myself while working full time. I thought if I took the rug off the stairs it would be just plywood. Not sure if I should paint that…
Wow, Debbie, we have a lot in common! Thanks so much for you sweet comments! It’s funny, but someone at work just asked me this morning where I get the energy to work full time and do these home improvements. It’s difficult at times, but so worth it. I’ll be curious as to what you find under your carpet. You might be pleasantly surprised – I was! Let me know!
You did a beautiful job and have encouraged me to try it! One question though: what do you do at the top of the stairs to transition to the carpet in the upstairs hall?
Thanks!
Hi Patty. Thank you so much for the kind words! I’ll have to update this post and show a photo of how I dealt with the top of the steps, but basically, I just left enough carpet to wrap under the edge at the top.
Love those stairs. Did you do anything special so they weren’t so slippery. We have hardwood and left the stairs bare for awhile after we pulled the old carpet in the hopes that we could just varnish them and leave them uncarpeted. They were so slippery that the dogs and cats wouldn’t even use them so we did a runner to solve that problem. We still would like them bare but need to solve the slipperiness issue. Any suggestions?
Thanks Laurie,
No, I didn’t do anything special to them and they don’t seem to be slippery (but I don’t have any pets so maybe they would be slippery for cats and dogs). I can’t think of anything that would solve that problem for you other than the runner.
Hi, this looks great! I did the same thing, but painted the top of each stair black since the wood was awful. Then my poor old dog kept slipping, so I bought black FLOR carpet tiles, cut them in half, and used carpet tape to secure. Problem solved…except the painted steps were so much easier to clean! Hope this helps for those who have animals and don’t want a runner. Pat
Thank you Pat! And that’s a good tip for those with pets!
What did you do at the top landing?
Hi Ali,
I cut the carpet long enough so that it wraps around the top edge. I’ll take a photo and update this post.
wow, I just love this. Given me the best idea yet to tackle my stair issue. I can’t tell from your pictures, but does the horizontal board, the one you step on? Does it have a lip, or piece that goes over the other vertical board? (sorry I hope that describes it enough!) I am afraid of what I would find under the pad! 1972 split level, think I would find wood that is paint able?
Hi Patty! I think I know what you’re trying to explain. Yes, the tread does overhand the riser on each step. I’m curious to find out what you find under carpet on your steps – I hope you’re pleasantly surprised! There’s no way of knowing for sure until you take a peek!
Wonderful job! Thanks for the step by step explanation. I do have a question, how did you finish off the top of the stairs? Is that area carpeted or other type flooring. Please feel free to email me.
Thanks.
Marilyn C.
they look so much better now Jeannie great job
Fabulous job!! Thank you for sharing. You are one of the features at The Round-Up from the Before and After party at The Dedicated House. Here is the link so you can check out your feature. http://www.thededicatedhouse.com/2014/05/the-round-up-from-before-and-after.html Hope to see you again at the bash! Toodles, Kathryn @TheDedicatedHouse
Wow, looks fantastic! I see a few others have commented on how you dealt with the carpet at the top of the stairs. Can you please post a picture? I’d love tackle this project this year!
Thank you Ashley! Yes, I am going to update this post shortly with pictures of the top step and explain how I did it. Good luck with your staircase!
These look great! I am actually in the middle of the same project at my house and was wondering if you ran into any issues staining the treads after painting the risers? I was worried that the stain might run onto the newly white paint and cause issues.
Thanks!
Heather
Going to do this!! Looks great & our carpeted stairs are in horrendous condition … My only challenge is, we have cream/distressed wrought iron bannister. Just awful … Worth it to leave up & paint, or is that a terrible undertaking? Thank you!
My big question is how did you restrain the oak colored handrail and trim. Did you use a gel stain over it or paint? We removed the carpet and this is how I want our stairs to look, but everyone is saying you have to sand everything down.
I am in the middle of doing my stairs. I pulled out the carpet not only did I have staples but also nails. I sanded to perfection but when I started staining with the ebony stain it hides a lot. I painted before I stained and I will have to go back and touch up because I have gotten some of the stain on the white. I am very excited about how great it is turning out, thanks for the instructions.
I just removed my carpet and have tons of little staples in parts. Some are so deep I can’t even get to them with pliers. Lol It will take some work but I’ll get them out.
Can you use a gel stain on it or paint? We removed the carpet and this is how I want our stairs to look, but everyone is saying you have to sand everything down.
How much sanding required will depend on the condition of your wood. I used both stain and paint. Stain for the treads and white paint on the risers.
Metal handrails offer increased value and appeal to any indoor or outdoor setting. The fact that it can be kept shiny and polished just by wiping it clean and using a brush or polish to mildly brush it over is an alluring benefit. Furthermore, stainless steel handrails won’t warp, crumble, fracture or bend over time.
Looks awesome, been thinking of doing the same but was going to use paint not stain?Did you use the ebony stain on the railings as well?
Geometry Dash has become a very popular game! It’s noted for its fast-paced gameplay, difficult levels, and catchy music. geometry dash
I love a good DIY project, and this makeover is inspiring! I’ve tackled a few home updates, but this one made me rethink my staircase. I found some great ideas that worked perfectly in my space. Plus, it reminded me how much my dog enjoys sitting on the stairs watching everything!
Your staircase makeover looks amazing—the color choice and updated railing really give the whole space a fresh, modern feel. It’s inspiring to see how a simple redesign can completely change the atmosphere of a home. Projects like this remind me how important well-organized details are, whether in design or when searching through New York arrest records for accurate public information. Great job bringing new life to your space, it truly stands out!